Windows 8 (as well as Windows XP and Windows 7) by default displays a list of all local computer accounts on the Welcome screen (login screen). To log in to the system, the user must select the desired account and enter its password. With a large number of local users, the login screen turns into a Christmas tree. This is not very convenient and, in part, not very secure (administrative / service accounts are revealed). In such cases it would be convenient hide unnecessary user accounts from the Windows Welcome screen.
The ability to hide specific user accounts from the user list on the login screen is available in all versions of Windows. This feature is implemented through a small registry tweak. Thanks to this feature, you can hide service accounts (created for the operation of third-party services and applications), or the system administrator account, ensuring that the computer and desktop boot under the user account, and the PC operator does not need to select the account he needs each time on the welcome screen. In the latter case, if necessary, you can escalate privileges using RunAs by specifying the administrator name and password.
First of all, you need to determine the list of accounts in the system. You can display a list of all users with the command:
Net users

Or in the Computer Management console interface compmgmt.msc (Computer Management -> System Tools -> Local Users and Groups-> Users). 
Copy the name of the account that we want to hide to the clipboard. Let's say in our case it will be User1.
Advice. We're interested in the account name that appears in the Name column, not the Full Name that appears on the login screen.
Open the registry editor (regedit.exe) and go to the branch HKEY_LOCAL_MACHINE\SOFTWARE\Microsoft\Windows NT\CurrentVersion\Winlogon
. Let's create a new branch in it with the name SpecialAccounts, in which we will in turn create a branch with the name UserList. 
In the created UserList branch (we got this path: HKLM\SOFTWARE\Microsoft\Windows NT\CurrentVersion\Winlogon\SpecialAccounts\UserList) create a new parameter with the name DWORD, as the name of which you need to specify the name of the user account that you want to hide (the default value of the parameter is 0, which does not need to be changed).
- 0 - Hide user from Welcome Screen list
- 1 - Show user in Welcome Screen list
In our example, we will create a DWORD value named User1 with a value of 0. 
Restart your computer and, if you did everything correctly, the User1 account icon will not appear on the login screen. 
It should be taken into account that along with hiding the account in the Welcome window, it will be hidden in the Control Panel applet User Accounts (Control Panel\All Control Panel Items\User Accounts). You can manage hidden accounts using the Local Users and Groups snap-in (lusrmgr.msc) or using the standard console: control userpasswords2
To make your account appear on the Windows 8 login screen again, you just need to delete the DWORD value you created in this tutorial (or set it to 1).
In one of the recent articles about I already talked about the fact that in Windows XP, the organization of this very general access to folders and drives of the computer is carried out at the user level. Those. on the computer on which we are sharing a folder, we need to create accounts for all users who will access this folder from their workstations.
Let's say I shared a folder on one of the organization's computers that three different employees need access to. I create accounts for these employees on the same computer (for example, Olga, Natalia, Svetlana
).
As a result, after turning on the computer, I see the start window where all these accounts are displayed: 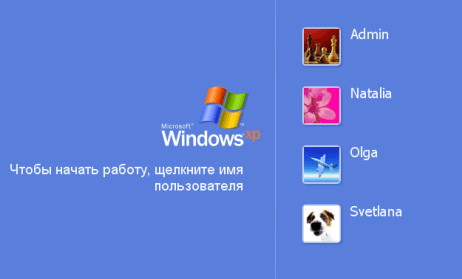 Because I log into the system on this computer only under the account Admin
, and other existing users are unlikely to ever use this machine, then I don’t need to see all the accounts every time I turn it on. You can hide them in the following ways:
Because I log into the system on this computer only under the account Admin
, and other existing users are unlikely to ever use this machine, then I don’t need to see all the accounts every time I turn it on. You can hide them in the following ways:
1 way. Go to “Start” – “Control Panel” – “User Accounts”. Click on the line “Change user login” - in the window that opens, uncheck the “Use welcome page” checkbox: 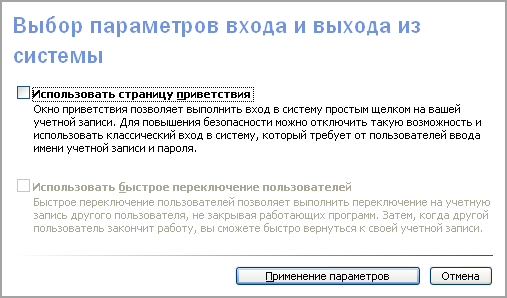 As a result, when you turn on the computer after the system boots, it will appear. But you will have to enter your username and password yourself:
Method 2. Because I would like the user Admin was still displayed on the start page, then the method described above is not suitable. In this case, you can do this: make all other accounts except Admin – hidden. To do this, go to the registry editor (“Start” – “Run” – regedit).
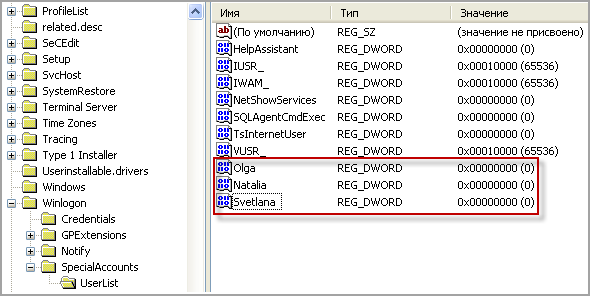
Opening a thread HKEY_LOCAL_MACHINE\SOFTWARE\Microsoft\WindowsNT\CurrentVersion\Winlogon\SpecialAccounts\UserList .
In the right column, right-click on an empty space and select “New” – “DWORD Value”: 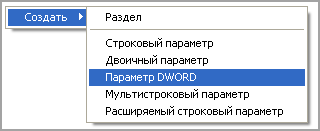 For the parameter name, enter Username, which needs to be hidden (for example, Svetlana
). Parameter values can be: 1 – the user will be visible; 0 – the user will not be visible. We put the value 0
:
For the parameter name, enter Username, which needs to be hidden (for example, Svetlana
). Parameter values can be: 1 – the user will be visible; 0 – the user will not be visible. We put the value 0
: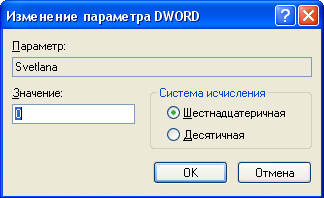 I create three such parameters here ( Svetlana, Olga, Natalia
):
I create three such parameters here ( Svetlana, Olga, Natalia
): After this, you can restart your computer - you will no longer see hidden accounts in the welcome window.
Be aware that with this method of hiding users, they will not be displayed even if you go to “Start” - “Control Panel” - “User Accounts”. In this case, you can manage accounts through the “Computer Management” console – “Local users and groups” – “Users” (right-click on the “My Computer” icon – “Manage”).
By the way, if you suddenly want to log into the system as a hidden user, just press the key combination twice Ctrl+Alt+Del on the welcome page. It will open in Windows, where you can enter your username and password.
3 way. Can be customized. Those. after turning on the computer, the specified account will automatically load without requiring you to enter a login and password. But in my case, it is undesirable to use this method, because then it will turn out that any user who turns on the computer will be able to log in and work under my administrator account.
Thus, the second method described in the article is the most optimal in my situation. But it wouldn’t hurt to know other options for solving a similar problem.
When installing Windows 10, the system asks you to create and configure a user account, or rather, a local administrator. However, during the installation process of the system in stealth mode, another administrator account is automatically created with higher privileges and access rights. In particular, it is not covered by the UAC mechanism; therefore, all applications launched with “global” administrator rights are executed bypassing this security system.
The hidden administrator account can be used to install drivers, unsigned programs, and perform various settings that require elevated access rights. However, it is recommended to use it only in extreme cases, and be sure to turn it off after performing the necessary actions. There are three main ways to enable the hidden administrator account: through the command line, through the Local Policy Editor, and using the Local Users and Groups snap-in. Let's look at them in order.
Enabling the hidden Administrator account via the command line
The first method is the simplest and most convenient. Open a command prompt as an administrator (Windows Command List (Windows CMD) will also be useful for you) and run the command in it:
net user Administrator /active:yes
If you suddenly receive the message “User name not found,” it means that your hidden admin has been renamed or you are using the English version of Windows (the message will be in English). In this case, check the admin name by immediately running the command
By default, the hidden administrator account does not have a password, so we strongly recommend that you set it using the command
net user Administrator password
having first replaced “password” with your password.
Enabling the hidden Administrator account through the Local Group Policy Editor
With the Local Group Policy Editor everything is just as simple, just a little longer. Open it with the command gpedit.msc(right click on the Start menu - Run) and go to Computer Configuration -> Windows Configuration -> Security Settings -> Local Policies -> Security Settings, in the right part of the window find the option “Accounts. Administrator account status" and enable it.

Enabling the hidden Administrator account through the Local Users and Groups snap-in
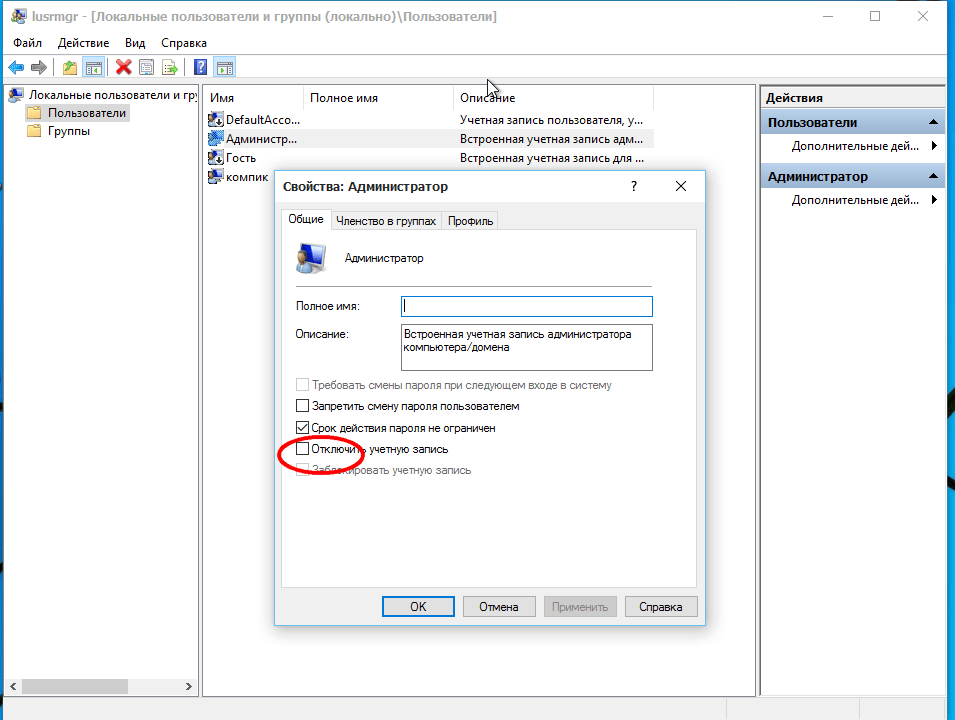
It will take approximately the same amount of time to enable the administrator account through the Local Users and Groups snap-in. Open it with the command lusrmgr.msc(right click on the Start menu - Run), expand the “Users” section, find the “Administrator” entry on the right side and double-click on it, uncheck “Disable account” in the window that opens and save the changes.
Whichever of these three methods you use, the hidden administrator account will become available on the login screen. This account is disabled in exactly the same way by replacing yes in the first command with no. In general, the simplest and easiest way to disable it is from the same CMD console (command line) by running one single command in it
net user administrator /active:no
How to enable the built-in administrator account when Windows 10 can't sign in
And the last possible option is that logging into Windows 10 is impossible for one reason or another and you need to activate the Administrator account in order to take steps to correct the situation (see also Windows 10 How to remove built-in applications and How to speed up Windows 10). If you remember your account password, but for some reason you can’t log into Windows 10 (for example, the computer freezes after entering the password). In this case, a possible solution to the problem would be:
- At the login screen, click the power button shown below on the right, then hold Shift and click Restart.
- The Windows Recovery Environment will load. Go to “Troubleshooting” - “Advanced Options” - “Command Prompt”.
- You will be required to enter your account password to launch Command Prompt.
- This time the login should work (if the password you remember is correct).
- After that, use the first method from this article to enable the hidden account.
- Close Command Prompt and restart your computer (or click Continue. Quit and use Windows 10).
Conclusion
Remember: such an account is blocked not because of the whim of the developers, but for your own good and safe work on the computer. Working with full administrator rights, there is a higher chance of picking up viruses or causing something irreparably disrupted in the system. Therefore, even professionals are recommended to enable the administrator account only to solve a specific problem or perform a specific action, after completing the work, switching back to a regular user account - the computer, your nerves, and the money that you will not have to pay for repairs will be safer. You might be interested in How to reset Windows 10 to factory settings and disable Windows 10 spy features.
Be careful when using Windows 10, and your device will reward you with good and fast performance!
- In Windows 7. Has the "Change user" option become unavailable?
The problem is solved using Group Policy settings:
go to gpedit.msc, select:
Local Computer Policy -> Computer Configuration -> Administrative Templates -> System --> Login
The parameter “Hide access points for quick user switching” is forced to “Disable”. - How to enable super administrator in Windows 7?
For security reasons, Administrator is disabled by default in Windows 7, so in order to enable it you must do the following: First way
Launch lusrmgr.msc
Local users and groups -> Users -> Administrator, Select “Properties”
In the "General" tab, uncheck the "Disable account" checkbox. Apply. OK. Second way
Via command line running as Administrator
net user Administrator /active:yes Third way
By launching secpol.msc
Security Settings -> Local Policies -> Security Settings -> Accounts: State of the "Administrator" account, Select "Properties", Enable.Important!!! Don't forget to set a password for security purposes.
In the standard way, log in to the Administrator and set a password in the user settings.
or via command line
net user Administrator password - How to hide the administrator account in Windows 7?
In order not to disable but simply hide the Administrator account in Windows 7,
You need to create a branch using the registry editor regedit:
HKEY_LOCAL_MACHINE\SOFTWARE\Microsoft\Windows NT\CurrentVersion\Winlogon\SpecialAccounts\UserList
add the "Administrator" parameter of type DWORD with the value 0. - The "Run" button does not appear in the launcher, how can I enable it?
If you do not see the Run button, you need to enable it by right-clicking on the Start panel properties.
Select the Start Menu tab -> Settings -> Run command, check the box. You can also access the Run command using the hotkeys Win + R. - (product key) installed Windows 7?
Due to the protection of the product key, you cannot view it completely using Windows, but only partially. To do this, you need to run the command slmgr.vbs /dlv
It will show the last five digits of the key. To view the product code in full, you can use the EVEREST or aida64 programs, as well as ProdKey.
P.S: You can also find out the product key using the Windows.8.Product.Key.Viewer program, it shows the keys even for Windows 7 and XP