In one of my old articles, I told you how to make a multiboot flash drive. And although this article is about how to restore forgotten password to log into windows (you can read the article), many people were interested in only one action - “multi-boot”. What is this?
– this is the automatic loading of a program located on external media, a flash drive or disk, when it is “inserted” into a USB port and drive, respectively. I'll explain in simple example – installation disk Windows. When you insert it into the drive, you don’t need to launch anything; some beautiful window immediately pops up on the screen, where it says something like, “Proceed with installing Windows.” I think you must have encountered this, so I won’t dwell on it too much.Well, I already told you how to make a bootable USB flash drive, the link to that article is at the beginning. A how to do it boot disk ?
Before I begin to describe the process itself, I want to notify you. I will make a boot disk from iso file . This is an image. Having an image saves us from various problems. Which ones? Well, for example, the most problematic is where to find the file that will make the disk bootable, or how to make it. If you do not have an iso file of the program you want make the disk bootable, then find it. Fortunately, the Internet is full of this stuff now. There are two lessons on the site that talk about services for searching and downloading files, here are links to them - and.
Well, for those who have an image and for those who came from the article about ERD, let’s begin the process.
How to make a boot disk or multiboot disk?
We will make a boot disk using one wonderful, free and very easy-to-use program - Astroburn Lite. You can download it. Just click on big green button in the right column, “Download”.
After you download and install it, you can start.
To start insert a blank disc. Well, you can insert a “dirty” one, it will still be cleared before recording (if it’s a CD-RW or DVD-RW, then you can insert “dirty” ones, but CD-R or DVD-R, only clean ones). If the image weighs less than 700 megabytes, use CDs, and if larger, then use DVDs.
A window like this will open in front of you.
To begin, go to the “Image” tab, underlined in red. Then select the file with the iso image to open a selection window, click on the button underlined in blue. After that, if you have several drives, make sure that you have selected the one in which the disk to be written is located, the selection button is highlighted in green. Then click “Start Recording”. A window like this will pop up on your screen.

Click Yes.
After which you will see the process of disk cleaning, and then recording.

When finished, a window like this will appear.

Click OK. All.
You can check it very simply. After recording, remove and immediately insert the disc back into the drive. And if you have it will start automatically or a window like “Run autorun” will appear. So you did everything right. I tried it on two different programs and it worked.
Happy recording.
P.S. By the way, for readers who came from the article password recovery. I checked SPECIALLY, everything that I described above, on the same image - everything works.
Its main purpose is to install or reinstall the Windows 7 operating system (OS). It can also help to reset a forgotten or lost administrator password. This media can also be used to enter the OS preinstallation environment (Windows PE), which is a minimum set of operating system functions used to prepare the computer for OS installation, launch its installation, and roll back to a previously created restore point.
First and foremost important condition- this is the presence of a so-called Windows 7 installation image file. This is a file containing all the necessary data for installing the OS. It has a file name extension of .iso and is about 4 GB in size. It can be downloaded from various Internet sources, for example, torrent trackers. Typically, such sources provide so-called hashes (checksums) of the image, which after downloading must be checked to ensure the authenticity of the image and the absence of errors during downloading.
We will need a DVD blank (namely a DVD, not a CD, which is explained by the size of the file - the system image), and one of the programs for transferring (not copying - a bootloader is also written to the DVD) of this image to the DVD. This disc can be either one-time recording (DVD-R) or rewritable (DVD-RW), and its recording speed is of great importance does not, since it is produced at very low speeds. The following article discusses several in various ways perform the required task.
Ways to create a boot disk
Now let's move on directly to describing methods for creating an installation disk using third-party utilities such as:
- Ultra ISO
- CDBurnerXP
- ImgBurn
- Windows 7 USB/DVD Download Tool
All of them can be easily downloaded from the Internet and have a simple and intuitive interface that does not require any complex actions from the user. In addition, the installation disk can be made using the tools built into the seven.
Burn a bootable disc using UltraISO
After launching this program, its main menu is displayed, in which you need to select the “File” element, and in the submenu that opens, select “Open”.
A window opens to select a boot image of the seven, in which you need to point to the required iso file and click the “Open” button. Then this window closes and you return to the main menu of the utility. After that, click on the “Tools” item in the main menu and in the drop-down list click “Burn CD image...”. 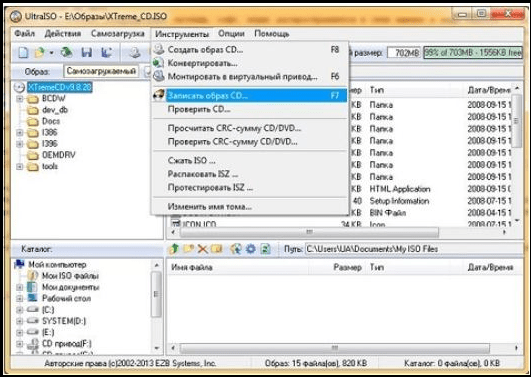
In response to this, a window with recording parameters appears: 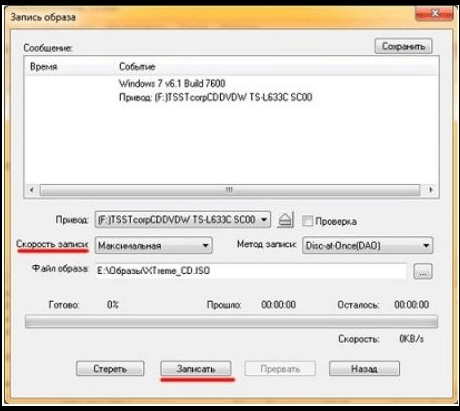
It needs to be set:
- The “Drive” parameter is a DVD device with the future boot disk installed.
- Recording speed is “Minimum”.
- Disc-at-Once recording method.
After this, you need to click the “Record” button. The burning process starts, usually taking several minutes. At the end of the process, the DVD device tray opens, which signals the completion of the process.
Creating a boot disk with ImgBurn
Before you run this utility, you need to install a DVD blank into the DVD device. In the Russified version of the program, its main window looks like this: 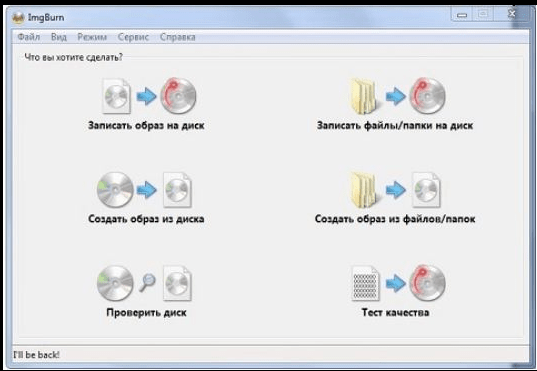 In this window, you need to click on the “Burn image to disk” picture, after which a window appears to set the parameters for the image burning process:
Here you need to set the following parameters:
- In the “Source” parameter, select (yellow button) the required image file.
- In the “Destination” parameter, set the DVD device.
- Check the “Check” checkbox so that upon completion of the recording process, the recorded image is compared with its original file.
- In the “Recording speed” parameter, set the lowest speed.
- Click on the picture with the arrow in the lower left part of the window to start the recording process.
The process of burning the image begins, which also takes several minutes. Having finished recording, the program pulls out the DVD device tray, then pushes it back in and begins the process of checking the recorded image. If the check is successfully completed, the utility plays a melody as a signal that the recording process has completed.
How to burn an installation disc using the CDBurnerXP utility
Despite the presence of “XP” in the name, starting with XP, this utility is functional in all versions of the OS. As for its interface, it is not much different from the ImgBurn interface. This is what the main CDBurnerXP window looks like: 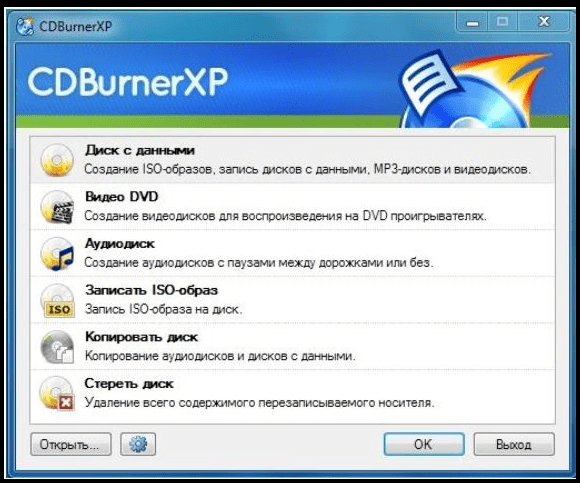
Of course, to make installation media, you should click “Burn ISO image” in this window, and then click the “OK” button. In response to this, a window appears for setting recording parameters: 
What to do now:
- Using the Browse button, specify a file with an iso image of the seven.
- In the “Recording device” parameter, specify the DVD drive, and to the right of it – the minimum speed.
- In the “Recording method” parameter, set Disc at Once.
- Check the “Check data after recording” box.
Other parameters are set by the user at his discretion. The image burning process begins by clicking the “Burn disc” button. Upon completion, a check is performed - comparing the recorded image with its source in the file.
USB/DVD Download Tool
This utility was developed by Microsoft. It can be downloaded from the Internet and installed. The recording process in this utility is divided into several steps, each of which has its own window.
Step 1 of 4. In this window you need to specify the file with the iso image. To do this, click the Browse button, select the required file and click “Next”. In some cases, the program does not like the specified files, about which the user receives a message. If he is sure that the image file was downloaded correctly and is not corrupted, then the only thing that can be done is to use another utility;
Step 2 of 4: This step selects the type of media that will be used as boot media. It can be a USB drive (for example, a flash drive) or a CD. To create an installation DVD, press the DVD button;
Step 3 of 4. At this step, the utility asks you to install a blank DVD disc. You should not try to install a DWD-RW disc that has already been burned - it must be erased in advance. Insert a blank DVD-R or DVD-RW disc and press the “Try again” button. The utility will make sure that the disk is clean and display the “Begin burning” button. We press it, the next step begins;
Step 4 of 4. This is the process of burning the image itself. We are waiting for the message “Bootable DVD created successfully” to appear, indicating the completion of the process of creating the installation disk of the seven.
Recording an image using built-in OS tools
It should be noted right away that this method, although it does not require the installation of third-party programs, is not reliable and sometimes requires repeated repetition due to errors that arise.
To make the installation disk built into the OS, you must complete the following steps:
- Insert a DVD-R disc (or DVD-RW - whichever is better) into the drive.
- When using a DVD-RW, erase all data recorded on it. To do this, in the “Computer” window, right-click on the DVD drive and select “Erase this disk” from the list that appears. A message will appear indicating that all information on the disk will be deleted. Click “Next” and wait for a window to appear indicating that the erasure was completed successfully, then click “Finish.”
- Double-click on the iso image with the left button. If no program is associated with this file, a window opens to select the program to record. In it, select “Windows Disc Image Burner” and click “OK”.
- The Disc Image Burner window appears. In it you need to set the “Disc recording device” parameter, check the “Check the disk after burning” checkbox and click the “Burn” button. The disc burning process will begin.
Sometimes all of the above steps have to be repeated due to errors that occur.
- The need to set a minimum write speed is explained by the fact that DVD discs do not always support the write speed declared by the manufacturer. It follows from this that errors may occur during recording, which can only be detected after the recording is completed - at the verification stage. If using a DVD-R, this will result in the CD having to be thrown away.
- The recording process must not be interrupted under any circumstances - this usually leads to the same thing as described in paragraph 1.
In contact with
Most often, the operating system does not load correctly if the files that launch Windows have been damaged. The reasons for such damage can be different: loss of files, damage to the boot sector, viruses, incorrectly working drivers, and others.
Unfortunately, this problem cannot be resolved quickly.
So that similar situation did not create any problems or malfunctions, we recommend creating and keeping a boot disk in reserve. The fact is that the Windows operating system was designed in such a way that it could run not only with hard drive, but also from a CD. Moreover, in this case, Windows is not reinstalled, we're talking about about loading the system itself.
A little theory
The boot disk is an ISO image - an exact copy software. That is, the image includes all the contents of the CD/ DVD disc A.
The program, which will be used to open, create, edit and extract DVD image files, will allow users to convert the extracted content into an ISO image that is an exact reflection of the contents of the DVD.
What is required to create a boot disk?
To create a boot disk we need:
- blank CD/DVD disc;
- image with Windows XP. This refers to a CD/DVD disc with a recorded operating Windows system XP;
- a program for creating and working with images. For example, Nero, DAEMON Tools, Ultraiso. Beta versions of these programs can be downloaded from the official websites of the developer (www.nero.com, www.daemon-tools.cc, www.ezbsystems.com/ultraiso).
If you are convinced that you have everything you need, then you can get down to business.
Since the procedures for working with programs for creating images are somewhat different, we will describe step by step guide for each of them.
How to create a bootable disk using Nero?
Step 1.
To get started, take a boot disk with Windows XP and run it using the CD-ROM, launch the Nero program. Depending on the disc type - CD or DVD - run the appropriate project. In the list of project types, find the “Image creation” item. Please note that the project name may vary depending on the program version. In any case, the project name will contain either the word "image" or the abbreviation ISO.
Advice: use discs with the largest capacity for recording, since the entire array of information may not fit on a standard disc with a capacity of up to 700 MB.
Step 2.
In the list of information sources, you should select an optical drive; the information receiver will be HDD. Click the “Next” button.
Step 3.
A copy window will pop up on the screen, followed by a window where you need to select the path to save the image.
Tip: to make the folder with the image easier to find, we recommend saving it on your desktop.
Step 4.
After clicking the “Save” button, the image creation process will begin. At this stage, all you need is patience - wait until the process is completed and the “Burning Complete” notification appears on the screen.
Step 5.
Now you can remove the boot disk with Windows XP, and instead insert a blank disk of the same size - CD or DVD.
Step 6.
You should select the “Burn image to disk” project. A window will pop up again in which you should determine the path to the image created the day before. Now you can start the burning process.
Step 7
Creating a boot disk using DAEMON Tools?
- ШTo create a new image in the DAEMON Tools application window, select the “Burn image” button (located on the top panel).
- In the window that appears, select the DVD drive. From the Write Speed drop-down list, select highest value– “4.0”. In the “Path to image file” field, enter the path to the Windows XP installation disk image.
- After completing all the steps, click the “Start” button.
- DAEMON Tools will take some time to burn the image to CD.
How to create a bootable disk using Ultraiso?
Step 1.
Launch the Ultraiso program. It is important that this action is performed with administrator rights. To do this, when you click on the program shortcut in the window that appears, select the “Run as administrator” option. Next, the program will prompt you to complete the registration procedure. When using a trial version, click on the corresponding “Trial period” button and move on.
Step 2.
On the left side of the program, select the “File” tab. As a result, Explorer will open. In it you should select a file with the extension *.iso, which contains the image of Windows XP.
Step 3.
In the main menu of the program, select the “Tools” tab. In the menu that “drops down” at the top, click on the “Burn image” button.
Step 4.
Here are the main methods for creating a bootable Windows XP disk. However, we cannot help but mention another method - the “Dosov” method. Despite its relative complexity and some obsolescence compared to the previous ones, it also has a right to exist.
How to create a boot disk using the DOS method?
- We create a folder on the hard drive in which we will enter all the necessary data. First of all, you should add a file manager adapted for DOS: Norton Commander, FAR or Volkov Commander.
- To make it convenient to launch a file manager (for example, Volkov Commander), we create a bat file. It’s very simple: open notepad and enter:
Let me explain a little. The first line is a command to replace the directory with Volkov Commander. The second line is a command to run the file called "vc.com".
Save the notepad file under the name “vc.bat”. The presence of a file under this name makes it possible to enable Volkov Commander using the letter combination on the command line: vс. And confirm everything with the Enter key.
- Later, when you use the boot disk, you will need to select the exact drive letter that corresponds to the CD drive. This is done as follows: in the command line, write first D:, then E:, and so on until the notification “The disk is not specified correctly” pops up. The most recent disk in existence will most likely be your CD drive.
However, this should be checked. To do this, enter the command “dir” in the command line. This command will display all files and folders contained on the disk. In this simple way, you can make sure that the disk is selected correctly and continue.
- Next we will use the Partition Magic program, namely its DOS version. This software product is designed to work with hard drives: formatting, dividing the hard drive into partitions, converting file system types and much more.
- In the folder where we collect everything necessary for the boot disk, we create an additional directory called “PQ” with program files. Similarly, with Volkov Commander we create a launching notepad file with the following content:
We give it the name “xp.bat”.
Thus, everything necessary for the boot disk has been created.
- Launch Nero (or any other imaging program described above). In the menu that opens, select “Create a bootable data disk.”
- Click the “Add” button and enter into the window all the folders and files that should be written to the installation disk. Then click the “Next” button.
- At this stage, you may be prompted to insert a boot floppy disk, ignore this requirement and select “Next” again.
- Now directly select the “Record” button.
Creating a multiboot Windows XP disk
Unlike a boot disk, a multiboot disk can contain not only operating system files, but also other necessary programs. For example, text and graphic editors, social applications, and so on. At its core, the procedure for creating a multiboot disk is not too different from that described above. The files of all necessary programs are accumulated in one folder, and then the image is recorded.
But let's take a closer look.
What do we need
As before, you need:
- image creation program;
- systemic Windows files XP.
In addition, we will need the xpboot.bin file, as well as files of some program.
Guide to creating a multiboot disk.
In conclusion, we note that it is easy to check whether a boot/multi-boot disk is working. To do this, immediately after burning, return the recorded disc back to the CD-ROM. If it starts automatically and the “Run Autorun” window appears on the screen, congratulations, you succeeded.
We’ll also give you one last piece of advice: you may not be able to create a boot disk the first time, so we recommend rehearsing it on RW disks.


Anyone who has dealt with installing an operating system on a computer on their own is familiar with the problem of creating boot disks on optical or flash media. There are specialized programs for this, some of which support manipulation of disk images. Let's look at this software in more detail.
The review opens with Ultra ISO, a software tool for creating, editing and converting images with ISO, BIN, NRG, MDF/MDS, ISZ extensions. With it, you can edit their contents, as well as directly create ISOs from a CD / DVD-ROM or hard drive. In the program, you can write a pre-prepared image with the operating system distribution onto an optical disk or USB drive. The downside is that it is paid.

WinReducer
WinReducer is a convenient application designed for creating personalized builds of Windows. It is possible to record the finished package into images in ISO and WIM formats or deploy the distribution directly on a USB drive. The software has ample opportunities for customizing the interface, for which a tool called "Preset Editor". In particular, it provides the ability to remove unnecessary functions services and enable those that make the system faster and more stable. Unlike other similar software, WinReducer does not require installation and has its own version for each edition of Windows. At the same time, the absence of the Russian language slightly reduces the overall impression of the product.

DAEMON Tools Ultra
DAEMON Tools Ultra is the most comprehensive imaging and virtual drives. The functionality is slightly similar to Ultra ISO, but, unlike it, there is support for all known image formats. There are functions for creating ISO from any type of file, burning onto optical media, copying from one disk to another on the fly (in the case where there are two drives). It is also possible to create virtual drives in the system and a bootable USB drive based on any Windows versions or Linux.

Separately, it should be noted the TrueCrypt encryption technology, which provides protection for hard drives, optical and USB drives, as well as support for virtual RAM storage for storing temporary information in order to increase PC performance. Overall, DAEMON Tools Ultra is one of the best solutions in its class.
Barts PE Builder
Bart PE Builder is a software tool for preparing bootable Windows images. To do this, it is enough to have the installation files of the desired OS version, and he will do the rest himself. It is also possible to record images on physical media such as a flash drive or CD. Unlike other similar applications, burning is carried out using the StarBurn and CD-record algorithms. The key advantage is a simple and intuitive interface.

Butler
Butler is a free, domestically developed utility whose main function is to create a boot disk. Its features include providing the ability to deploy different operating systems and choosing the design of the Windows boot menu interface.

Power ISO
PowerISO refers to specialized software that supports the full range of possible manipulations with disk images. It is possible to create ISO, compress or edit ready-made images if necessary, as well as burn them to an optical disc. The function of mounting virtual drives, in turn, will allow you to do without burning an image onto a CD / DVD / Blu-ray.

Separately, it is worth noting such features as the preparation of Windows or Linux distributions on USB media, Live CD, which allows you to run the OS without installing them, as well as Audio CD grabbing.
Ultimate Boot CD
Ultimate Boot CD is ready-made boot disk that is designed to solve various computer problems. This distinguishes it from other programs in the review. Contains software for working with BIOS, processor, hard drives and optical drives, as well as peripheral equipment. These include applications for checking the stability of the processor or system, modules random access memory for errors, keyboards, monitors and much more.

Software for performing various procedures on the HDD takes up the largest amount of disk space. Includes utilities that are designed to display information and control the loading of different operating systems on the same computer. There are also programs with functions for recovering passwords from accounts and data from disks, editing the registry, backup, complete destruction of information, working with partitions, etc.
All of the applications reviewed do a good job of creating bootable disks. More advanced functions, such as working with disk images and virtual drives, are provided by UltraISO, DAEMON Tools Ultra and PowerISO. With their help, you can easily create a bootable image based on a licensed Windows disk. But at the same time, you will have to pay a certain amount for such functionality.
Using Butler, you can make a Windows distribution disk with an individual installer window design, but if you want to completely customize the OS installation process, including the installation of third-party software, then WinReducer is your choice. Ultimate Boot CD stands out from other software in that it is a boot disk with many free programs for working with a PC. It can be useful in restoring a computer after virus attacks, system failures, and more.
Creating a bootable disk using UltraISO
First, you need to download and install the UltraISO program from the Internet. The program is paid, but most Internet resources post already hacked versions (for example, on the website rutracker.org). You can also download the Windows image there if you haven't already. In addition, you will need a blank CD or DVD, which you can buy at any computer store or at the market :) The next process is incredibly simple! Insert a blank disk into the drive of your computer, go to the folder with the already downloaded Windows image. Right-click on the image, point to the “UltraISO” inscription, move the mouse arrow to the right to the menu that appears and select “Burn to disk...”.
creating a bootable disk using UltraISO
The “Burn disc” window appears, there you simply click the “Burn” button and wait. When the recording is complete, the drive will give you a ready boot disk.

Creating a Boot Disk Using Nero
To create a boot disk using this method, you must have any version of the popular Nero program installed on your computer. Also, as in the previous method, you must have a blank CD or DVD and a Windows image. Launch the Nero Burning Rom program (Start->Programs->Nero->Nero Burning Rom). You should see a window “ New project" On the left, select the “DVD-ROM (boot)” option from the list, then to the right of the “image file” line, click the “browse” button and specify the path to the Windows image.

Click the “New” button, then in the window that appears at the top, select “Record”. It is advisable to check the box next to “Finalize disc”. Insert a blank disc into the drive, if you have not already done so, and click the “Burn” button.

Wait for your boot disk to burn. That's it 😉 An article on installing Windows XP, and an article on installing Windows 7.
Best regards, Alexander Molchanov