Elena Gennadievna Khokhlova
KOP program “What a surprise” (crafts from Kinder surprise capsules)
Explanatory note
The new living conditions in which children are placed put forward their requirements: be thoughtful, proactive, independent, develop your own new original solutions; be focused on better end results. The realization of these requirements requires a person with creative abilities.
Creativity gives birth to a living fantasy and a vivid imagination in a child. Creativity, by its nature, is based on the desire to do something that has not been done before by anyone, or at least to do something that existed before you in a new way, in your own way, better.
Construction of toys from waste material It just contributes to the development of creative potential in children. This is a very interesting and exciting activity. Much of what is usually thrown away can serve as material for the manufacture of various crafts. Such material in itself is a storehouse for the play of imagination. And if you combine it with sleight of hand, then everything can be revived, given a second life, as it were.
Kinder capsules - surprises an excellent basis for creativity. Such waste material provides enormous opportunities for the fulfillment of fantasies. Thanks to the brightness of modern plastic packaging, crafts They turn out to be very bright, elegant and festive. In the process of work, children acquire labor skills and abilities, develop creative imagination and constructive thinking. Toy making, crafts made from such material is painstaking, exciting and very enjoyable work.
Program COP is designed for 5 hours. (1 week per month) for children of senior preschool age.
Develop Creative skills in children through production crafts from waste material. (Kinder surprise capsules)
Introduce a variety of techniques when working with Kinder surprise capsules.
To promote the development of children's interest in working with waste material;
Develop imagination, creative thinking, fine motor skills.
Expand children's communication abilities.
To cultivate diligence, accuracy, and the desire to complete the work started.
Children's age: 5-7 years
Duration: intensive - 5 lessons (25-30 minutes.) per 1 week, 1 COP per month.
Events
1. Examination of finished products; material that will be needed for work. Making dishes for dolls. (mug, teapot, etc.)
2. Making characters consisting of one Kinder Surprise capsules.
3. Manufacturing of products consisting of 2 Kinder Surprise capsules.
4. Making toys using the sticking method plasticine capsules.
5. Staging a fairy tale with made-up characters.
Product: exhibition of works.
Carrying out a promotion "Let's give a toy to the kids"
Publications on the topic:
 A little history. Owner's son confectionery factory Michele Ferrero came up with a Kinder surprise. In Italy, baked cakes were baked for Easter.
Summary of educational activities for cognitive development in the senior group “Looking for a surprise” Implementation of the public organization “Cognition” 1. Develop an interest in nature, a desire to actively learn and act with natural objects. 2. Enrich the presentation.
Program content: Continue teaching children to sculpt from plasticine, using previously learned techniques. continue to learn how to plan your own.
Preparing for the New Year always brings joy and immerses you in childhood. How nice it is to prepare for your favorite holiday with your child.
For the manufacture of greeting card For mom, we decided to use the origami technique. In our preschool educational institution, I lead a paid Origami club with children.
All children love sweets, especially if you can find an interesting toy inside. Accordingly, parents unwittingly become owners of seemingly unnecessary toy containers. However, handicraft ingenuity has found a use for them, so today we will learn how to make fun crafts from kinder eggs.
Materials for work:
- Containers of Kinder eggs in any quantity (the more, the more interesting);
- Chenille wire;
- Glue;
- You can use colored cardboard, felt;
- Ready-made eyes for toys or markers and paints;
So, let's start by making a festive garland for Easter. In just a month and a half, this wonderful holiday awaits us, the symbols of which are eggs and chickens. An original garland, or even a wreath made from Kinder eggs, will be a wonderful addition to the holiday decor, especially since it is not at all difficult to make.
We start working on kinder crafts by connecting all the containers together. We just open it and put the cap from one on the next one. In this way we create a garland or wreath of any size. In this case, the author of the master class used 14 containers. We close the resulting chain into a circle and get an excellent basis for creativity.
To make chickens we use chenille wire various colors. We create paws from the red one, two for each container, and forelocks from the yellow one. We secure them either with glue, or by making a small hole in the container itself.
We add a beak made of colored paper or cardboard (an ordinary small triangle), draw eyes with a marker and become the owners of a very interesting thematic wreath.
In fact, there are a lot of ideas for creating different animals; you just need to show a little imagination and use various decorative elements to realize your plans.
The second option is to make glowing fireflies. For them, in addition to the materials mentioned above, you will also need a small lamp that can easily fit inside the container. It should run on batteries and have a switch so that if necessary, you can extinguish the firefly.
Next, it’s all a matter of technique - we also use chenille wire to decorate the antennae and paws, draw eyes and a mouth with markers or paints, then insert the prepared lamp into the container, turn it on, and assemble the container. As a result, your firefly is almost ready. All that remains is to add wings, which can be made from the same colored paper or cardboard, and place your product on a window or shelf.
Children are unlikely to pass by a display case with Kinder surprises without asking their parents to buy a chocolate egg. It’s not just the bright wrapper that attracts kids, delicious chocolate and intriguing content, but also the container itself, in which the toy is securely hidden. Some people collect them in a collection, others use them in games, and many make unusual or practical crafts.
There are many beautiful ideas for crafts made from kinders, and the best ones are presented below with step-by-step instructions.

Storage tank
In childhood, many people wore a kinder pendant around their necks, into which mothers and grandmothers carefully placed garlic to protect against viral infections. However, over time, people came up with other similar purposes for the yellow container:
- a compact headphone case that protects against moisture and tangling;
- stand for toothpicks, salt shaker (you just need to make the appropriate holes);
- container for puzzles, buttons;
- homemade container for storing lollipop or toothbrush.

It’s easy to make such useful things in everyday life; sometimes you just need to make a few holes, paint and glue a few decorations.

Maracas rattles
Children's crafts from kinder eggs open rattles, which can be made in a few minutes if you follow the following instructions:
- Prepare the necessary materials: three containers, cereal or beads, glue.
- Wash containers and dry.
- Fill the containers with a variety of cereals, beads and seed beads.
- Carefully glue the eggs together.


You can also make an unusual rattle in the shape of a maracas, for which a hole is made in the egg, a rod is inserted, fixed with glue, and the entire structure is tied with thread.

Baby slings
Sling beads are several rattles connected to each other. It's easy to make them:
- Prepare kinder boxes, an awl, ribbon, multi-colored threads, a crochet hook, scissors, a needle and small items for filling.
- Use an awl to make two holes on both sides of each egg.
- Using a needle, thread the containers onto a ribbon or strong thread, alternating them with colorful beads of various sizes if desired.
- Fill each box with cereal, beads or pebbles; it is advisable to use a different “filling”.
- Tie each container.
- Give the toy the appearance of a caterpillar by making eyes, antennae and a tail.

You can use toy beads as an independent toy, keychain or decoration for a baby stroller.

Garlands and wreaths are made using a similar pattern, although instead of tying, acrylic paints, varnish, and decorative elements are used.


Cute toys
The variety of small accessories that can be made using a yellow container is amazing. Thus, the following master classes on crafts from kinders are popular:
"Minion"
- Make four holes at the top of the egg and thread a thin dark wire through, simulating hairs.
- Glue eyes from pill molds with black beads inside.
- Make glasses, overalls, arms and legs from plasticine.
- Collect the elements into a single figure.

“Bees in the hive”
- Wrap the container with decorative black fuzzy wire to create three rings.
- Bend the two lower ends into short legs, and the upper ends into long, twisted tendrils.
- Draw eyes, nose and mouth.
- Attach the colorless fishing line to the back.
- Make a hexagonal tube out of cardboard and cut it into rings resembling a honeycomb.
- Glue the rings into honeycombs.
- Hang bees or insert them into honeycombs.

“Nest with chicks”
- Prepare six yellow eggs, two sheets of white paper, corrugated green paper, feathers, red satin ribbon, red, blue and orange felt.
- Build a nest: cut out two circles from white paper (one is three centimeters larger than the other), make cuts along the edges, wrap them with scissors, lay them on top of each other and secure with glue.
- Place green grass around the perimeter of the nest and scatter feathers.
- Make chickens: cut out eyes, a nose, a crest and a mouth from felt, glue them to each egg, decorate some with a bow from a red ribbon.
- Place the chicks in the nest.


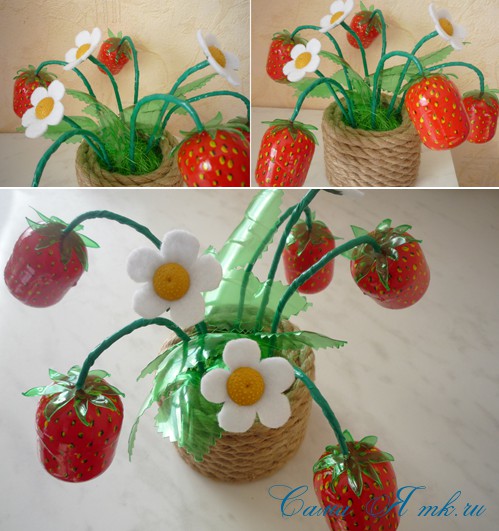
Strawberry or flower bouquet
Instead of quickly fading fresh flowers, you can decorate a table or shelf with a more unusual bouquet. So, following the following step-by-step process for making crafts, you can make spectacular and durable strawberry bushes from kinders with your own hands:
- Paint the eggs red and dry.
- Use a felt-tip pen to draw characteristic dots on the berries.
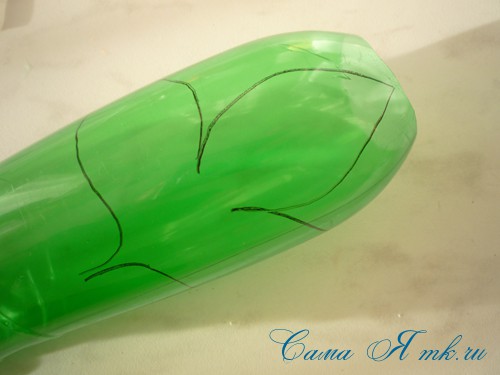
- From green plastic bottle cut out leaves (or paint transparent plastic).
- Make a hole in the berry and insert the wire, securing it securely inside the container.
- Wrap the wire with green thread.
- Collect several bushes into a single bouquet.

The instructions on how to make a craft from kinders in the form of a basket of flowers look similar: the eggs are painted in the desired color, and buds with various petals are cut out of the containers.

The photos of kinder crafts and detailed algorithms will help you turn yellow containers into unusual decorations or practical things. The main thing is to show your imagination by involving children and trying to implement new ideas.

Photos of crafts from kinders


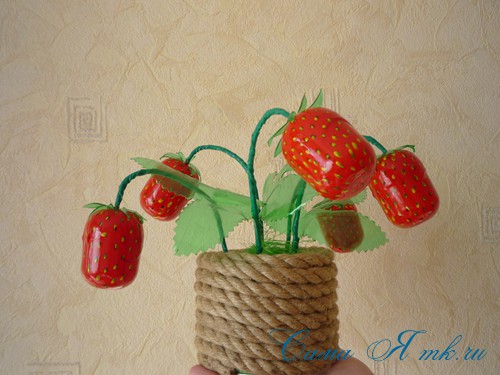
A very cute craft can be made from a plastic bottle Green colour and containers for kinder surprises. These will be almost real delicious strawberries that can decorate your home or summer cottage. A whole bush of such luxurious strawberries with berries and flowers looks beautiful.
To make this craft we will need a lot of things:
- wire,
- cases for kinders – 5 pieces,
- green plastic bottle – 1 piece,
- scissors (for leaves you can use curly scissors),
- acrylic paint red, black and yellow,
- brushes for applying paint (medium and thin),
- green insulating tape,
- a little foam (so that it sits tightly in the pot you are using),
- a small flower pot or any suitable jar,
- a little green sisal
- candle,
- decor of the pot - optional.
So, let's begin:
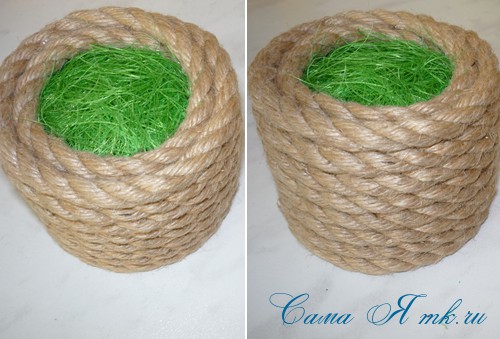
To begin with, I prepared a pot for planting our strawberries, which can be decorated in any way in an accessible way. First we place a piece of foam inside and decorate it. I decorated it with jute rope; for children's crafts, you can use corrugated paper and other suitable materials.
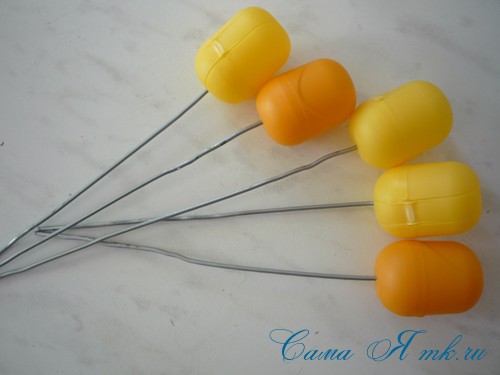
Each Kinder Surprise container must be pierced with scissors or an awl and a wire inserted into this hole and bent slightly.
Close the container and so on for all 5 pieces.

These are the preparations...
Coloring acrylic paint…


The leaves must be cut with cuttings to make it easier to attach them to the stem.

The sepal and leaf blanks can be slightly heated over a candle so that they are slightly deformed and take on a lively appearance.

We pierce the sepals with an awl or scissors in the center and put them on a wire for each berry.

Then, using green insulating tape, we wrap the stem-wire in a spiral, attaching the leaves. Insulating tape can be replaced with corrugated paper, tape or green yarn.

From such blanks we make a bouquet by piercing the foam in the pot with wire.
Let's add a few flowers for beauty.
They can be made from any available material; I have white felt and ready-made flower centers. You can use a white bottle or yogurt jars. We also use any suitable material as the center; you can even cut it out of a bottle and paint it with yellow acrylic paint.
We fix the flower on the wire... Depending on the material used, the wire can be slightly bent at the tip, and the middle can be glued on top of the glue. We wrap the wire stem with electrical tape and plant it in a pot.
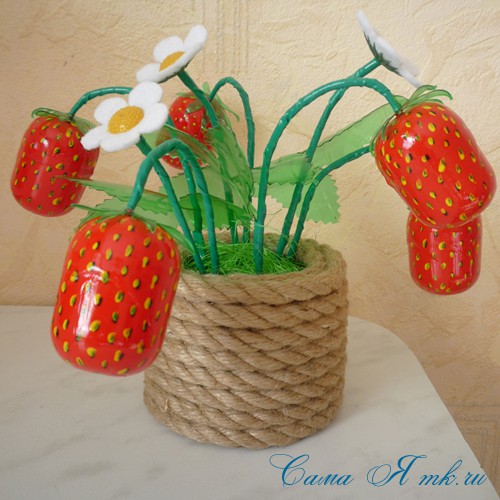
An attractive strawberry bouquet of kinder surprises will look good both in the interior and on personal plot. It can also be a wonderful handmade souvenir gift, for example, for March 8th!
Have fun creating!
I was glad to help!
I admit frankly that I adored these chocolate eggs as a child. The figurines were so cute, and a sweet souvenir was given only on special occasions... Nowadays, parents have much more opportunities to please their child with a “Kinder surprise” than in those distant 90s.
The ideas presented are for adults, not children! Justice triumphs; a super use for yellow plastic capsules has been found. I'm crazy about the first idea!
Crafts from Kinder Surprise
Practical ideas

DIY crafts from Kinder Surprise so useful in everyday life! But the capsules themselves are a godsend; they are convenient for storing spices, beads, beads, and various little things that can easily get lost...
Chocolate eggs with a toy inside have been delighting children and adults since 1972. To get your own original “surprise”, you don’t have to wait for every seventh egg. It's enough to just work with your own hands!

If you are fascinated by these ideas, show them to your loved ones. , we are doing a good deed and helping environment!
She has been interested in medicine since childhood and grew up in a family of doctors. She knows how to prepare a sumptuous breakfast from literally nothing, and is not afraid to experiment in the kitchen: she prepares pies without flour, low-calorie mayonnaise, and healthy sweets. He never gives up and believes that people are created to help each other! Her son Sasha is her assistant in all her household chores. Alexandra’s favorite book is “The Art of Loving” by E. Fromm.