The agricultural technology for growing garlic and bulbs is not particularly complicated or labor-intensive. However, having mastered it, the farmer will be able to save money on planting material every year and grow large heads of garlic on his plot, distinguished by their spicy taste and aroma. The most common practice is to plant garlic bulbs before winter, which makes it possible to harvest in mid-summer, but spring planting of seeds is also acceptable. The gardener can choose the optimal method of growing the crop himself.
How to plant garlic bulbs?
Spring planting is considered more gentle, since it is carried out during the warm period of the year, when the frosts have already passed and the soil temperature has warmed up to 7 degrees Celsius. Work begins with preparing the bulbs. Seeds stored in a warm, dry place over the winter are stratified before planting - placed in the cold to imitate natural processes awakening.
The period for stratification and seed sowing is selected individually, in accordance with the climatic characteristics of the region. Summer residents living in temperate latitudes can transfer the bulbs into the cold in early February, and plant the seeds in the ground in early April. For residents of the southern or northern regions, these dates may be adjusted.
In order for the bulblets embedded in the ground to sprout well, seven days before the approximate sowing date, the seeds must be dried, ventilated and disinfected by spraying them with a pale solution of potassium permanganate. Next, you should begin preparing the substrate. The soil for growing garlic should be light, nutritious and porous. If there is a deficiency of organic matter, organic fertilizer can be added to it.
Seven days before the approximate sowing date, the seeds need to be dried, ventilated and disinfected by spraying them with a pale solution of potassium permanganate.
The furrows for seeds in beds with prepared substrate should be made shallow - for growing garlic, a depth of 3-4 cm is sufficient. Row spacing should also not be made excessively wide. To make it easy to care for seedlings between the furrows, it is sufficient to maintain an interval of 15-20 cm.
After preparing the site, disinfected and stratified seeds are distributed along the grooves at a distance of 3-4 cm, covered with soil and lightly compacted. After sowing, the beds with bulbs must be covered with a cushion of mulch.
Planting winter garlic bulbs
For sowing, healthy large and medium-sized bulbs are used. 4-5 days before sowing they are peeled. With earlier peeling, the teeth are quickly affected by diseases, are poorly stored and lose their germination capacity. The yield of garlic depends largely on the size of the cloves.
Table. Dependence of the yield and weight of the heads on the size of the cloves of seed garlic (according to data from the Skvirsky experimental field)
| Weight of teeth, g | Productivity, c/ha | Weight of bulbs, g | Number of cloves in an onion, pcs. |
| Uncalibrated (control) | 63,2 | 24,9 | 3,8 |
| 6-9 | 90,4 | 34,9 | 4,1 |
| 4-5 | 65,2 | 25,2 | 3,8 |
| 2-3 | 48,3 | 19,5 | 3,8 |
Planting winter garlic in bulbs also has its own nuances. It differs from spring sowing in that deeper grooves (5-6 cm) are prepared for the seeds in pre-disinfected beds fertilized with minerals - phosphorus, potassium and nitrogen. To improve the drainage properties of the soil, the bottom of the furrows is covered with river sand. The sand layer should be about 2-3 cm.
The soil in the beds is moistened and seeds are sown at the bottom of the furrows at intervals of 4-5 centimeters
Another specific point in winter planting garlic is the mandatory mulching of the beds. It is necessary in order to protect the sets from negative influence Wednesday - cold, wind and heavy rains. The following materials can be used for mulching:
- green manure;
- sawdust;
- peat;
- plant remains.
The timing of sowing winter garlic depends on climatic features region. The approximate planting time is calculated taking into account the period of persistent frosts and deep freezing of the soil. In temperate latitudes, bulblets are planted in late September - early October. Farmers from other regions calculate the planting date on their own, subtracting 35-40 days from the date of the first stable frost.
Seedling care
Planting garlic seeds in autumn and spring will bring a good harvest if the farmer provides the young seedlings with proper care. Like any other plants, garlic seedlings need moderate watering and fertilizing with fertilizers.
Also, don’t forget about weed prevention. To prevent them from spreading, some gardeners cover their garlic beds with several layers of damp newspapers, which should have holes for air circulation.
When should you reap the harvest?
Traditionally held on cloudy days in mid-August. A signal that it is time to dig up the cloves is the yellowed foliage of the plant. You should not wait for it to dry completely, as this will negatively affect the condition of the garlic heads. After harvesting the crop, the farmer can place it under a ventilated shed for drying and storage.
A signal that it’s time to dig up the cloves is the yellowing of the plant’s foliage.
It is important to choose the right time for digging up the heads, since if the harvest time is violated, the harvest will not be stored well.
Secrets of a great harvest
Gardeners should select garlic beds based on the site's crop rotation plan. It is recommended to alternate crops every year. In particular, the following can be used as precursors for garlic:
- cucumbers;
- pumpkin;
- tomatoes;
- eggplants.
You should not plant bulbs after carrots, turnips and potatoes.
Video: how to plant garlic bulbs
It should be remembered that the technique for growing garlic presented in the article is designed for a two-year period. In the first year, the farmer will receive a small one-clove onion, and in the second year, a full head of garlic with large cloves. Knowing how to grow large garlic bulbs and following the recommendations for caring for seedlings, the farmer can get an excellent harvest with minimal effort and time.
Garlic. This crop occupies beds in almost every garden. Still would! Garlic contains a lot of vitamins, it is necessary for pickling, and many dishes without it would not have their attractiveness. But do we know everything about garlic?
What is the difference between winter and spring garlic?
Garlic can be winter or spring. At first glance, both have absolutely similar structures: head, roots, stem, leaves... But in fact, the differences are significant. Winter varieties have one row of large teeth, and spring varieties have several rows, but smaller ones. Winter crops can be planted in the spring and, more correctly, in the fall (during spring planting, they do not have time to divide into cloves); spring crops are planted exclusively in the spring and produce a harvest in the same year. Winter garlic has more pungency, while spring garlic is better stored. If you disassemble a bulb of winter garlic into cloves, you will find that inside it there is a remnant of the shoot (a kind of rod) around which the garlic cloves are located, but spring garlic does not have such a rod, since it does not shoot.
Why does winter garlic bolt?
Why does winter garlic shoot? And in order to have more seed material for propagation, because only 4 - 10 cloves are formed in its bulb, and this is clearly not enough to leave for planting and save for the table, but the bulbs (aerial bulbs) on one The arrow is loaded from 20 to 100 pieces at once. In addition, the formation of aerial bulbs ensures the preservation of the quality of garlic, allows you to obtain healthier planting material, and grow a more complete crop that is highly resistant to diseases and pests.
Unfortunately, many amateur gardeners neglect the method of propagating winter garlic through bulbs, but in vain. This crop tends to become smaller over the years, so it needs to be rejuvenated at least every 5, and preferably 3, years. And for this there is nothing better than seed material collected from your own garden bed, belonging to your favorite variety.
How to grow bulbs?
Growing garlic from bulbs to full bulbs usually takes two years. However, there are cases when already in the first year the set forms a fairly large single-toothed onion, ready for use. By taste qualities and the content of useful substances is in no way inferior to the two-year one, but if the goal is reproduction, it is better to be patient and grow good planting material from the airy garlic cloves, and from it grow a crop for the table.
There are two ways to grow seedlings. The first is to plant bulbs before winter. However, during the period of frost there is a fair amount of young garlic falling out, partly due to cold weather, partly due to their being pushed to the surface by frozen soil. Therefore, a less risky method is the second method - spring planting.
To preserve the seed until spring, the aerial bulbs are packed in newspaper and hidden in a dry, dark place, with a stable temperature of +18 to +20°C. But already a month and a half before planting (approximately February) they are transferred to a cellar or refrigerator, or placed in a fabric bag and buried in the snow to withstand for some time at a temperature of 0 to + 4 ° C. This allows the bulblets to go through a period of stratification, which ensures the maturation of tissues for germination and gives a kind of impetus to the beginning of the growing season. Then the garlic cloves are dried, ventilated and disinfected in a light solution of manganese, and only after that they are planted in beds, to a depth of 3 - 4 cm, with a distance of 3 cm arcs from each other, forming rows every 15 cm. After the seed material is placed in holes, upper layer The beds are carefully compacted and covered with mulch. This ensures good adhesion of the seeds to the soil, which provokes more vigorous germination, and allows moisture to be retained in the soil, which is very important for germination.
At the same time, it is necessary to remember that garlic cannot be planted in the same place for several years in a row, as this contributes to the accumulation of diseases, and it should not be placed next to predecessors that adversely affect the harvest (after onions, cucumbers, carrots), but rather Place after tomatoes, peas, early white cabbage or cauliflower.
When to collect grown bulbs?
The time to collect grown bulbs comes in early August. A clear sign that it is already due is yellowed garlic foliage. However, you should not wait until the leaves dry out completely, because if the above-ground part dies off, it will be difficult to find the shads in the ground.
When harvesting, you must remember that dug up garlic should never be left in the open sun, as is recommended in the notes of many gardeners, since this crop tends to “glaze” in direct sunlight. sun rays, and this significantly reduces the quality of garlic. Drying of one-toothed bulbs (as well as two-year-old bulbs) should take place in the shade, in a well-ventilated place.
Once the outer husks have dried, the planting material can be tied into bunches and hung in the shed or attic. In the fall, single clove garlic is ready for planting for the main winter planting!
Garlic is a plant from the onion family. Can replace an incredible amount of medical medicines. In ancient times it was even used in magic to scare away evil forces, also many housewives grow it on windowsills, believing that it brings prosperity and protects the house from damage and the evil eye.
Scientists have discovered something about garlic
Once upon a time, a long time ago, the ancestors of our modern favorite, after flowering, formed real garlic seeds, which they successfully reproduced. But, over the years, people have left the best heads for planting, giving preference to those specimens whose main energy was spent on forming bulbs rather than flowering.
After the formation of the underground part, flowering could have continued, but it was hampered by inappropriate external factors - heat air and the length of daylight hours. All these facts were found out by scientists from one of the Israeli universities. Having eliminated the listed reasons, they forced the garlic to bloom again and obtained garlic seeds, which turned out to be suitable for further breeding work. I also want to note that real seeds, as such, do not exist in ordinary garlic. What most gardeners call seeds, in fact in fact, buds that have an embryo inside and develop only after fertilization.
Timing of sowing seeds
Landing Garlic seeds should be carried out in early autumn.
Obtaining seeds from garlic
Plants grown from the most suitable, largest and healthiest cloves do not have the shoots removed. The ripened garlic is removed along with the arrows and dried well for several weeks. When the stem dries, the heads are separated, and the bulbs with seeds are wrapped in paper and stored.
Garlic seeds preparation for sowing
The day before sowing garlic seeds soaked in an infusion of wood ash, subsequently selecting only those that sank to the bottom of the vessel.
Preparing beds for sowing
Seed beds begin to be prepared in the summer. Choose a place for them that is sunny and not damp. Two weeks before planting, fertilizers are applied to the soil: for one square meter prepared beds 400 g of wood ash, 30 g of superphosphate and potassium sulfate and 10 kg of humus. It is undesirable to plant garlic from seeds in those beds where potatoes or tomatoes grew - the planting material may become infected with fusarium. Good predecessors for planting garlic seeds are legumes, pumpkins, cabbage and perennial herbs.
Sowing seeds in open ground
For planting, make shallow grooves into which the seeds are laid bottom down, but no deeper than one centimeter. They are covered with humus or pre-prepared soil from the garden. After planting, the soil is immediately mulched so that it does not dry out.
Second sowing method
This method of planting seeds will make weeding and spring care easier. The prepared beds are covered with wet newspapers, small holes are made in them and garlic seeds are planted, sprinkled with humus.
After the entire bed is sown, newspapers are sprinkled with a thin layer of earth or sand. With such sowing, perennial weeds do not germinate in the spring - they are prevented by a layer of newspapers. Of course, after some time they will still break through, but then they will no longer be afraid of the stronger seedlings.
Caring for garlic seedlings
In spring, the bed with seedlings must be well weeded. In hot, dry summers, the seedlings must be well watered and loosened after watering. Fertilizing must be done a month after germination of the seedlings.
To fertilize the sprouts, use 10 g of superphosphate and ammonium nitrate per square meter. - fertilizing is necessary after two weeks, it is carried out with the same mixture.
At the end of June, the garlic is fed with wood ash - at the rate of two cups per square meter. In the autumn, one-cloves are obtained from the planted seeds, which next year will become planting material for growing full heads of garlic. Perennial garlic There is also perennial garlic that does not form bulbs.
It reproduces by seeds similar to onion seeds. Only the feathers of this type of garlic are eaten. It is especially popular in Eastern countries, where they adore its fragrant green arrows and feathers.
Decorative garlic From seeds you can grow decorative garlic, which has its own beneficial features. Such garlic from seeds can fill the air with phytoncides and protect rose bushes from fungal diseases.
How to grow garlic and reap a good harvest
Garlic is one of the most favorite vegetables of our gardeners and gardeners. It can be grown in almost all regions of Russia. In order to get a good harvest, you must follow the technology of planting, caring for and storing bulbs.
Let's take a closer look at how to grow garlic.
When to plant garlic
Garlic is one of the few cultivated plants, which can be planted both in spring and autumn. In the first case it is called spring, in the second - winter. In cold regions, garlic is usually planted in the fall, and in warm regions in the spring.
In the latter case, the cloves are buried in the ground, already slightly sprouted. Spring planting should be done as early as possible. Ideally, the ground should not even dry out after the snow melts.
Only in this case can you get large enough heads.
Choosing a location and preparing a bed for spring garlic
How to grow garlic into heads and greens to achieve a good harvest? Of course, the bed for this vegetable must be carefully prepared. This crop grows best on loose soils well fertilized with organic matter.
To obtain large heads, garlic is planted in a sunny place. If you need greenery, create a garden bed fruit trees, somewhere in partial shade. The best predecessors for this vegetable are considered cauliflower, cucumbers, pumpkin, zucchini, beets, carrots, beans and peas.
After onions, garlic can only be planted after 3-4 years. Every year the bed is laid out in a different place. It is not recommended to plant garlic next to potatoes.
The fact is that these plants are susceptible to similar diseases.
Spring garlic planting scheme
How to grow good garlic? This is quite possible, you just need to follow all the rules. First of all, the heads must be seated correctly. Garlic is grown both in mulched and regular beds. In the first case, the cloves are planted to a depth of about 5 mm.
If mulch is not provided, planting should be done to a depth of 7.5-10 mm. Of course, the cloves must be buried in the soil with the root part down. The distance between holes should be 10-15 cm, between rows - about 25-30 cm.
If the garden is small, you can plant garlic more often. However, the heads will grow smaller.
How to grow spring garlic
It is still worth using mulch in garlic beds. This significantly increases productivity. The beds for plants can be covered with straw, reeds, leaves, etc. Arrows should be removed immediately as they appear.
Otherwise you won't get big heads. Arrows take a lot of nutrients from the plant. Many summer residents use them as a seasoning when preparing baked meat dishes.
They also go well as a frying dish for borscht. Water the garlic moderately, but do not allow the soil under it to dry out.
Preparing beds for winter garlic
We have found out how to grow a good harvest of spring garlic. Now let's see how to get a large number of large heads of winter crops. They begin to prepare the beds for it two weeks before planting. The fact is that the soil must first subside thoroughly.
If you are planting garlic after cabbage, eggplant or legumes, under which a lot of compost or manure was added in the summer, there is no particular need to fertilize the soil with organic matter. However, it is still worth doing mineral fertilizing.
In this case, a mixture of the following composition is used: 40 g of superphosphate, 15-30 g of ammophosphate, 10 g of potassium chloride. The specified amount of ingredients is used to fertilize 1 m2 of soil.
If garlic is planted where organic matter has not been added, the soil should be fertilized with humus or compost in an amount of approximately 6 kg/m2. Experienced gardeners do not recommend fertilizing garlic beds with fresh manure. Otherwise, it will grow loose and unsuitable for storage.
In addition, the cloves will contain too many nitrates. Compost, humus and mineral fertilizers should be applied as evenly as possible. Scatter them over the garden bed and dig it up. Then thoroughly loosen the soil with a rake.
Preparation of planting material
Now let's see how to grow winter garlic. The cloves should be prepared before planting. The heads are kept in a cool room for two weeks (at a temperature of approximately 5 °C).
They should be separated into cloves the day before planting. Planting material should be carefully sorted. It is best to plant the teeth of the middle and big size. Cracked, double-topped and rotten ones should be discarded.
In order to protect future plants from various diseases, the teeth must be disinfected. To do this, prepare a solution of copper sulfate (4 g per liter of water). Keep the planting material in it for half an hour.
You can also use a lye solution for disinfection. It is prepared from ash (1 tbsp boiled in a liter of water for half an hour).
When to plant winter garlic?
If you have asked the question “how to grow a good harvest of garlic,” you should definitely find out what rules for planting it exist. It is very important to meet deadlines here. Before frost, garlic must take root, but not grow.
Approximately the landing begins somewhere in the twentieth of September (for middle zone Russia).
How to plant winter garlic
It is worth preparing beds about 20 cm high and a meter wide for winter garlic. They should be oriented from north to south - this is required condition! This will ensure maximum soil warming in autumn and spring.
The distance between the holes is 15 cm. Garlic is planted in three rows. The distance between them is 25 cm. Row spacing should be 50 cm wide.
Planting depth - two clove heights.
Caring for winter garlic
How to grow winter garlic correctly? You need to start caring for it in the fall. Immediately after planting, the beds must be mulched with manure or humus in a two-centimeter layer.
In the spring, immediately after the leaves begin to sprout, the garlic should be fed. You can use urea or ammonium nitrate (at the rate of 15 g/1m2). The garlic is fed a second time in mid-May. Nitrogen-potassium fertilizers are applied to the soil.
The third time, fertilizing is done in the seventh leaf phase. In this case, a mixture of potassium chloride (10 g/m2) and superphosphate (20 g/m2) is used. After each feeding, the garlic should be watered thoroughly. The frequency of watering in summer is once a week.
There is no need to create swamps under the plants. Water in moderation, otherwise the bulbs will simply rot. Stop moistening the soil under the plants two weeks before harvesting.
This will increase the shelf life of the bulbs. As in the case of spring garlic, you should definitely break off the arrows of winter garlic. They can reduce the harvest by almost three times.
Diseases of culture
When discussing how to grow garlic in the garden, it is impossible not to dwell on pests. Various kinds of insects are not particularly fond of this vegetable. Infection occurs rarely and mainly only with nematodes or onion thrips. The first ones look like microscopic “worms”.
They live inside the plant itself. They do not cause much damage, but in some cases they can destroy the entire crop. Thrips feed on garlic leaves, drinking the juice from them. This leads to slower growth of the bulb.
The most common disease affecting garlic is white rot. After infection, the plant's leaves begin to turn yellow, causing it to die.
Garlic also suffers from fusarium and downy mildew. You can get rid of nematodes by planting the beds with low-growing marigolds with a strong odor. Plants are rid of thrips by treating them with a solution of karbofos (60 g per 10 liters of water).
Growing Garlic Seeds
Many summer residents would like to know how to grow garlic seeds, the so-called bulbs. Later they are used to produce single-prong heads. In spring, the largest cloves are selected and planted in a sunny place.
Plant garlic bulbs a little sparser than commercial ones. Caring for seed plants is the same as for regular ones.
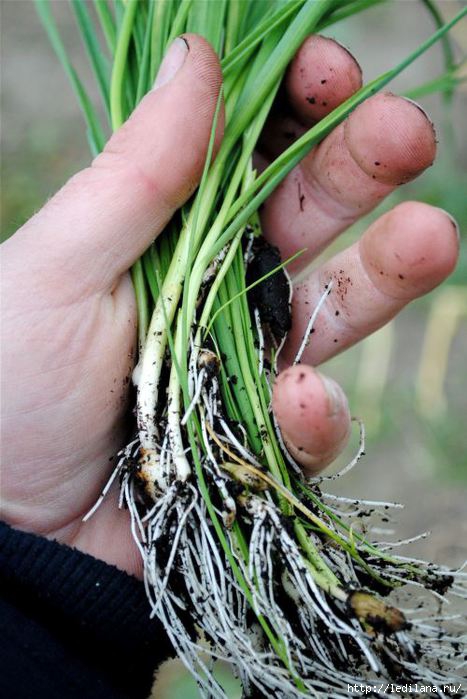
After the arrows straighten completely, the plants are dug out of the ground with roots and hung out to dry in bunches in a dark, dry place (possibly in the attic). They are kept like this for a month, until the stem is completely dry.
After this, it is cut off, leaving a stump of 2-3 cm near the bulb itself. The seeds should be stored in a dark, dry place.
Growing garlic from bulbs
Next, let's figure out how to grow garlic from seeds. Sometimes this method is practiced at dachas. Bulbs are planted in the spring, after the soil has warmed up. Before planting, they must be kept in the refrigerator (at a temperature of 5 ° C) for about a month.
Otherwise you won't get any bulbs. Only greenery will grow from unprepared seeds. The bed is laid out in a sunny place. Organic fertilizers are added to the soil and thoroughly loosened.
You should not bury the seeds too deeply, otherwise they will take a long time to germinate. After planting, the bed must be watered. We hope you now understand how to grow garlic from bulbs.
By planting the seeds in compliance with the required technology, in the spring you will reap a good harvest of single-claw garlic. It can be eaten or used as planting material. This method is good because the bulbs do not carry infection.
This means that the plants will not get sick in the summer. In particular, such garlic is never infected with nematodes. Among other things, this technology allows you to significantly save seed material.
Harvesting
We have found out how to grow winter and spring garlic from cloves and seeds. Now let's figure out how to properly harvest the resulting crop. Bulbs should be dug up after 3/4 of the lower leaves have withered.
Winter garlic usually ripens at the end of July. Yarovoy - at the end of August. Dig it out after most of the lower leaves turn yellow.
First, for testing, you need to pull two or three heads of garlic out of the ground. The bulbs should be well formed and dense. Digging up the crop with a pitchfork. Pry up a lump of earth with garlic and pull it out with your hand along with the heads.
The dug up plants should be laid out around the perimeter of the bed for several hours to dry. The leaves do not need to be cut off immediately. They keep spare nutrients, which continue to enter the bulb. The existing arrows should be removed.
The leaves are cut off after drying. The roots of garlic intended for human consumption are cut off. Experienced gardeners believe that it is better to under-expose garlic in the ground than to over-expose it. The fact is that unripe bulbs may well survive even after digging.
Overripe ones fall apart and are stored much worse.
Storage
It is better to store garlic that will be used as planting material in the future separately from food. For the winter, the heads should be placed in a cool (temperature +16...+20 °C for food and +18... +20 °C for seed), well-ventilated room.
The air humidity in it should not exceed 90%. Air that is too dry is also not good for garlic (at least 60%), as it can dry out and begin to disintegrate into cloves. It is best to put the bulbs in slatted boxes.
Now you know not only how to grow garlic in the garden, but also how to properly preserve it. Next we will give a few useful tips, which may be useful to someone.1.
In order to protect garlic from drying out during storage, you can put it not in boxes, but in bags made of thick fabric, pouring the heads onion skins. Also sometimes the heads are lubricated with boiled vegetable oil(0.5 l), to which iodine (10 g) is added.
Apply this composition to the bulbs with a cotton swab.2. Winter garlic is stored worse than spring garlic. If you want to use it for seeds in the spring, after the onset of cold weather, simply bury the bulbs in the ground to a depth of about half a meter, placing them in a plastic bag.
You can plant planting material saved in this way very early. So, we have discussed in detail how to grow garlic from bulbs or cloves yourself. Take care of the beds, observe planting and harvesting times, prepare and store the seeds correctly - and this wonderful vegetable will always delight you with good harvests.
Add a comment
You don’t have to become a landscape design specialist to design a garden with your own hands and turn it into a nice corner where you’ll want to spend time.
| How to grow garlic? |
|
Garlic has long been known to people and is one of the most popular spices, which decorates the taste of various dishes with a spicy note. It is used in the preparation of marinades and pickles, sausages and pates, salads and sauces. The healing properties of this plant are known: its use prevents flu and gum disease, it strengthens blood vessels, and has a choleretic and diuretic effect. Due to the content of vitamins and microelements in it, garlic has a general strengthening effect. That is why everyone who has at least a little land tries to grow this plant. Despite the fact that garlic is quite unpretentious, inexperienced gardeners are often interested in how to grow garlic properly. In general, garlic can be bolted or non-shooted, winter or spring. The latter is planted in the spring; when it ripens, it produces only bulbs with cloves. In addition to the bulb, the shooter has a ripening arrow, at the end of which there is an inflorescence with aerial bulbs - bulbs. They are planted in the fall in September and ripen in the summer. Winter garlic is more frost-resistant, but is stored only until spring. Spring garlic is consumed before the next harvest ripens, but it has small bulbs. Conditions for growing garlic Garlic prefers fertile soil with a neutral reaction. Land plot shouldn't hold melt water, which can wash out winter bulbs or delay the planting of spring seeds. In the fall, if possible, fertilize the soil with manure, compost, or apply mineral fertilizers. It would be good if cauliflower, legumes or cucumbers were grown in this area before garlic. Precursors such as onions and potatoes are undesirable. Planting garlic in a certain area should not be repeated earlier than 3-4 years. Growing garlic from seeds involves planting them in spring - in mid-to-late April. The garlic bulb is disassembled into cloves immediately before planting. It is advisable to choose the largest seeds. Sowing is done in moist soil. It is necessary to make a furrow 2-3cm deep and plant the cloves at a distance of 6-7cm from each other. Each row of planted garlic should be at a distance of about 25 cm from each other. Signs of ripening of spring garlic are the drying of the lower leaves and yellowing of the upper leaves - as a rule, this occurs in early August. To plant garlic, a large number of bulbs are needed. A more economical way is to grow garlic from bulbs. In summer, garlic will produce arrows with airy bulbs, which must be collected, divided and dried for 2-3 weeks. At the end of September - at the beginning of October, the prepared bulbs are planted, and in July the so-called single cloves - plant bulbs consisting of one large clove - are collected. In August, fertilizers are applied to the planting site. The end of September and the beginning of October is the time for planting the one-toothed tree. Each bed should be 20-25cm apart. A furrow 4-6 cm deep is made. Garlic cloves are planted in it vertically or sideways so that there is 6-7 cm between them. In the spring, when shoots appear, the ground can be loosened. In the absence of precipitation, the area with garlic is watered from May to mid-July. Many novice gardeners have no idea how to grow large garlic. To do this, the arrows of the plant are cut off. Then all the beneficial substances of garlic will go into the growth of its bulb. Several arrows are left for collecting bulbs. In July, when the lower leaves become dry and the upper ones droop, you can harvest garlic. This is how you can grow one of the most popular spices with your own hands. |
Garlic. This crop occupies beds in almost every garden. Still would! Garlic contains a lot of vitamins, it is necessary for pickling, and many dishes without it would not have their attractiveness. But do we know everything about garlic?
What is the difference between winter and spring garlic?
Garlic can be winter or spring. At first glance, both have absolutely similar structures: head, roots, stem, leaves... But in fact, the differences are significant. Winter varieties have one row of large teeth, and spring varieties have several rows, but smaller ones. Winter crops can be planted in the spring and, more correctly, in the fall (during spring planting, they do not have time to divide into cloves); spring crops are planted exclusively in the spring and produce a harvest in the same year. Winter garlic has more pungency, while spring garlic is better stored. If you disassemble a bulb of winter garlic into cloves, you will find that inside it there is a remnant of the shoot (a kind of rod) around which the garlic cloves are located, but spring garlic does not have such a rod, since it does not shoot.
Bulbs, or aerial bulbs of garlic.
Why does winter garlic bolt?
Why does winter garlic shoot? And in order to have more seed material for propagation, because only 4 - 10 cloves are formed in its bulb, and this is clearly not enough to leave for planting and save for the table, but the bulbs (aerial bulbs) on one The arrow is loaded from 20 to 100 pieces at once. In addition, the formation of aerial bulbs ensures the preservation of the quality of garlic, allows you to obtain healthier planting material, and grow a more complete crop that is highly resistant to diseases and pests.
Unfortunately, many amateur gardeners neglect the method of propagating winter garlic through bulbs, but in vain. This crop tends to become smaller over the years, so it needs to be rejuvenated at least every 5, and preferably 3, years. And for this there is nothing better than seed material collected from your own garden bed, belonging to your favorite variety.
Garlic bulb and bulbs

How to grow bulbs?
Growing garlic from bulbs to full bulbs usually takes two years. However, there are cases when already in the first year the set forms a fairly large single-toothed onion, ready for use. In terms of taste and content of nutrients, it is in no way inferior to the biennial one, but if the goal is reproduction, it is better to be patient and grow good planting material from the airy garlic cloves, and then grow a crop from it for the table.
There are two ways to grow seedlings. The first is to plant bulbs before winter. However, during the period of frost there is a fair amount of young garlic falling out, partly due to cold weather, partly due to their being pushed to the surface by frozen soil. Therefore, a less risky method is the second method - spring planting.
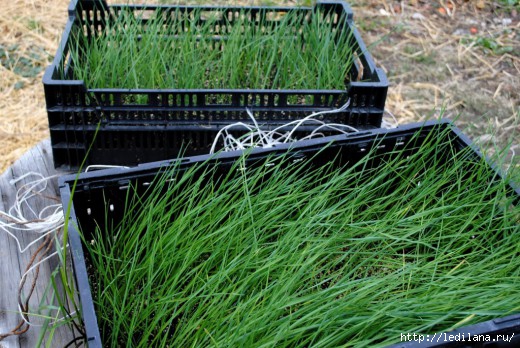
Seedlings of garlic bulbs planted in a seedling box
To preserve the seed until spring, the aerial bulbs are packed in newspaper and hidden in a dry, dark place, with a stable temperature of +18 to +20°C. But already a month and a half before planting (approximately February) they are transferred to a cellar or refrigerator, or placed in a fabric bag and buried in the snow to withstand for some time at a temperature of 0 to + 4 ° C. This allows the bulblets to go through a period of stratification, which ensures the maturation of tissues for germination and gives a kind of impetus to the beginning of the growing season. Then the garlic cloves are dried, ventilated and disinfected in a light manganese solution, and only after that they are planted in beds, to a depth of 3 - 4 cm, with a distance of 3 cm arcs from each other, forming rows every 15 cm. After the seed material is placed in holes, the top layer of the bed is carefully compacted and covered with mulch. This ensures good adhesion of the seeds to the soil, which provokes more vigorous germination, and allows moisture to be retained in the soil, which is very important for germination.
At the same time, it is necessary to remember that garlic cannot be planted in the same place for several years in a row, as this contributes to the accumulation of diseases, and it should not be placed next to predecessors that adversely affect the harvest (after onions, cucumbers, carrots), but rather Place after tomatoes, peas, early white cabbage or cauliflower.
When to collect grown bulbs?
The time to collect grown bulbs comes in early August. A clear sign that it is already due is yellowed garlic foliage. However, you should not wait until the leaves dry out completely, because if the above-ground part dies off, it will be difficult to find the shads in the ground.
When harvesting, you must remember that dug up garlic should never be left in the open sun, as is recommended in the notes of many gardeners, since this crop tends to “glass” in direct sunlight, and this significantly reduces the quality of the garlic. Drying of one-toothed bulbs (as well as two-year-old bulbs) should take place in the shade, in a well-ventilated place.
Once the outer husks have dried, the planting material can be tied into bunches and hung in the shed or attic. In the fall, single clove garlic is ready for planting for the main winter planting!
When the box with the bulbs bursts, then you need to remove the garlic and bulbs. For example, the boxes have already burst, but the rain prevents us from harvesting the garlic. So exact date cleaning cannot be said.
http://www.botanichka.ru/blog/2015/07/07/chesnok-iz-bulbochek/