Many of you have long been accustomed to working in Word. In addition, most are quite happy with the standard document settings. But if you have to use a computer at work, I'm sure that sooner or later you will need to set a document or some separate sheet to landscape orientation. This article will discuss exactly how to do it in Word album sheet. By the way, one of the simplest tasks.
Standard Sheet Sizes
Before making landscape or book sheets, I would like to tell you a little about standard sizes. It just so happens that a standard A4 sheet has a size of 297 by 210 millimeters. This sheet format is called book format. But if you take and turn the sheet 90 degrees, you will get a sheet with parameters of 210 by 297 millimeters. This sheet will have the same A4 format, but in landscape orientation. And if you already know, then A4 is not the only standard size.
Size chart of standard formats
| Format | Landscape size(mm) | Book size(mm) |
| A0 | 841x1189 | 1189x841 |
| A1 | 594x841 | 841x594 |
| A2 | 420x594 | 594x420 |
| A3 | 297x420 | 420x297 |
| A4 | 210x297 | 297x210 |
| A5 | 148x210 | 210x148 |
| A6 | 105x148 | 148x105 |
Create a landscape sheet
If there is a need to make a landscape sheet, then there is no need to strain - it is done simply. For these purposes, it is best to use the “Page Layout” panel. It contains a group of elements called “Page Settings”. It is in the page parameters that you can change the sheet orientation from portrait to landscape and vice versa.
Please note that if you perform the suggested manipulations, the orientation of the sheets will change throughout the document.
But you don't always need to change the orientation of the entire document. I personally met a large number of documents in which most of the sheets are made in portrait orientation. But there are also sheets with landscape orientation. So, I want to draw your attention to the small square with a down arrow, located in the page options section.

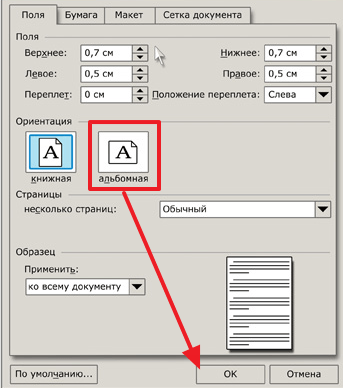
By clicking on the indicated square, you can get to the “Page Settings” dialog box.

View of the Page Setup window
As you can see, in the image of the Page Setup dialog box, the arrow indicates how the setting will be applied. There may be several such methods:
- To the entire document;
- Until the end of the document.
By manipulating the “Apply” parameter, you can easily achieve the desired result. And in the future, don’t think about how to make a landscape sheet in Word. You will just take it and do it.
By the way, you may have a question about how to make a landscape sheet in the middle of a Word document. If you haven't guessed yet, I'll give you a hint:
- We stand on the desired sheet;
- We make landscape sheets until the end of the document;
- We stand on the next one after the desired sheet;
- We make everything bookish until the end of the document.

How often do you create ads? — Sooner or later, every Word user encounters some nuances of working with the program. For example, how to make a landscape page in Word? It would seem - what could be simpler?! However, as in the case with, there are many tricks and tricks that will allow you to do whatever you want with the page orientation!
Let's look at the example of Microsoft Office Word 2016, however, the instructions are applicable to any version of Word starting from 2007 with minimal changes (for example, in 2016 the tab is called “Layout” and in 2007 - Page Layout, the meaning does not change)
Recently I was preparing a Word document and came across an interesting situation! I typed about 30 pages in Word and now I needed to make one of them landscape...
Here's the truth - I've been using Word for over 15 years and have never encountered such a problem before. I spent about 20 minutes experimenting with sections and page breaks and finally realized how it works. (I didn’t look it up on the internet)
Creating one landscape page in Word is not a very intuitive task. If you have never encountered sections and page breaks before, then most likely you will not be able to understand how it works at all... but you are here and my task is to explain this process
How to make a landscape sheet in Word (for the entire document)
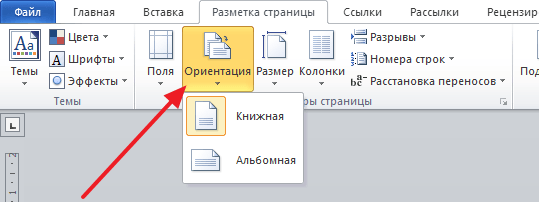
Switching from portrait to landscape orientation for an entire document in Word is as easy as shelling pears - we need the “Layout” tab (or “Page Layout” depending on the version of the office suite). We look for the “Orientation” button and select “Landscape” from the pop-up menu.

All pages of the document will change orientation to landscape... and if you had data there, it will probably break your entire layout. In general, nothing complicated, until it comes to changing one specific page to landscape!
Landscape orientation of one page Word 2007-2016
We have two ways to make one sheet of a Word document landscape. The first one is simple, and the second one is correct (in my opinion). I recommend using the option with sections and breaks (the second one) since it gives a complete picture of the layout of documents and editing it in the future is much easier.
Method 1
IN Microsoft Word It is possible to apply page rotation only to the selected text fragment. It works and is very easy to do, however this method unpredictable. Firstly, you should already have the text typed, and secondly, no one knows exactly how many landscape pages it will take you.
What am I talking about? — For example, I highlighted part of a note and decided to make it in landscape format... the fragment did not fit and now I have two landscape sheets in the document. You can use it, but it’s not entirely convenient. However, you still need to talk about this; it’s quite suitable for express editing.
Select the text that needs to be placed on a sheet with landscape orientation. Looking for the “Layout” tab (or “Page Layout” - haven’t I bored you with this clarification yet?) and click on the “Page Options” settings.

In the window with formatting options, check the “Landscape” item in the “Orientation” category and mark in the drop-down list that it should be applied only “to the selected text.”

Click “OK” and make sure that the selected piece of text is now located on the landscape page of MS Word - absolutely nothing complicated.

The problem is not only that the text must first be printed and it is not clear how it will be positioned on the page - this option of changing portrait to landscape will add problems to future users into whose hands your document falls
Method 2
Now we’ve reached the point of correctly completing the task—we’re dealing with the sections. Open required document Word and go to the end of the page after which you want to place the landscape sheet.
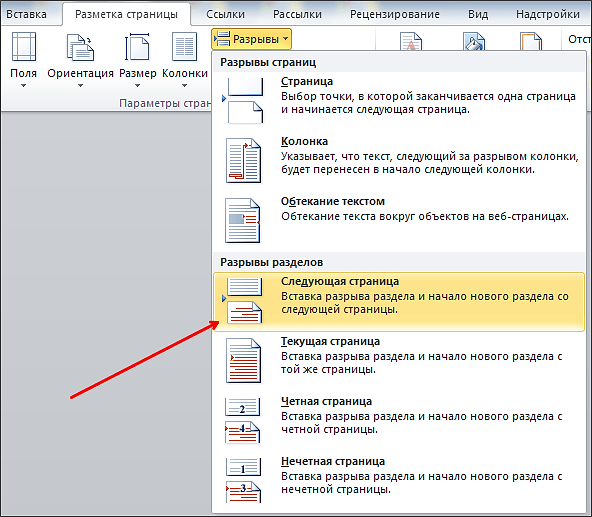
What do we have? — There is a document where you only need to make the second page landscape. To do this, go to the end of the first page and on the “Layout” tab (or "Page Layout") Click Breaks. From the drop-down menu in the Section Breaks category, select Next Page.

Now the most important thing is that we need to see where our partition boundaries are. The "Home" tab has a "Show all characters" button (¶) and sections can now be easily found (highlighted in yellow in the picture below)

Now go directly to the second page, where it starts new section and therefore the orientation change will occur only for this section (the first page will remain untouched). Simply go to the Layout tab and select landscape orientation.

I would like to draw your attention to the fact that your second and all subsequent pages are a single section and all sheets will be landscape. To make book pages appear again after the second page, you just need to add a section break and set your parameters in the new section
As a result, we will have three sections:
- First book - first section
- Second album - second section
- The third album and all subsequent ones - the third section
I hope you understand how it works and will be happy to put this method into practice.
Bottom line
As you can see, there is nothing difficult to make a landscape page in Word. We have discussed the option of how to quickly make all pages of a document landscape or selectively make a couple of sheets. If you have problems creating such pages, be sure to write in the comments, I will try to help you!
It is well known that Word can have both book and landscape sheets. That is, there is a portrait or landscape orientation of document pages. Portrait orientation is usually in A4 size. But what if this size is not enough? This may happen if you need to insert a long table, long graph or image, big size. In this case, knowledge of this will come in handy, since the landscape sheet is much wider than the usual format. In order to select or change the sheet orientation on the toolbar, go to the “page layout” tab. Next, immediately in the page parameters section we find “orientation”. Choose portrait or landscape. That’s it, the sheets of the entire document will take the desired orientation.
Select landscape orientation
But sometimes the question arises, how to make only one landscape sheet? Or maybe you need to make some landscape sheets and some book sheets. What should I do?
Lesson - how to make only one landscape sheet.
First, place the cursor at the beginning of the page that will be landscape and click it. Then we follow the same path: “page layout” tab, “orientation”. But now let’s pay attention in this same “page options” section to the small button at the bottom right. Moving the cursor over it, we will see the “Page Options” dialog box, go into it. There are three tabs here, we need the first “field”, we stay in it. Select landscape orientation and this will be reflected in the sample, then select “apply to the end of the document.” If you select “apply to the entire document”, then again all sheets will become landscape. If you only need one landscape sheet, you need to select “to the end of the document.”

How to make landscape orientation - button at the bottom “page options”
We see that starting from this sheet, all sheets have become landscape. Next, we leave this sheet in landscape orientation. Click the next sheet, from which the portrait orientation should again go, with the cursor at the beginning of the sheet. We go along the same path again, only now we change the landscape orientation to portrait. We are left with one landscape sheet in the middle of the document.
Here in the “page settings” you can select fields for the landscape page.
Basically, that's all there is to it how to make a landscape sheet in Word.
Setting the sheet orientation to landscape is one of the most common tasks that users encounter when working with the Word text editor. In some cases, you need to change the orientation of sheets for the entire document, and in others only for one or a few pages. If you are also faced with a similar problem, then this article will be useful to you. Here you can learn how to make a landscape sheet in Word 2003, 2007, 2010, 2013 and 2016. We will also tell you how to make a landscape sheet for only one page of a document.
If you want to make a landscape sheet in Word 2003, then to do this you need to open the “File” menu and select “Page Setup” there.
This will open the Page Setup window. Here you need to select the “Landscape” sheet orientation and click on the “Ok” button.
This way you can make landscape sheets throughout your Word 2003 document.
How to make a landscape sheet in Word 2007, 2010, 2013 and 2016
Word 2007, as well as more modern versions of this text editor, uses the so-called ribbon interface. This is an interface in which all the tools are distributed into several tabs.
Therefore, if you use a modern version of the Word text editor, namely Word 2007, 2010, 2013 and 2016, then in order to make a landscape sheet you need to perform slightly different operations. To get started, you need to go to the “Page Layout” tab. All the main tools designed to control the appearance of the page are displayed here. Among other things, there is an “Orientation” button, by clicking on which you can choose one of two options: “Portrait” or “Landscape”.

By selecting the “Landscape” option, you will convert all sheets of the Word 2007 (or 2010, 2013, 2016) document to landscape orientation.
How to make a landscape sheet in Word only one page
If you want, it will be a little more complicated than converting the entire document to landscape orientation. After all, this will require dividing the document into sections. Below we will demonstrate how this is done using the ribbon interface of Word 2007, 2010, 2013 and 2016 as an example. But, these instructions will be useful even if you have Word 2003, since the same principle is used there.
So, first you need to enable the display of non-printable characters. This will make it much easier to work with sections.

The next step is to place section breaks. In order to make a landscape sheet in Word on only one page, you need to insert a so-called “Section Break” before this landscape page and after the landscape page.” To do this, place the cursor on the page that comes before the landscape one, go to the “Page Layout” tab, click on the “Breaks” button and select “Next Page”. Next, place the cursor at the end of the page that you want to make landscape, and again set the section break after the next page in the same way.
After that, place the cursor on the page that you want to make landscape and change its orientation to landscape.
If you did everything correctly, then you will receive a landscape sheet of only one page, and not the entire Word document. After this, you can turn off the display of non-printable characters and continue to work with the document as usual.
Page orientation in Microsoft Word is how it is laid out: horizontally or vertically. The last option is also called “Book” and is considered standard, that is, it is the default. So, when we open a new document, the sheets in it are always arranged vertically.
Why do we need a different position of the pages, reminiscent of landscape sheets? People usually learn how to make a landscape orientation for one page in Word before preparing a report, article or presentation. This is convenient, because it is by rotating the sheet that you can fit a large picture, table or diagram on it.
Here is an example when the landscape sheet is at the beginning of the article:
Landscape sheet at the beginning of the documentIt contains a high-resolution image, that is, a large size. Its location is horizontal, so it simply would not fit on a vertical sheet.
How to change the position of pages in Microsoft Word?
To rotate all pages of a document, you need to do the following actions:
- Open the document you need in Word 2016 by left-clicking on the file twice in a row.
- Find the “Layout” tab in the toolbar located at the top and click on it.
Attention! In earlier versions Microsoft programs The Word section is not called “Layout”, but “Page Layout”.
- Click on the second icon called “Orientation” - it is located immediately after the icon called “Margins”.
- In the "Orientation" section, the default is "Portrait". Click the Landscape icon instead.
 Changing the Sheet Orientation
 Everything would be fine, but now all the pages of the document look like sheets from a sketchbook. If you don't need to rotate all sheets, then read on.
How to rotate one page in Microsoft Word?
It often happens that you only need to rotate 1 sheet (for example, at the beginning of a document, in the middle of the text, or at the end to show something voluminous or wide).
To expand one sheet rather than the entire document, do this. Select the text on the page whose orientation you want to change.
To select text, the procedure is as follows:
- place the pointer at the beginning of the line;
- hold down the left mouse button;
- Without releasing the left mouse button, move the cursor (pointer) over the text to the very end of the page.
After selection, do the following:
- At the top of the toolbar, go to the section called “Layout” (or “Page Layout” in older versions of Microsoft Word 2010 and 2013).
- Select “Fields”, and then, at the very bottom of the menu that opens, click on “Custom Fields”.
 Opening the page settings editing window
 - In the window that appears, change the orientation from portrait to landscape. In the "Sample" section there is the word "Apply". Click next to the drop-down list button and select not “To the entire document”, but “To the selected text”. The last action is to click on the “OK” button.
 Setting Page Options
 This way you can select text anywhere else in the document. Changing the page format in a large text document can be applied multiple times.
How to view multiple pages on the screen?
To see what multiple sheets will look like, follow these steps:
- Click the “View” tab on the top toolbar;
- select the mode called “Multiple Pages”.
There is another way:
- find the page scale scale in the lower right corner;
- Click on the slider with the left mouse button and drag it to the left.
The pages will be zoomed out so you can see what multiple sheets look like at once.
 Changing the page scale
 It is possible to complete an article or report with a landscape sheet. This page arrangement can be used for applications with wide ,circuits.
That's all! Now you know how to turn pages. Good luck in job!
Dear reader! You have watched the article to the end.
Have you received an answer to your question? Write a few words in the comments.
If you haven't found the answer, indicate what you were looking for.