The high performance of modern computers has reverse side: increased heat generation from chips installed on the motherboard, video adapter, and even in the power supply. That is why almost every PC is equipped with a fairly powerful cooling system. The most inexpensive, simple and common option is to cool devices using radiators installed directly on the chips and fans that cool them.
But three or more installed fans make quite a lot of noise. You cannot turn off the coolers, as the computer will overheat with all the ensuing troubles. But how then to deal with noise, which becomes stronger over time due to wear and tear of the mechanical part of the fan and production of lubricant? There is only one answer: take control of your computer fans into your own hands. Our publication will discuss how to achieve this.
Ways to solve the problem
Today, all motherboards, chipsets, video adapters and CPU, V mandatory equipped with temperature sensors, thanks to which the temperature of these elements can be monitored using PC hardware or software. By reducing the speed of the coolers, preventing overheating of the processor and the system as a whole, you can effectively combat the noise generated by the fans.
There are several other ways: replace the fans with quieter ones, or upgrade the entire PC cooling system by installing the existing Peltier elements. You can purchase expensive liquid nitrogen refrigeration by investing a fairly large amount of your hard-earned money into this enterprise. Next, we will talk about the simplest and cheapest way - controlling the speed of the processor cooler and other elements of your PC.
There are several options to control your PC's fans:
- Use special software.
- Adjust fan speed from BIOS.
- Use a device under the incomprehensible name “Reobas”.
- Reduce the supply voltage of coolers artificially.
Which fans are adjustable?
Before you start choosing a specific method for controlling fans, you should know that you can control the rotation of devices with a 2-wire connection only by changing the power supply, but you cannot obtain information about its rotation speed.
Three-pin coolers have feedback to the control board. But to solve this issue, it is necessary to turn on the device in order to obtain reliable data on the engine speed. Only some controller models can do this.
In 4-wire fans, in addition to the power, feedback and ground wires, there is a PWM input, which makes it possible to linearly control the fan power, which allows you to change the fan speed on the processor, setting up to 10% of the maximum.
Setting the fan speed from the BIOS
- Restart your PC and press DEL to enter Bios.
- Find the item responsible for setting the fan parameters. On most motherboards this is the Advanced Chipset item. The Always Fan function must be Enabled.
- Select 50-70% for each available cooler and press Esk.
- Save the settings by highlighting Save & Exit Setup, then click Ok.
- After rebooting, the noise from the coolers should disappear.
After changing the settings, monitor the temperature of the processor and motherboard.
Setting fan rotation using third-party software
A huge amount of specialized software is dedicated to all those who did not find the desired option in Bios. In this publication I would like to review the completely free Speed Fan utility. This computer fan control program allows you to very quickly reduce the speed of some coolers and is guaranteed to rid you of annoying noise.

Important! This utility, like most similar ones, is useless for some motherboards. You should try another program.

Mechanical control of PC fans
For mechanical control, you can use a device called Reobas, which was mentioned at the beginning of the article. This device is mounted in the front panel of the PC, in the CDRom compartment. It has one or more manual controls on its panel, with the help of which the processor cooler and other elements equipped with fans are controlled. . 
This device can be connected directly to a PCI slot. An additional connection to the FAN connector of the motherboard will make it possible to control the rotation speed of the coolers of their operating system.
It should be understood that Reobas is a rather expensive toy, so before purchasing this device, try using software, which is faster to install and is distributed absolutely free to developers.
There are situations when the preset fan speed does not cool the processor of a laptop or personal computer well enough.
To configure the fan parameters there is different ways: technical and software. Under the operating room Windows system there is special software for this. There is no similar convenient tool for Linux.
The same article will discuss the option of settings through the BIOS.
BIOS Setup has parameters for different cooler operating modes. Let us immediately note that at various motherboards Variations in function names are possible.
1. CHA Fan Duty Cycle allows you to set the fan speed by specifying different percentages from 60 to 100%.
2. Function Chassis Fan Ratio also used to configure the operation of fans when the temperature inside system unit a specific value is set. It is possible to set automatic speed calculation, or select a percentage as a fraction of the maximum possible value.
3. Parameter Q-Fan Control makes it possible to adjust the cooler speed in conjunction with the temperature regime for the chipset and processor of the ASUS motherboard family. There are two values for this function: Enabled, Disabled. If in the second case the cooler must operate at maximum rotation, then when you select the first value for setting, you are given the opportunity to set additional parameters and modes.
If Q-Fan Control is enabled, additional options will be available on individual boards:
CPU Fan Profile affects the volume of the cooler and comes in three types, the choice of which depends on the degree of load - Silent, Optimal and Performance;
CPU Fan Ratio requires you to specify the temperature threshold for the processor;
CPU Target Temperature– temperature limit, above which the cooler speed will increase.

4. Parameter CPU Quiet Fan present on motherboards manufactured by ASRock. It also has two modes: on and off. When you select Enabled, you can set the values of additional options:
Target Fan Speed– the function provides three speed modes – Slow, Middle, Fast – for temperatures below critical;
Target CPU Temperature sets the temperature for which the cooler speed drops (45-65⁰C);
Tolerance– serves to set the error of the temperature settings of the previous parameter.

5. For ECS or Gigabyte type motherboards, the speed setting parameter is CPU Smart FAN Control. It assumes two possible modes: when the fan runs as fast as possible, and when the speed is adjusted by the system.

When you enable the second mode, additional functions are available:
CPU SmartFAN Idle Temp sets the lower temperature limit in percent;
CPU SmartFAN Full 1-Speed– critical temperature threshold – if it is exceeded, the cooler switches to maximum rotation mode.
6. On boards of the Biostar family, the parameter for setting the rotation speed is CPU Fan Control, the set of settings of which is divided into automatic adjustment 1Smart and operation at the maximum possible speed Always On.
7. CPU Smart Fan Target you will find on MSI boards. When set to Disabled, the speed will be maximum. The second parameter value allows you to set the temperature in the range from 40 to 70⁰C to enable automatic speed adjustment.
The processor makes a lot of noise - a problem for most people who use system units (commonly known as a processor out of ignorance). To be more precise, then the fans are noisy, which cool the system from overheating.
There are a variety of reasons why a fan may make noise. Most often, they need to be thoroughly cleaned of dust (including the cooling radiator) and lubricated. But there is one more thing that caused noise at my workplace - the rotation speed of the cooler.
Coolers are divided into two types: with speed control function software and without. Fortunately, I have a Sumerian cooler that supported rotation control using software.
Everything could be configured perfectly in the BIOS, which itself regulated the rotation of the cooler. But there was one thing. The principle of adjusting the cooler with the BIOS is that you set the minimum rotation speed that the BIOS adheres to. And as the temperature increases, the rotation speed of the cooler increases in order to lower it.
And since I work in the range of 45-50 degrees, the system thinks that it is overheating and always spins the fan, which means this is not an option. What was needed was manual control of the cooler rotation speed without any resistors, etc. A couple of searches on the Internet and found program for monitoring cooler rotation speedSpeedFan.
Fortunately, the program turned out to be free and compatible with Windows XP and Windows 7 (x32-64). I also ran it on Ubuntu Linux via Vine, but the program refused to work.
Setting up SpeedFan. Increase and decrease cooler speed
To get started, go to the download page and download the latest version of the program. Now that the program is installed, it can load in about a minute (sometimes much faster). The first launch of the program reads information about the hardware and coolers that are installed. Here's how it's configured for me:
- all hints are disabled
- the program starts with Windows
- launching the program in the tray
- When “closing the program” it is minimized to tray
The program has a lot of settings and since the interface is in Russian, it’s easy to customize it for yourself. Initially, the program is installed in English; to install the Russian language, click on the configuration button:
In the window that opens, find the “Options” tab and in it select the language you need and click Ok:

Now the program works in Russian. Hints are turned off at the moment they are shown. They hinder more than they help. Therefore in Once again, when you see the prompt, check the box next to “Don’t show again.”
In order to the program was loaded withWindows, open Start and select the Startup folder. You need to copy the shortcut to SpeedFan into this folder. This is the simplest option.
If you want the program to load invisibly (in the tray), then go back to the settings tab and check the box next to “run minimized”.
In the same tab, check the “minimize when closing” checkbox and when you click on the cross in Windows, the program will not close, but will be minimized to tray. I think this is very convenient, since opening and closing the program every time is inconvenient.
The coolers themselves are determined in the main program window. These windows with percentages are the rotation speed regulators. I have three coolers in my system, so three are displayed. By changing the power percentage, the speed will decrease or increase. Accordingly, 0% fans stop, 100% fans spin at full power.
Sometimes the hum from the system unit does not allow you to enjoy the silence or concentrate. In this article I will tell you how to regulate the speed of coolers using special program for Windows XP/7/8/10, and at the end I will show the whole process in more detail in the video.
Why are fans noisy and what are the ways to fix it?
With the exception of special fanless modifications, each computer has: in the power supply, on the processor, video card, in the case, and others. And everyone makes noise in their own way, and that's bad news. Many people are simply accustomed to the noise of their system unit and believe that this is how it should be. Maybe it should, but it doesn't have to! In 99% of cases, computer noise can be reduced by 10%-90%, which is good news.
As you already understand, quietness is achieved by reducing the noise from coolers. This is possible by using coolers that are quieter by nature, or by reducing the speed of existing ones. Naturally, you can reduce the speed to non-threatening levels! This article will discuss exactly this method. Programs for will help reduce noise even further.
So, to reduce the cooler rotation speed, you can use one of the options:
- Program for controlling the rotation speed of coolers
- “Intelligent” speed control system built into the BIOS
- Utilities from the manufacturer of the motherboard, laptop or video card
- Use a special device - reobass
- Artificially lower the fan supply voltage
Those who have normal control from the BIOS may not read further. But often the BIOS only superficially regulates the speed, without lowering it to silent, and at the same time still acceptable, values. Utilities from the manufacturer, sometimes the only way impact on fans because third-party programs often do not work on unusual motherboards and laptops. Let's look at the most optimal - the first method.
SpeedFan cooler management software
It is multifunctional and completely free program. I’ll probably upset you a little right away by saying that this program does not work on all laptops, but you can try, and it will not regulate the speed of those fans that the motherboard cannot control from the BIOS. For example, from my BIOS I can enable the SmartFan cooler control feature for the CPU only. Although you can look at the current revolutions for two more.
Attention: before using the program, disable cooler management from the BIOS!
Otherwise, the following situation may occur. When the SpeedFan program is loaded, the current speed is read and taken as the maximum. Accordingly, if by this time the BIOS does not spin the fan to maximum speed, then the program will not be able to do this.
It happened to me once that when the program was loading, the cooler on the processor was spinning at a speed of 1100 rpm, and SpeedFan could not install higher value. As a result, the processor heated up to 86 degrees! I noticed this by accident when, at a moment of heavy load, I did not hear any noise from the fan. Fortunately, nothing burned, but the computer could
Launch and appearance of the program
Download and install the application from the official website.
When you first start it, a regular window will appear offering help on the program’s functions. You can check the box so that it does not appear again and close it. Next, SpeedFan reads the parameters of the microcircuits on the motherboard and the values of the sensors. A sign of successful completion will be a list with the current values of fan speeds and component temperatures. If the fans are not detected, then the program cannot help you. Immediately go to “Configure -> Options” and change the language to “Russian”.

As you can see, the processor load and information from voltage sensors are also shown here.
Block “1” contains a list of detected cooler rotation speed sensors with names Fan1, Fan2..., and their number may be greater than it actually is (as in the picture). Pay attention to the values, for example, Fan2 and the second Fan1 have real indicators of 2837 and 3358 RPM (revolutions per minute), and the rest are zero or with garbage (in the picture 12 RPM is garbage). We'll remove the extra ones later.
Block “2” shows detected temperature sensors. GPU- this is a graphics chipset, HD0 – HDD, CPU– the central processor (instead of the CPU in the Temp3 picture), and the rest is garbage (cannot be 17 or 127 degrees). This is the drawback of the program, that you need to guess where everything is (but then we ourselves will rename the sensors as needed). True, you can download well-known configurations on the site, but the procedure is not simple and is complicated by the English language.
If it is not clear which parameter is responsible for what, then you can look at the values in some other program to determine the parameters of the computer and sensors, for example, and compare with those determined by the SpeedFan program in order to know exactly where what speed and temperature readings are (in the video under the article everything I'll show you).
And in block “3” we have speed adjustments Speed01, Speed02..., with which you can set the rotation speed as a percentage (can be shown as Pwm1, Pwm2..., see the video for more details). For now, we need to determine which Speed01-06 affects which FanX. To do this, change the values of each from 100% to 80-50% and see if the speed of any Fan has changed. We remember which Speed influenced which Fan.
I repeat that not all fans will be regulated, but only those that the motherboard can control from the BIOS.
Setting up SpeedFan
Now we get to the settings. Click the “Configuration” button and first of all, let’s call all the sensors with clear names. Using my example, I will programmatically control the processor cooler.
On the “Temperatures” tab, we find the processor temperature sensor defined in the previous step (I have Temp3) and click on it first once, and then a second later again - now you can enter any name, for example “CPU Temp”. In the settings below, enter the desired temperature that the program will maintain with the minimum possible cooler rotation speed, and the alarm temperature at which the maximum speed is activated.
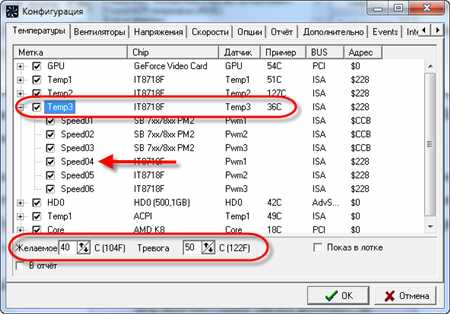
I set it to 55 and 65 degrees respectively, but this is different for everyone, experiment. At a very low set temperature, the fans will always spin at maximum speed.
Next, expand the branch and uncheck all the boxes, except for the Speed0X one, which regulates the FanX of the processor (we have already defined this earlier). In my example it is Speed04. And we also uncheck all other temperatures that we do not want to see in the main program window.
On the fans tab, we simply find the fans we need, name them as we want, and turn off the unnecessary ones.

- Minimum – the minimum percentage of maximum speed that the program can set
- Maximum – respectively, the maximum percentage.
For me the minimum is 55%, and the maximum is 80%. It’s okay that the program will not be able to set the value to 100%, because on the “Temperature” tab, we set an alarm threshold value at which the speed will be forced to 100%. Also, for automatic adjustment, do not forget to check the “Auto change” box.

In principle, that's all. Now go to the main SpeedFan window and check the box “Auto fan speed” and enjoy the automatic adjustment of the rotation speed. You won’t be able to optimally configure it for yourself the first time, experiment and leave the appropriate parameters, it’s worth it!
Extra options
The SpeedFan program has a bunch of other functions and parameters, but I won’t delve into them, because... this is the topic of a separate article. Let's check a few more necessary boxes on the “Configuration -> Options” tab
- Launch minimized– so that SpeedFan starts immediately in minimized form. If you do not install it, then when Windows starts, the main program window will hang on the desktop. If the program does not start with Windows, then simply add its shortcut to startup.
- Static icon– I prefer to set the system tray to display just the program icon instead of numbers
- Collapse when closing– set so that when you click on the “cross” the program does not close, but is minimized to the system tray (near the clock)
- Full fan speed at exit– if not set, then after exiting the program the cooler speed will remain in the state it was in at the time of closing. And since there will be no one else to manage them, the computer may overheat.
And now a video with detailed setup of SpeedFan. Note: There was a slight glitch in the video. After manually adjusting the processor fan Fan1, its value did not return to 3400 RPM, but for some reason remained at 2200 RPM. After restarting the program everything returned to normal. IN latest versions SpeedFan did not have this on my computer.
SpeedFan 4.52 is a good set of functions for monitoring and managing some PC performance. In particular, this software product allows you to monitor the temperature indicators of the processor, power supply, system unit, hard drive etc., subject to the presence of appropriate tracking sensors on the computer components. However, the main function of the SpeedFan program is to regulate the rotation speed of coolers depending on the corresponding temperatures, which allows you to reduce power consumption and background noise during low use of computer resources. In this case, adjustment is possible both automatically and manually. Another feature of SpeedFan is the ability to automatically regulate the frequencies (clocks) of the internal processor bus and the PCI bus (but this should be considered as a bonus).

Key features of the SpeedFan program:
– Fan speed control.– Implemented support for SMART technology.
– The user is given the opportunity, at his own discretion, to specify the temperature and voltage limits. In this case, you can set options for the program to act when these limits are reached: launch external program, displaying a message, sound warning, sending a message via e-mail.
– Changing the system bus frequencies on motherboards equipped with frequency generators supported by the program.
– Statistics of the parameters taken and recording them in the log.
– Plotting graphs of changes in temperatures, voltages and fan speeds.
– Support for working with HDDs on EIDE, SATA and SCSI interfaces.
– Conducts a web analysis of the status of hard drives using data from S.M.A.R.T. using the online database.
Russification of the SpeedFan program:
1. Install the SpeedFan program and run it.2. In the main window (Readings), click on the Configure button, select the Options tab, enter the selection list languages Language and select Russian.
3. Now SpeedFan will be in Russian!