I welcome everyone who wanders through Word 2016 in search of information on the landscape orientation of pages (one, several or all) in a document. Today we will discuss this issue with you, as before in previous “Cribs,” in detail, with all the details. Anyone who reads this article, and even more so watches the video posted below, will no longer have any confusion about changing the format of Word pages. Shall we get started?
How to make a landscape page in Word 2016 for the entire document
By default all documents text editor Word 2016, as well as all previous versions, are presented in book format. But, if you have an idea to make your creation in the form of an album, then it is very simple to implement it.

All operations are carried out on the tab panel " Layout" Go to the first section on the left " Page Options", click on the button " Orientation" In the drop-down menu, select landscape design for the document. The task is completed.
But let’s also see what else Word offers us in “ Page settings»:
- by clicking on the “Margins” button, you can select indents from six templates or set them as desired;
- button " Size» will allow you to choose the future printing format in both portrait and landscape versions;
- button " Columns» you can split the text into 2, 3, 4, 5 columns, setting their width at your discretion;
- about the button Gap“We already talked in the Cheat Sheets” on headers and footers and numbering; In the future, I plan to write a separate post about all the capabilities of this team.
And it is also necessary to note that if you change the orientation of the pages of the entire document, the format will change accordingly title pages. You can always choose the appropriate one in the “ Insert", section " Pages».
And now, dear Word researchers, let's look at a more interesting problem.
How to make several pages landscape in Word
That is, friends, you understand that we will not expand the entire document into landscape format, but only its individual pages. Those of you who carefully read the “Cribs” about page numbering and headers and footers, by analogy with the material given there, may decide that we will again begin to divide the document into technical sections. And they will be wrong! Hurray, hurray! In this case, Word will do it for us. So it's boring preparatory work There is no need to separate selected pages into separate sections.
So what needs to be done? Everything is very simple this time. In order to make only a few pages landscape in Word 2016, we take 7 simple steps:
- select the text intended for landscape pages;
- open the tab panel " Layout»;
- Left-click on the arrow in the lower right corner of the “ Page Options»;
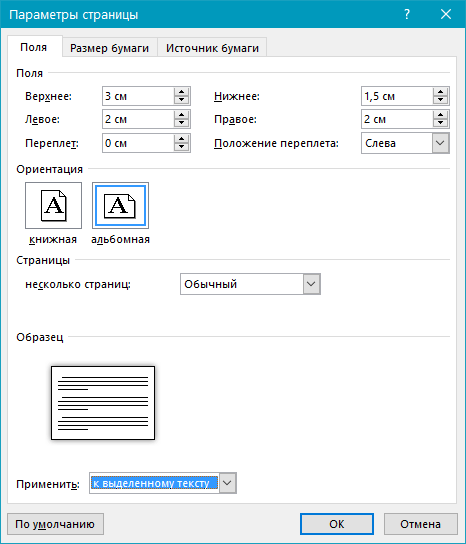
- In the window that opens, select the tab “ Fields»;
- note landscape orientation;
- in the line " apply» select « to selected text»;
- click " OK».

It is well known that Word can have both book and landscape sheets. That is, there is a portrait or landscape orientation of document pages. Portrait orientation is usually in A4 size. But what if this size is not enough? This may happen if you need to insert a long table, long graph or image, large size. In this case, knowledge of that will be useful, since album sheet much wider than the usual format. In order to select or change the sheet orientation on the toolbar, go to the “page layout” tab. Next, immediately in the page parameters section we find “orientation”. Choose portrait or landscape. That’s it, the sheets of the entire document will take the desired orientation.
Select landscape orientation
But sometimes the question arises, how to make only one landscape sheet? Or maybe you need to make some landscape sheets and some book sheets. What should I do?
Lesson - how to make only one landscape sheet.
First, place the cursor at the beginning of the page that will be landscape and click it. Then we follow the same path: “page layout” tab, “orientation”. But now let’s pay attention in this same “page options” section to the small button at the bottom right. Moving the cursor over it, we will see the “Page Options” dialog box, go into it. There are three tabs here, we need the first “field”, we stay in it. Select landscape orientation and this will be reflected in the sample, then select “apply to the end of the document.” If you select “apply to the entire document”, then again all sheets will become landscape. If you only need one landscape sheet, you need to select “to the end of the document.”

How to make landscape orientation - button at the bottom “page options”
We see that starting from this sheet, all sheets have become landscape. Next, we leave this sheet in landscape orientation. Click the next sheet, from which the portrait orientation should again go, with the cursor at the beginning of the sheet. We go along the same path again, only now we change the landscape orientation to portrait. We are left with one landscape sheet in the middle of the document.
Here in the “page options” you can select fields for the landscape page.
Basically that's all there is to it how to make a landscape sheet in Word.
It happens that when creating a document in Word, you need to change the position of all sheets. This is not difficult to do. Use the commands below. But keep in mind that they are different for each version of the text editor. Instructions are also provided for those who want to make only one page in the desired position. We recommend that you update your office software to make the interface easier to navigate.
How to make a landscape sheet in Word 2016?
It is better to start with this version because it is now installed on most computers. There are two options for solving this problem.Method number 1. Here's what to do:
After these manipulations, you will get a horizontally located sheet.
To keep the rest of the pages vertical, follow the same steps. Just click the “Portrait” button in the last paragraph, and you will get one horizontal sheet on which you write the desired text, and the rest are vertical. So, in a document you can make the required number of landscape sheets throughout the document anywhere.
Method No. 2. The second method is simpler. Word will insert all page breaks automatically. Do the following: 
After these operations, you will see that only the marked text is located on the horizontal page.
How to make one sheet in modern versions of Word 2007-2013?
The above methods are valid for these programs as well, but with one exception: you won't find the Layout tab. It is otherwise called “Page Layout”. Otherwise, all actions performed are identical.How to make a landscape sheet in the old Word 2003?
Although this program has almost become obsolete, many still use an “old” text editor “because they’re used to it,” an “ancient” computer with Windows XP, or simply no new licensed software(applies to organizations). There are plenty of reasons.The sequence of actions is slightly different due to the difference in the application interface. Follow these steps:
 This is how easy it is to solve the problem. Use the method you like in any version of Word. All actions are completed quickly. Literally in a few seconds.
In Microsoft Word, as in many other programs, there are two types of sheet orientation - portrait (set by default) and landscape, which can be set in the settings. Which type of orientation you may need in the first place depends on the job you are doing.
Often, work with documents is carried out in a vertical orientation, but sometimes the sheet needs to be rotated. Below we will talk about how to make a page horizontal in Word.
Note: Changing the page orientation also entails changing the collection of finished pages and covers.
Important: The instructions below apply to all versions of the Microsoft product. Using it, you can make a landscape page in Word 2003, 2007, 2010, 2013. We use as an example latest version— Microsoft Office 2016. The steps described below may differ visually, the names of items and sections of the program may also be slightly different, but their semantic content is identical in all cases.
1. Having opened the document in which you want to change the page orientation, go to the tab "Layout" or "Page Layout" in older versions of Word.

2. In the first group ( "Page Options") on the toolbar, find the item "Orientation" and expand it.

3. In a small menu that will appear in front of you, you can select the orientation. Click "Landscape".
4. The page or pages, depending on how many of them you have in the document, will change its orientation from vertical (portrait) to horizontal (landscape).

How to combine landscape and portrait orientation in one document
Sometimes it happens that in one text document it is necessary to arrange both vertical and horizontal pages. Combining the two types of sheet orientation is not as difficult as it might seem.
1. Select the page(s) or paragraph (piece of text) whose orientation you want to change.
Note: If you need to make landscape (or portrait) orientation for a portion of text on a portrait (or landscape) page, the selected piece of text will be placed on a separate page, and the text that is located next to it (before and/or after) will be placed on surrounding pages .
2. In masonry "Layout", chapter "Page Options" click on the button "Fields".

3. Select "Custom Fields".

4. In the window that opens, in the tab "Fields" Select the document orientation you require (landscape).

5. Below, at point "Apply" from the drop down menu select "To selected text" and press "OK".
6. As you can see, the two adjacent pages have different orientations - one is horizontal, the other is vertical.

Note: A section break will automatically be added before a piece of text whose orientation you changed. If the document is already divided into sections, you can click anywhere in the required section, or select several, after which you can change the orientation of only the sections you have selected.
That's all, now you know how to flip a sheet horizontally in Word 2007, 2010 or 2016, as well as in any other versions of this product, or, to put it correctly, make landscape orientation instead of portrait or next to it. Now you know a little more, we wish you productive work and effective learning.
When creating multi-page documents in the Word text editor, a number of users may be faced with the need to present a number of document pages in portrait orientation, and another row in landscape orientation (especially if this concerns materials that include various charts, graphs, and so on). In this case, an attempt to change the orientation of the desired page completely changes the orientation of all pages in the document, which is not at all necessary for the user. In this article I will tell you how to make one page portrait and another landscape in Word, and what methods exist for this.
How to make one page portrait and another landscape in Word - methods
If you need to create one portrait page in Word and another landscape page, then I recommend using a number of methods, which I will outline below. At the same time, I note that these methods work with versions of MS Word 2007 and higher, and if someone has older versions of a text editor, then I recommend abandoning the mastodon programs and installing a more modern version of MS Word. So, let's move on to listing the necessary tools.

Method 1. Select the desired text
So how to make landscape orientation on one page in Word? If you have several pages of a document in portrait format, but you want to present some text from that document in landscape format, then follow these steps:


The required text will be transferred to a separate page in landscape format, and you will receive a visual example of how to make one page portrait and another landscape in Word. If you need to reduce the font on your computer, the instructions have been described by me.
Method 2. Page markup
An alternative to the first method is page-by-page markup of the document you need. So, if you were unable to make one page landscape and the other portrait in Word using the first method, then do the following.
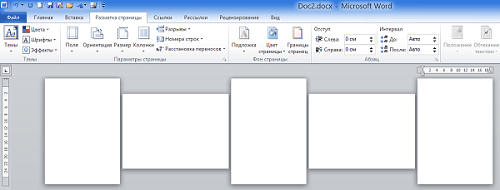
Let's say you have five pages of text in book layout, and you need to make the second and fourth sheets in landscape format. Proceed as follows:

Starting from the second page, all pages became landscape.

- Now we need to make the third page a book page in Word. Place the cursor on the upper left edge of the third page, again enter the page settings, but there select “Landscape” and “To the end of the document”.
- The third and subsequent pages will become landscape. Now we go again to the fourth page and use the same algorithm to make it book-ready.
- Then we move to the fifth and make it landscape. I think the essence of the actions is clear to the reader.
- As a result, we get this result.
How to make one page landscape in a Word document and another portrait page [video]
You can see how these methods visually look in the video below.
The methods I have listed will help the reader answer the question “How to make one page portrait and the other landscape in Word.” In most cases, the first method is sufficient, which effectively places the text you need on the page in the orientation you need. If you want to mark up your document in advance, then create required quantity pages (tab “Insert” - “Blank Page”), and then use method No. 2, and your idea will be effectively implemented.