How to draw beautiful drawing for Easter with a pencil or paints? What plot to choose for a holiday picture? On the eve of the bright celebration, these questions are beginning to be asked by parents whose children have been tasked with preparing such work for kindergarten or school with their own hands. The answer here is very simple - any thematic images associated with the Resurrection of Christ are suitable, for example, Easter eggs, still lifes with Easter cakes and genre landscapes with holiday paraphernalia. Our detailed master classes with step-by-step photos will tell you how to draw them on paper for children.
A simple drawing for Easter for children - master class “Easter egg” with step-by-step photos
An egg with a bright decorative pattern is one of the obligatory Easter attributes. This simple and accessible guide will tell you how to draw it correctly. children's master class With step by step photos. The work is not difficult, but requires a certain accuracy, especially at the stage of decorating the sketch with felt-tip pens.

Necessary materials for a simple children's drawing for Easter
- A sheet of white medium-weight A4 paper
- simple pencil B2
- eraser
- ruler
- set of colored markers
Step-by-step instructions on how to draw an Easter egg step by step

Beautiful do-it-yourself drawing for Easter in kindergarten

IN kindergarten For Easter, it is appropriate for the children to prepare a beautiful thematic drawing containing the most basic elements of the holiday - Easter cake with a candle and colored eggs. All this can be depicted against the background of a spring landscape and a flowering tree branch, personifying the awakening of nature towards a bright triumph.
Necessary materials for a beautiful drawing for Easter
- white landscape paper
- simple pencil
- eraser
- watercolor paints
- oil pastel
- brush
Step-by-step instructions for do-it-yourself drawing for kindergarten in honor of Easter
- Divide a sheet of white landscape paper approximately in half, drawing a straight horizontal line down the middle by hand.
- In the center of the sheet a little closer to right side make a sketch of the Easter cake, and on both sides of its base draw one Easter egg.
- Yellow watercolor paint process the bottom part of the sheet, but not completely painting over the paper, but making wide lines like sun rays. Leave white space between them.
- Paint the top of the sheet with light blue paint, symbolizing the spring sky.
- When the yellow rays below have dried, put several dots of blue paint in the white space between them and draw a third Easter egg in the lower left corner with the same color.
- Paint the base of the Easter cake with brown paint, and paint on top with white paint sugar icing, traditional for decorating Easter baked goods.
- Tint the eggs at the base of the cake yellow and red. Leave the work to allow the watercolor to dry thoroughly.
- On a dry watercolor surface in the upper left part of the composition, draw a branch trunk with a thin brush, and then add white flower buds with broad strokes.
- Draw a candle with a burning flame on the Easter cake and set aside the work again until it dries completely.
- The last step is to clarify the contours of the drawing with oil pastels of a dark shade and use the same color to add volume to the cake and emphasize the column of the candle. Use light strokes to outline the petals on the tree branch and add perspective to the horizon line with a couple of sweeping movements.
- Use contrasting colors to write the letters “XB” on the eggs near the Easter cake.
Drawing for Easter for school in pencil step by step - master class with photos

This master class with step-by-step photos describes in detail how to draw a classic Easter pattern with your own hands for school - Easter cake and eggs on a wicker plate. The work fully reflects the spirit of the holiday, and the blossoming tree branch depicted on the left side of the composition symbolizes all living things waking up to meet spring and the Resurrection of Christ.
Necessary materials for pencil drawing for school for Easter
- A4 sheet of paper
- simple pencil 2B
- simple pencil HB
- eraser
Step-by-step instructions for step-by-step pencil drawing for schoolchildren on the occasion of Easter

Do-it-yourself painting on the theme of Easter - master class for children

On the theme of Easter, with your own hands you can draw with your children not only a classic still life with Easter cake and eggs, but also a thematic genre landscape, described in the master class below. Of course, kindergarteners cannot cope with such work, but schoolchildren can special problems will not cause. The teacher may have to help the children with drawing the figures of the main characters. As for everything else, the students can definitely handle it themselves.
Necessary materials for creating your own Easter painting with paints
- paper
- simple pencil
- eraser
- paint set
- brush
Step-by-step instructions for a master class for painting for Easter with paints
- Make a preliminary sketch on a landscape sheet. Using a simple pencil, conditionally divide the entire field into two parts - one smaller (this is the sky) and the second larger (this will be the earth with the location of the main characters of the composition).
- Draw a high hill on the conventional horizon line, and sketch the turrets of the temple on top. Nearby, with light rounded movements, depict lush vegetation in the form of shrubs with a lush crown.
- In the foreground, draw the figure of a girl who sees a boy lying next to her on the grass. In the girl’s hands, draw a long “corner” die along which she rolls colored Easter eggs.
- When the sketch is ready, paint the work. For the sky, choose the most delicate blue tone, and make the grass light green. The crowns of the bushes become darker and more saturated green. Leave the picture until completely dry, and then start painting small details.
- Use contrasting colors to tint the clothes of the main characters in the composition. Using a rich blue color, draw clouds in the sky - one large one on the left side of the landscape and another slightly smaller one in the upper right corner of the picture. Just below the second cloud, use a thin brush to depict a school of flying birds.
- Use bright colors to draw Easter eggs lying in front of the children.
- Paint the domes on the temple with yellow paint, and make the turrets themselves very light, almost white with a delicate pink tint.
- Give the image perspective and draw with light strokes the branches and trunks of trees in the background.
- Draw flowering herbs in the foreground of the clearing, and a collected bouquet next to the girl.
- Draw a path up the hill to the temple using thin dark lines. Leave the painting until completely dry, and then use it to decorate the room or submit it to a competition dedicated to Easter.
Easter is one of the brightest, joy-filled holidays. Having understood how to draw Easter, you can create a picturesque postcard on your own, which will be an excellent gift for loved ones on this occasion. For example, you can learn how to draw Easter with eggs, because eggs are one of the most striking attributes of this spring holiday. Of course, you need to draw not ordinary eggs, but painted ones, both plain and with all sorts of patterns, sometimes very intricate ones.
Before you draw Easter you need to prepare:
1). Multi-colored pencils;
2). Paper;
3). Pencil;
4). Liner;
5). Eraser.
The easiest way to learn how to draw Easter with a pencil is to do it step by step:
1. First, with light strokes made in pencil, outline the outlines of the main objects - eggs, Easter cake and vase;

2. Draw the jug. Draw the willow branches that are in it;

3. Draw the eggs, depicting various patterns on them. Draw an outline of frosting at the bottom of the cake;

4. Draw top part Easter cake Draw a lit candle. Draw a checkered tablecloth;

5. Having understood how to draw Easter step by step with a pencil, you can move on to the next stage - outlining the sketch with a liner;

6. Erase the pencil image with an eraser;

7. Color the Easter cake in brown tones. Shade its glaze with lilac and blue tones. Color the sprinkles in different shades. Use red, yellow and orange pencils to color the candle;

8. Color the eggs, choosing the brightest and most saturated colors;

9. Color the willow branches in brown tones, and shade its heads with pencils in gray and yellow tones;

10. Shade the main part of the jug with brown. Color in the pattern on this jug with pencils in yellow and soft pink shades;

11. Paint the tablecloth in blue and light green tones.

The Easter still life drawing is ready! Now you yourself know how to draw Easter step by step, which means you can independently create a picture with a similar plot. To color such a picture, it is not at all necessary to use multi-colored pencils. Paint, such as gouache, which is distinguished by bright and rich shades, is also perfect for this purpose. And in order to make the Easter still life more delicate and airy, it is recommended, on the contrary, to use watercolor, which many artists love for its translucent shades and economical consumption.

Happy Easter - the largest Orthodox holiday, a time of triumph of light over darkness, a day of hope and joy. Easter colors always so bright and rich! Easter has many integral attributes, such as Easter cake, colored eggs, willow branches.
In this art and craft competition, you can paint a traditional Easter still life or draw on the meaning and deep roots of this holiday.
Works are judged in the following categories: drawing, crafts, photography.
The works are evaluated by a professional jury. The work file must be uploaded before last day acceptance of work.
Work requirements
- The participant of the competition performs the work independently.
- Nomination: drawing. The work can be done in any way available to the author, both on paper (pencils, paints, etc.) and using a graphic editor (Paint, PhotoShop, etc.).
- Nomination: craft. The work can be made from a variety of materials.
- Nomination: photo. A participant can act as a photographer, author of an idea or a photo model. The work of professional photographers (wedding, staged photo sessions, etc.) is not allowed in the competition. Works containing images of people in underwear, including swimsuits, are not allowed for publication.
- Only works in in electronic format in JPEG format (photos of crafts or drawings, scanned copies of drawings, photographs).
- Image width and height from 800px to 2000px.
- The file size should not exceed 15 MB.
- The work must correspond to the theme of the competition.
Summarizing procedure
- Participants who scored the maximum number of points ( 20 points), take 1st place.
- Participants who scored at least 90% of maximum quantity points ( 18 - 19 points), take 2nd place.
- Participants who scored at least 80% of the maximum points ( 16 - 17 points), take 3rd place.
Diplomas and certificates
Diplomas and certificates in electronic form are available after summing up in the section my diplomas.
All documents in electronic format are provided free of charge.
 | |
Theme: Easter colors
Participant diploma all event participants receive. The document is sent to email user within 1 hour after downloading the work.
Winner diploma are received by participants who take 1-3 prizes.
Certificate of the curator who prepared the participant(s) each teacher whose students took part in the event receives. The document is sent to the user's email within 1 hour after the work is uploaded.
Certificate of the curator who prepared the winner(s) is awarded to the teacher whose students took 1-3 prizes in the event.
Gratitude receives a teacher whose at least three students took 1-3 prizes in the event.
Gratitude educational institution awarded for training ten winners in one event.
Results of the event
You can view the evaluations of the work in your applications.
Diplomas and certificates in electronic form are available in the section
Simple ways to draw pictures for Easter.
Bright, festive Easter days evoke an extraordinary state of enthusiastic feelings and a sublime feeling of grace. It is impossible to explain this in simple human language. For this purpose, there are corresponding holiday rituals that further emphasize the grandeur and solemnity of this day.
Do-it-yourself drawings of the appropriate theme will help you congratulate you on a bright Easter day and convey true, warm wishes along with a piece of your soul.
What to draw for Easter with children?
This celebration is associated with delicious Easter cakes, bright eggs and green willow.
Drawings with children should be not difficult, but interesting.
Painted egg the most important attribute of Easter.
You can even draw it together with your parents. 3 year old baby.
Drawing for Easter with a baby
An equally important symbol of the holiday is Easter cake.
You can try to depict a very simple option with older children.


 Candle and Easter drawn by children with parents
 More difficult option, with which Easter is integrally connected - temple or church. This option will take a lot of time and will require certain skills and patience.
 Easter symbol in an image made by a more experienced little master with mom or dad
 In addition, you can draw:
 Simple still life in gouache
  Good bunny with paint
  Simple Easter and eggs using paints
 Video: Drawing Easter: Easter cake, eggs
How to draw a picture for Easter step by step and easily with a pencil for beginners and children?
The first steps of drawing should begin from the most basic details.
Let's choose as an example a simple basket with bright eggs.
 Simple Easter Drawing for Beginners
 Let's prepare for work:
- Pencils and colored pencils
- A4 sheet of paper
- Eraser
- Black marker
Let's move on to creativity:
- Visually divide a sheet of paper in half
- In the upper part we make the contours of the basket handle - a rectangle with soft corners

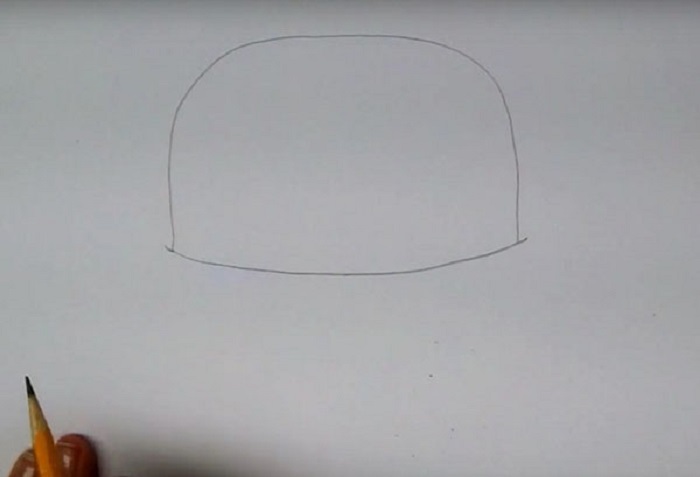
- Add a sketch of the base of the product. This will be a figure similar to the previous one, but a little wider

- We decorate the weaving of the basket with vertical and horizontal lines to create wide cells
- Add a second line to the outline of the handle


- Decorate the pen with a bow


- Filling the basket with eggs
- We place the semi-ovals in any position until they occupy all the free space


- We bring all the sketches to clarity with a black marker.
- After the marker has dried, erase the excess pencil lines with an eraser.
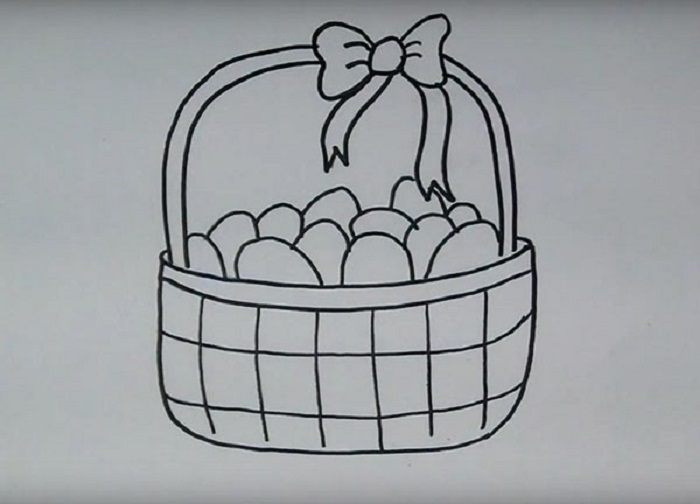

- Add brightness to the drawing with colored pencils
Video: How to draw an Easter egg?
DIY drawings for Easter with children in kindergarten and school
Children love to create on one's own. The main thing is not to interrupt this initiative from them. Even if these drawings are not entirely perfect at first.
Any beginning artist will want and can try to draw a soft, fluffy Easter bunny.
First we do schematic sketch of a figure:
- Head and torso
- A circle on the tummy (hereinafter this will be a basket)
- We divide the muzzle into 4 halves (we move the cross to the upper left corner)

Now step by step fill in the base:
- Draw the head and bangs
- Adding perky ears
- Sketch out funny eyes, nose, mustache, mouth
- The bunny should jump merrily. Drawing the paws
- The rabbit has prepared a holiday basket with gifts for friends - add an accessory
- Fill it with eggs
- Now let's sketch out the tail
- Add fur to the tummy


- Erase extra lines
- Let's start coloring. Paints or colored pencils, optional

 Children's creativity for Easter
 Drawings for Easter with paints for the competition
Draw with paints for a competition fine arts- a very important moment.
After all, the task ahead is not just to draw a picture, but also to put it on display for everyone to see.
Since we know the topic, the task becomes easier. Knowing the main attributes associated with the celebration of Easter, we select them for the competition drawing.
- First of all, we make sketches of Easter. This will be the main object of our creation
- We wrap the Easter cake with a beautiful ribbon
- Decorate with a flower
- Adding sketches of the tablecloth on which Easter settled
- We make all the contours with a simple pencil, barely noticeable
- Sketch out the outlines of Easter eggs and willow branches
- Basic silhouettes are made
- Remove extra lines with an eraser


Next stage - working with paints.
- Color the Easter base light brown

- When the watercolor dries, apply the next layer.
- To do this, dilute the previous color with water, tint the base and creamy part of the cake, as shown in the picture.
- Then add some Easter shading with a red-brown tint.
- We make dark pink splashes on the white Easter decoration


- Color the ribbon pink, diluted with water
- Give the flower an ultramarine tone
- Increasing the shadow at Easter


It's your turn background design.
- We paint: the upper half of the still life in a blue tone, and the lower half in a mixed blue and aquamarine tone
- Next, fill the twigs and Easter eggs with the selected color

- Finishing the background


- Add finishing touches: we make the main contours clearer by darkening them, as in the picture
 Easter image for the competition
 Several examples of drawings for participation in the competition. The usual attributes of Easter. Maybe it will be yours personal feelings, different from the usual ones. The main thing is to draw a picture from the bottom of my heart, with love and faith into this sacred tradition. Then anyone seeing your drawing will understand what emotions I wanted to convey to the artist with this drawing.

 Fantasies on the theme of Easter
 Video: How to draw a bunny for Easter?
Children begin to get acquainted with traditions and main holidays in kindergarten and primary school. As a rule, this acquaintance occurs within the framework creative lessons drawing and labor. It has long been known that with the help of various themed crafts and drawings dedicated to a particular holiday, children remember information about it much better and at the same time develop fine motor skills and creative abilities. In today's article we will touch on the topic of children's drawings for Easter. Agree, it is quite difficult to explain the whole essence and traditions of this happy holiday small children. And with the help of a beautiful pencil drawing with images of eggs, the Easter bunny or a holiday cake, this is much easier to do. Learn how to draw a simple and original drawing for Easter with your own hands step by step from the following master classes with photos.
Beautiful children's drawing Kulich for Easter with a pencil in kindergarten step by step
Kulich for Easter is a variant of a beautiful and simple drawing pencil, which is perfect even for junior group kindergarten. You can draw it with a simple pencil, and then, if desired, color it with watercolors or felt-tip pens. This beautiful children’s drawing “Kulich for Easter” in pencil for kindergarten can be used as an independent gift or as decoration for a holiday card.
Necessary materials for children's drawing of Easter cake with a pencil step by step
- album sheet
- simple pencil
- eraser
- paints
Instructions on how to draw a beautiful picture of an Easter cake for kindergarten
A simple drawing for Easter “Easter basket with eggs” for children step by step
Another option for a very simple Easter themed design for children is an Easter basket with eggs. Since the egg is one of the main symbols of this holiday, its image is always relevant on Easter cards and drawings. And krashankas in a wicker basket look very festive! Read on to learn how to draw a simple drawing for children for Easter in the form of an Easter basket with eggs.
Necessary materials for drawing a basket with eggs for children for Easter
- simple pencil
- paper
- eraser
- black marker
- colour pencils
Instructions for a simple drawing of an Easter basket with eggs for children for Easter
How to draw a beautiful picture for Easter for school with a pencil step by step
A fairly popular symbol is the Easter chicken, hatched from a krashanka or pysanka. At first glance, drawing such a picture with a pencil, for example, for school on Easter, is difficult. But thanks to the following step by step instructions How to draw a beautiful picture for Easter for school with a pencil, it’s not at all difficult to do.
Necessary materials for a beautiful Easter drawing for school
- simple pencil
- eraser
- black marker
- felt-tip pens, paints optional
Instructions on how to draw a beautiful drawing for school for Easter step by step
DIY children's drawing “Rabbit” on the theme of Easter, step-by-step master class with photos
Another well-known symbol of the Easter holiday that can decorate any children’s drawing with their own hands is the rabbit. In the next step-by-step master class The photo describes in detail how you can easily and simply learn to draw a rabbit. This DIY children's drawing “Rabbit” on the Easter theme is aimed at elementary school students.
Necessary materials for a child's DIY drawing on the theme of Easter
- paper
- watercolor paints and brush
- simple pencil
- eraser
- black felt-tip pen
Instructions on how to draw a children's drawing with your own hands “Rabbit” for Easter