Usually you can buy figurines for computer games in a store, because they are made of plastic, painted and decorated in a special way. However, if you look at Minecraft, you can quickly understand that there is no point in going to the store and spending money on buying any items if you can make them yourself. After all, Minecraft is a minimalist game in which everything consists of blocks, and you can easily reproduce them on paper. This way, you can save money and do something yourself. Minecraft paper figures can be very diverse - everything depends only on you, as well as on the wealth of relevant Internet resources. How to make such figures? This article will describe the process step by step.
Printing the template
Of course, you can practice origami and try to create Minecraft paper figures yourself without any templates or blanks. But it is still recommended to contact worldwide network, where you will find a huge variety of colored blanks. All you have to do is print out the one you like the most. To do this, you can use regular paper - if you are not satisfied with the strength of your figure, then you can simply glue the paper onto cardboard and you will get a more durable model. Anyone can make Minecraft paper figures - the main thing is to take the necessary items. There are not so many of them - just scissors and glue, you will do everything else with your own hands.
Cutting out elements

Minecraft paper figures may consist of one or more elements, which at first glance may seem completely different from what should be the result. Don't attach much importance to this, as everything will still have time to change a little later. For now, you need to carefully cut out all the parts along the contours, but do not cut them, but leave them in the condition in which they were. This may seem like a fairly simple process, but in reality it can be more complicated, given the abundance of different angles, as well as the fact that any inaccuracy in the result can affect how the figurine will look in the end. Accuracy is very important here and this is what you need to pay attention to Special attention when you make from paper. The schemes are mostly freely available, so downloading and cutting should not be a problem.
Bending along contours

The long-awaited moment has come when the motley and strange flat sheets will gradually begin to transform into the figure you dreamed of. Naturally, this is what any Minecraft player would like to achieve. Paper figures, the diagrams for which you downloaded from the Internet, can decorate your desktop and the whole house, but for this you will first have to try. So, you need to bend all the existing elements along all the marked contours, and do this no less carefully than the cutting process itself. Initially, the figure may not accept the required form, but don’t be upset, because there is another very big and very important step ahead, without which you will not be able to make Minecraft figures from paper.
Gluing

So, you have in your hands something very similar to the figurine that you want to get in the end. But so far it only vaguely resembles something similar to Minecraft pictures. It is not so easy to make figures out of paper, so you should not give up - you need to go forward until the bitter end. To do this, you will need to take glue and start gluing together the white areas that are ultimately hidden inside the figure. This must be done very carefully so that there is not too much glue, otherwise it will end up on the outside and ruin it. appearance figurines. If you had a figurine from one element, then that's all - you can admire your own work of art, just let it dry first so that nothing accidentally comes apart. But if you had a figure of several elements, then you need to look for special places that will be marked with letters, numbers or icons - these are additional gluing points that will connect several elements into one figure. Here you need to glue even more carefully, since the likelihood that the glue will spoil the appearance of the figure is even higher.
Main character Minecraft games has become incredibly popular now. Many people are interested in how to make Steve out of paper. There are a few different ways. Let's consider the simplest and most accessible one.
Let's choose a skin
First, let's go to the site, where all users have the opportunity to download a beautiful and high-quality scan with our favorite hero, and you can choose one of the options that you like the most. In this official Minecraft studio you can watch a welcome video that will help you make right choice, and most importantly, it will explain subsequent manipulations with the future sketch.
Beginning of work
And here in front of us album sheet, on which our character's model is printed. Before you make Steve out of paper, you need to prepare it - cut it in the right places. This is not difficult to do, since the quality of such a drawing is excellent, it is made clearly, with the presence of all the symbols we need in our work.
- We cut out the figures strictly along the black contours, paying close attention to every detail.
- There should be six blanks in total: Steve's head, a pair of his legs, arms and torso.
- On each of them there are special dotted lines along which the parts need to be bent at an angle of ninety degrees.

Character head
Before making Steve's head out of paper, it's worth talking about it separately and performing the process step by step.
- The head is a simple block that is assembled on a workbench. The gluing pattern is always the same.
- We bend all parts of the structure alternately until a cube with equal sides is formed.
- The most important process is gluing. How to make Steve from Minecraft out of paper will be easier to understand after working with this design.
- First we combine the sides of the figure, and then its top and bottom, set aside until completely dry.
Torso
After we have thoroughly mastered how to make Steve out of paper, using his head as an example, we can begin assembling his torso. Now the process will go much faster.
- Carefully work out all the details, bending them in the right places, refer to the finished sample on the website.
- Be sure to start gluing from the sides, and then match the top and bottom of the pieces.
- We do all the work carefully, wiping off excess glue with a napkin so that it does not spoil the appearance of the finished figurine.
- Let's start the general assembly - apply just a little glue, one by one, to each part. Before making Steve out of paper, be sure to combine the designs with each other and check their consistency.
- The arms and legs are glued to the fold of the white parts of the body, this will provide them with good mobility, the same as in the game.
- The character has its own characteristics that will make the assembly process easier for us. Be sure to decide on the front and back of the arms and legs so you don't pin them together incorrectly. Steve's already prepared head is attached last.

In this way, you can quickly build your own paper Minecraft by gluing together many other characters from the game that many people love from paper. It is very easy to assemble chests, trees, stoves and other types of simple blocks that make up this virtual world.
9 711
How to make minecraft crafts. Perhaps you played a game called Minecraft, and if you didn’t play it, you heard it, or drove away your children and husband who were playing too much from the computer (I don’t exclude it with the goal of also playing a little). And so the craft is dedicated to the above-mentioned game and its fans, our goal will be to make a weapon like in Minecraft. 
What is needed for this? All you have to do is study at some decent university to become a programmer for about five years, study well, graduate with honors and, having gained experience, get a job in an organization developing computer games. Okay just kidding...
We will need:
- The paper is white.
- Cardboard.
- Ruler.
- Pencil.
- Scissors, cardboard cutter.
- Glue.
- Markers.
- Print template in PDF ( / / )
We will make a pickaxe. The principle will be as follows: our weapon will visually consist of pixels, squares as if they came off the screen of an ancient monitor, and the game will have a low resolution.
Previously we looked at how to do
The weapon itself will be made of cardboard; a printed template must be glued onto the cardboard. And then stick colored paper overlays on both sides.


The handle cover will fit on an A4 sheet if you draw it diagonally. We simply apply a grid of squares onto the sheet using a pencil and ruler. The side of the square is 18 millimeters (you can take 20 millimeters, but then you need a sheet large sizes, or do it on two sheets). Then we simply paint over the required squares with felt-tip pens (black, brown, light brown). You can draw a grid or even do everything completely (color and print on a color printer, if you have one).
The rest of our pickaxe is drawn in the same way; a certain number of squares are painted on the sheet with the desired color. The length of the side of the pick at its longest point is 9 squares. We cut out the overlays from paper, glued them onto a cardboard sheet, and cut out along the contour. Glued the overlays on the other side. 
Tool for theme party(of course for those in the know).
First, let's figure out what Minecraft is. Minecraft ─ this is what it is computer game in the style of construction. It was created by Markus Persson. This is a kind of horror game that allows you to build and also destroy different blocks and use objects in a three-dimensional environment. Therefore, we suggest making origami Minecraft out of paper together with your child. And those who are really into this game will enjoy making them. Moreover, almost all heroes can be made using origami.
The player simply controls a character who performs the above actions. These blocks consist of players, landscapes, mobs and items. In this game you can act in four modes ─ this is a creative mode, which is considered the most democratic, a survival mode in which the player is forced to independently search for resources. The third mode is adventure mode, in which players have the opportunity to create their own map, and in this mode the opportunity to play in a team is available. And the last mode is “Hardcore”, in which the hero has one life, and losing it means the end of the game. Very important for fans of this game is the ability to choose one or another type of world. They come in regular, super flat, Large Biomes, and stretched world types. This game is very popular among children and youth. They can sit at the computer not only for hours, but for days and create their favorite characters, and kill those they don’t like. But such games are very harmful not only to the child’s psyche, but also to his eyesight.
These crafts will distract your child from the computer and allow him to play his favorite game in reality. Firstly, it will be very interesting for him and will finally distract him from the computer, which will preserve his eyesight, and secondly, it will develop hand motor skills, imagination and attentiveness, and you will also have a lot of fun together. To do this, you just need to download diagrams on how to make your favorite game characters, print them and make three-dimensional characters with your own hands.
Making Steve's head

Surely every Minecraft fan wanted to feel like the main character Steve. Today we will make the head of this hero together, which will work well as a mask on New Year or Halloween. This is very convenient, since you only have to make the head, and you can choose the clothes yourself. In order to make Steve's head, you need to print out pictures.

Preferably on thick paper, and best of all on cardboard, so the mask will not wrinkle, will be dense and hold well.
Carefully cut, bend and glue where necessary.
1) Steve's face. Don't forget to cut out holes for the eyes.

2) Side. Don't forget to bend our template along the dotted lines.

3) Second side. You also need to remember that we will glue all parts of the head together using black stripes.

4) Back of the head.

5) Top part or "cover" of the head. We will glue all the other parts to it.

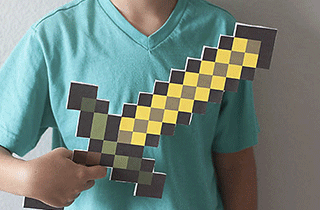
DIY pickaxe
A pickaxe is one of the most useful tools in the game Minecraft. We suggest you make a diamond pickaxe, shown in the photo, which will serve as a good souvenir or gift for fans of this game.

In order to make such a craft, you just need to download these diagrams, print them on a color printer or decorate them yourself, and use scissors and sleight of hand to make this item.


Schemes of the most popular heroes
We suggest you print out the diagrams below of the most popular characters of your favorite game, carefully cut them out, bend them along the fold lines and glue them together.

2) Steve in leather armor with a wooden sword.

3) Steve with a diamond sword.

4) Bender.

5) Village resident.


8) Squid.

9) Cow.


11) Chicken.

12) Pig.
13) Snowman.

16) Creeper.

17) Skeleton.

18) Slug.

19) Zombie Hulk.


Block diagrams
1) Boards ─ one of the basic blocks that serves as a building material used to create various structures and structures.

2) Foliage ─ block for creating plants.

3) Diamond block─ used to create decorations for buildings and structures.

4) Stone ─ used for construction purposes.

5) Sand ─ is used for construction in the same way as the previous block.

6) Pumpkin ─ a block that is used very rarely, only for Halloween celebrations.

7) Obsidian ─ used for the construction of dark things.

8) Hellstone ─ a block that is used in the “lower world”.

9) Mossy cobblestone ─ used to build structures in the form of old ruins.

10) Grass ─ a block that looks like a block of earth.

11) Gold ore ─ a block that is found very rarely deep underground.

12) Glowing stone ─ block is used to illuminate the “lower world”.

13) Furnace ─ a block used for cooking food and smelting minerals.

Above are some of the most common blocks used in this game. They will help you transfer the atmosphere from the virtual world to the real one.
Video on the topic of the article
Now we invite you to watch a selection of videos on this topic.
Minecraft popular game with grainy graphics that gamers love so much that virtual reality it has practically migrated offline. Now fans of the game have the opportunity to build various objects and landscapes, not only by pressing buttons, but also doing it in the real world from hand-created elements for the game using paper.
The essence of the game and modes
The essence of the game is to use various blocks for construction. There are several modes. The first - creative - uses the player’s imagination to create the most unusual figures. At the same time, there are no threats for the gamer, and to achieve the goal he is given the opportunity to fly.
The second mode - survival - is more difficult. The player needs to work on several fronts at once: obtain resources for construction, maintain their own livelihoods and defend against enemies. The original game mode - adventure - is somewhat similar to the survival mode, but has a number of differences:
- the ability to build your own map;
- requirements for compatibility of elements for construction;
- access for team play.

Hardcore mode gives no room for error - the hero only has one life. The difficulty level is selected at the very beginning of the game and cannot be changed during the process.
The game has negative characters (monsters, zombies, spiders, creepers, skeletons), which, along with the main character and his assistants, can be created in the real world.
The process of creating figures
Playing Minecraft with friends in the real world can be even more dynamic, and creating characters can be a rewarding and fun experience. To recreate battles for life and territory, as well as to reclaim your buildings and protect them from attacks by monsters in the real world, you will need scissors, any glue and printed blanks that can be found on the Internet. For the little ones, making such paper crafts will be very useful. The process of creating characters and building materials develops accuracy and perseverance, creative thinking and imagination in children. As a rule, collection schemes are also offered for paper blanks. The principle of creating one element is similar to assembling a cube from paper: you need to cut out a template, bend the parts along the fold lines and glue them together using white fastening labels.

Crafts in the Minecraft style can be very simple, consisting of one cube, or complex, including several elements connected to each other. You can make game characters, weapons, and animal figures from paper. You can not only play with them, but also, having collected a collection, decorate your room. In this way, children will gradually improve their figurine making skills. By creating such toys together with your child, you will not only improve his fine motor skills, but also have a pleasant time together!