Before you decide to select the system configuration of the devices required to build a computer, think carefully. Many people think that a computer system unit is a construction kit, that you can thoughtlessly put together any configuration you want, and everything will work great. This is far from true!
Our company “Computer Master” is ready to help you select components for assembling a computer directly by phone to order! You can leave a request for a professional selection of components for a full-fledged computer system unit. In less than one day, our specialist will draw up a list of tested equipment based on your order. All you have to do is buy everything you need and assemble your new computer, or simply use our services for assembling a custom computer!
When assembling a computer, you need to consider:
- The power of the power supply should be 30-40% higher than the total power consumption of all devices, including hard drives, motherboard, video adapter, processor, cooling system, RAM modules, optical drives. It is also recommended to think about the prospects of connecting new devices or upgrading existing ones.
- When choosing RAM, pay attention to its rated supply voltage. If the supply voltage is not standard (1.7 - 1.9 V), then you should make sure that these voltages can be adjusted in the BIOS settings of your motherboard.
- RAM frequency. If the motherboard does not support the clock speed that the RAM modules are capable of, then you need to choose another one.
- Availability of the required number of power cables. Very often, powerful graphics adapters require additional supply voltage. Even if the power supply you choose is very powerful, this does not mean that it has the required number of power cables. This should always be checked.
- Checking whether the processor matches the motherboard.
- You need to check how much heat the processor generates per unit of time. This is a very important parameter. Choose a cooling system so that it has time to remove heat from the processor at maximum load. If you are going to overclock your computer, then you need to pay a lot of attention to this point.
Computer assembly process
Preparing to build a computer
First of all, prepare your workplace to build your computer. Check the entire equipment of the devices: fasteners, cables, connecting elements.
We did not highlight the installation of the power supply in separate category articles. In many system units it is already installed. If you purchased a different power supply or are assembling a computer in an old case, then simply replace the power supply, securing it securely.
Note
Very often, a small syringe or tube with a special heat-conducting substance is included with the motherboard. This thermal paste. It is applied to the surface of the processor for better heat transfer to the radiator of the cooling system. This point cannot be neglected. If you do not have thermal paste, you will need to purchase it separately. Good thermal paste, popular and low price KPT-8.
Installing the motherboard
We will begin the assembly by preparing the computer system case. Remove all shipping plugs, stickers, parts packaging material. Before attaching the motherboard, do not forget to install the back panel that comes with the board, and also check for the presence of mounting pegs. Unscrew some or rearrange them as needed.
Attention!
Before installing the motherboard, install the plastic CPU heatsink bracket on the bottom of the motherboard.
Now carefully place the motherboard on the mounting pegs so that the holes on the board line up with them. In this case, you need to slightly press the board to the back of the system unit, pressing down the springs on the rear wall of the case. Then tighten the screws.
Processor Installation
Let's move on to the next stage of assembling a computer: installing the processor. This is very important point, requiring extreme care and accuracy. Let's consider installing the most common processors - Intel and AMD.
Intel processor
Intel processors are available for mounting on Socket 775. This is a new type of mounting for processors that do not have legs. Instead of legs, this type of processor has special contact pads that are pressed against the motherboard.
To install an Intel processor on the motherboard you need:
- Remove the protective cover from the mounting pad on the motherboard;
- Move to the side and lift the lever;
- Raise the metal bracket;
- Install the processor, lower the bracket and gently press the mount with the lever.
Attention!

Handle the processor by its edges only! Do not touch the processor contact pads and radio elements soldered on the bottom with your hands. Install the processor strictly vertically, parallel to the motherboard, avoiding distortions. The flag on the corner should match the triangular flag on the board.
The next step is installing a cooling radiator on the processor. Before this, you need to apply a thin layer of thermal paste to the entire surface of the processor. Apply evenly, avoiding the appearance of empty areas. Remove excess thermal paste with a dry, clean cloth.
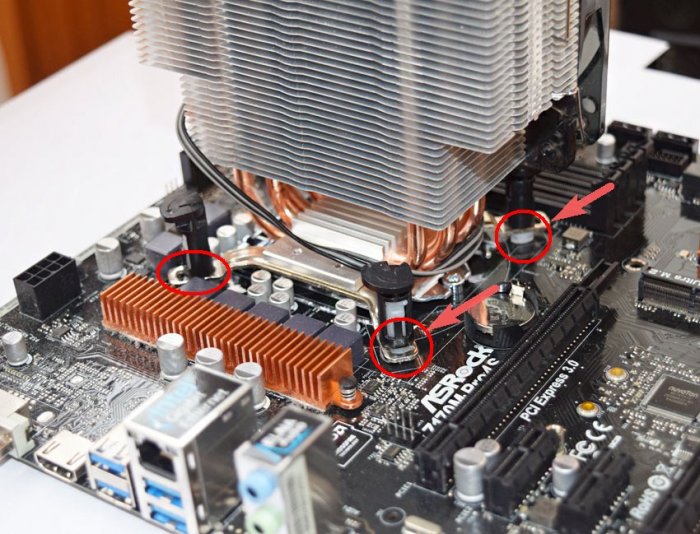
To install the cooler on the processor, install it so that all four mounting pins fit into the holes on the motherboard. Then press on each pin, you should hear a click.
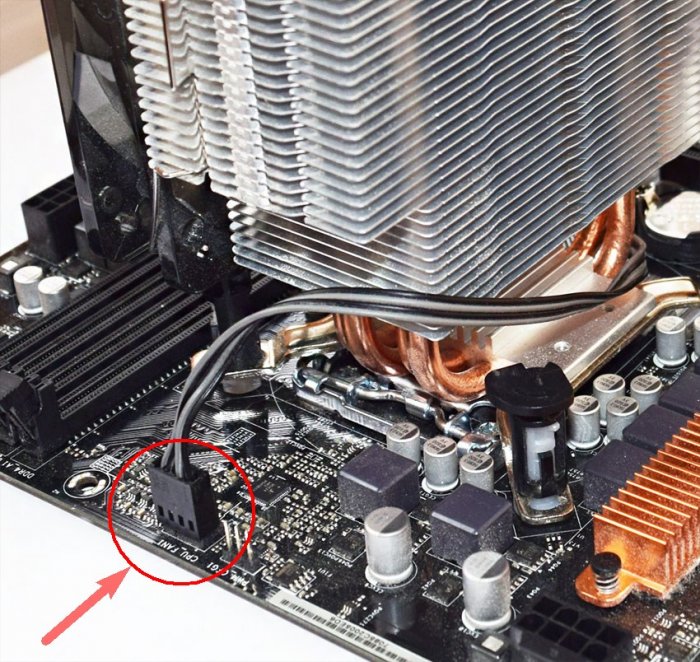
Now check that the heatsink is firmly in contact with the surface of the processor. All that remains is to connect the fan power cable to the motherboard - CPU-Fan socket.
AMD processor
If you choose an AMD processor, you need to pay attention to the fact that it has contact legs, unlike processors from Intel. Be careful! Do not touch the legs with your hands or bend them. Today, mounting pads for AMD are available in the following types: Socket 939, Socket AM2, Socket AM3.

Installation AMD processor not much different from Intel: the main thing is to take into account the coincidence of the flags on the processor and motherboard.

There are no difficulties in installing a cooler for the cooling system either. You just need to attach the metal bracket to the plastic pad of the motherboard and press the lever in order to press the heatsink to the surface of the processor.
Installing RAM modules
There should be no problems when installing RAM modules. You just need to move the latches along the edges of the slot, install the module and press it until it clicks on both sides.
On the other hand, you will not be able to insert the memory - there are keys on the mounting platform of the motherboard and on the RAM module itself in order to prevent mistakes. So there is nothing to be afraid of.
Within the framework of this article, the solution to such a problem as self-assembly of a computer will be described step by step. With such a layout of equipment there are a number of advantages, but there are practically no disadvantages. Moreover, every user can cope with such a task, regardless of their level of training.
Advantages and disadvantages
When viewing computer configurations in specialized computer stores The following question often arises from potential clients: “How to assemble a computer yourself?” Existing proposals do not always meet the requirements and requests. Either the video card is integrated, or the motherboard is cut to the brim, or there is little RAM, or the processor is slow... In general, there is no configuration that would be ideal for the user’s tasks. As a result, there is a natural desire to get exactly the PC that is perfect for the given purposes, that is, buy components separately and then assemble them together yourself. In this case, two advantages will be achieved: savings on computer assembly and an ideal configuration for your case. There is only one drawback in this case - the responsibility for assembling and selecting components falls on your shoulders. But there's nothing wrong with that.
Selection of components
The most popular platform for PC assembly at the moment is LGA 1150 (this is the connector on the motherboard for installing the CPU). Using her example, we will consider the process of how to assemble a computer yourself from components. In principle, a similar algorithm can be applied to other platforms from Intel and AMD that are on sale today. The system will be assembled from the following components:
- Processor - "Intel K" with a clock frequency of 3.5 GHz, 4 cores on board and a three-level cache system. Its productivity will be enough for the next 2-3 years. This is an excellent solution for those users who want excellent performance at a reasonable price.
- Motherboard - Z97 Gaming from MSI. Maximum equipment at an affordable price - these are its advantages.
- Housing "Orion 202" from the company AZZA. A stylish and spacious gaming case, in which the possibility of overheating of components is almost completely eliminated.
- RAM "TEAM 8GB 1600MHz". Its frequency will allow you to maximize the potential of the processor. You can also choose products from other manufacturers, but with similar characteristics.
- Video card from MSI with 2 GB of memory.
- Hard drive model WD10EZEX 1TB in size from Western Digital.
- TS256GSSD340 256MB solid state drive from Transcend
- Drive for reading all disc formats model BD-W512GSA-100 from TEAC.
- DeepCool Theta CPU cooler.
- Power supply Aerocool VP-750 0.750 kW.
We sorted out the components. Now let's find out how to assemble a premium 2014 computer from them (and this will really be a PC of this level). If desired, the configuration can be changed, but this is not critical. All the nuances outlined below are suitable for almost all cases. If you have problems selecting components, you can use various online services. For example, you can assemble a computer at Yulmart, in the “Configurator” section. Then purchase everything you need and assemble a PC.

Frame
Let's start with the body. The kit should include an installation kit (bolts, nuts, plugs) and a power cord. Therefore, when removing it from the box, we pay attention to this. First, unscrew the 4 bolts from the back of the case and dismantle it (with a careful movement we move them in the same direction: immediately right, and then left, or vice versa). Remove the plug where the motherboard is installed.
Hard drive and drives
At the next stage of how to assemble a computer in parts, you need to deal with the disk subsystem. It consists of three devices at once: hard drive, SSD and Blu-ray drive. The first of them is designed to store user data and toys. The solid-state drive is suitable for installing the operating system and the most demanding applications. The last representative of this group of devices will allow you to play movies in high quality. You can also use it to install Windows. Installation begins with the Blu-ray drive. It fits into a 5.25" top bay. There should be a drive bay on the front side of the case. It is secured with two bolts on each side. Then you need to install in the lower 3.5-inch bays HDD and a solid state drive. Since these devices have increased heat generation, it is necessary to leave an empty compartment between them. Next, they are fixed with bolts in the same way as a Blu-ray drive.

Motherboard
So, how to assemble a computer in parts? We continue our master class. Next, the motherboard is mounted into the case. It is necessary to remove the metal plug from its back side. A plate is installed in its place, which comes complete with the motherboard. We lay the case on its side so that there is space at the bottom for attaching this component. You need to select a plastic retainer from the set of fasteners. We turn the motherboard towards us with the side on which the aluminum radiators are located, and install it in the upper right hole. We prepare 7 bolts for fastening. We lay the motherboard, insert its connectors into the plate, and the holes for the bolts should also match. We fix this component using seven pre-prepared bolts and a Phillips screwdriver. You need to tighten it so that the board does not crack.
CPU
Well, assembling a computer yourself is quite simple, isn’t it? Let's continue. Now you need to install it in the socket (a square connector on the motherboard, located in its upper part next to 2 radiators). To do this, move the metal handle away from it and lift it up. Then remove the plastic plug. Then we remove the processor from the packaging and position it so that the golden triangle is in the lower right corner, in this position we install it in the socket. He should enter it without effort. After this, return the metal handle to its original position.

Cooler
When thinking about how to assemble a computer with your own hands, you should understand that you next need to equip the CPU with a cooling system. The cooler comes with a syringe with thermal paste. Gently squeeze it out and apply a thin layer to the surface of the processor. Next, we position the cooler so that its fastenings coincide with the holes on the motherboard. We carefully install and fix it. We connect the wires from it to the “CPUFAN” connector and lay them so that they cannot get tangled in the fan blades or other moving elements.
Video card
Let's move on. The master class entitled: “How to assemble a computer yourself from components” is already close to completion. Now you need to install the graphics adapter. First, carefully remove the two plugs on the case opposite the PCI-EXPRESS 16x motherboard slot. Then we remove the accelerator from the packaging and install it all the way into this place. In this case, the panel with connectors should go exactly to the place of the removed plugs, and the connection interface should go into the expansion slot of the motherboard. Next, it is fixed with a bolt on the body.

RAM
The next step is to install the random access memory device. In this case, two 4 GB sticks are used. This amount of RAM is enough to solve any problem today. We remove them from the packaging. We install the first module in the “DIMM1” slot. In this case, the “keys” of the memory stick and the motherboard must match. Also, during installation, the clamps must also be closed on the sides. In the same way, the second module is installed in the “DIMM2” slot.
power unit
Conventionally, according to the method of installing power supplies, cases are of two types: top-mounted and bottom-mounted. The last option is more preferable, since in this case there is more free space close to the motherboard, which provides better cooling of its components. This is exactly the installation of the power supply in this case. Since this material provides an answer to the question of how to assemble a powerful one yourself, you cannot do without installing an appropriate power supply. In this case, its power is 750 W, and this is more than enough for the normal functioning of such a computer system. It is installed as follows:
- We unfold it so that the fan goes out to the back of the case.
- Place it on the bottom of the computer.
- Carefully push it all the way to the back wall. At the same time, we look at the wires. They should not cling to other components of the computing system. If this happens, something may break. So we're watching this closely.
- We fix it with four bolts (included with the housing).

Connection
At the final stage, you need to perform switching and assemble the housing. We start by connecting the motherboard. We connect the largest connector from the power supply to it. His contacts are in two rows. It should connect easily. If you cannot insert this connector, then you need to turn it 180 degrees and try to connect it in this position. Then the front panel of the case is connected to the motherboard. All contacts that are used for this are located in its lower right corner. First of all, we attach “Power” and “Reset”. In this case, polarity does not matter. But when connecting “Speaker”, “HDD Led” and “Power Led” it must be observed. Therefore, we look at the instructions for the motherboard and check that the assembly is correct. Next, we find the four-pin additional connector and install it in the corresponding socket on it. In this case, the wires must be laid so that they do not accidentally fall on the cooler blades and stop it. Now we connect the drives to the motherboard. Cables for this are included with it. One end of the first of them is installed in the “SATA 1” connector, and the other - in the solid-state drive slot. The hard drive is connected in the same way, only now “SATA 2” is used. And in “SATA 3” we install the wire from the CD drive. Next, we connect the connectors from the power supply to the drives. First, we connect the solid-state drive and hard drive, and then a separate wire to the CD-ROM drive. At the final stage, we return the side covers of the case to their original position and fix them. After this, the PC is ready for use. As you can see, assembling a computer by yourself is not particularly difficult. Anyone can handle this.
Test
So, let's describe the final stage of assembly. Following tips on how to assemble powerful computer on your own, you must remember that you need to perform testing. To do this, all external devices (monitor, mouse, keyboard, etc.) are connected to it. Also, a wire from a 220V power supply network is supplied to the power supply. After this, voltage is applied by pressing the “Power” button. Next, when turning on, hold down the “DEL” key, and after entering the BIOS, release it. After that, on the “Main” tab (that is, “Main”) we check the equipment configuration. If something is missing (for example, 4 GB instead of 8 GB), then turn off the computer and check that the missing element is installed correctly. The next step is to start installing the operating system, drivers and application software. This procedure no longer applies to how to assemble a computer with your own hands. Therefore, it will not be considered within the framework of this material.

Results
This article describes a simple and clear procedure self-assembly computer. By following the previously stated instructions, solving this problem will not be difficult. In this case, you will receive exactly the PC that will best suit your requirements and needs. Another advantage of this solution is that, if desired, this computer can be easily and simply upgraded. For example, you decide to increase the amount of memory. To do this, just remove the side cover, install the modules in the empty slots and reassemble it. Similarly, you can replace the video card or add a new hard drive. We hope you now understand how to assemble a computer yourself.
A computer, like a construction set, consists of several boards and devices. If you know the purpose of each of them, you can assemble your own supercomputer. Assembling a computer along with installing the operating system can take from 1 hour to 3 hours if all the parts and necessary software are available. We will tell you how to quickly and easily cope with this simple task.
Materials and tools:
- Phillips screwdriver or screwdriver
- Computer case
- Motherboard
- Processor with special hot melt adhesive
- Sound card (can be built into the motherboard)
- Video card (can be built into the motherboard)
- RAM
- Winchester (HDD)
- Keyboard
- Power adapter (pilot)
- Monitor
- Minimum Required software- operating system (Windows, Linux...) and often a text editor is required for work (Microsoft office, Open office...)
Attention - when assembling a computer, follow the rules for working with electrical appliances, as well as the instructions included with the parts.
Computer selection:
- Decide what tasks the computer will perform. The cost of a computer directly depends on the complexity of the functions assigned to it. To work in the World and Excel office applications, an inexpensive office computer is enough for you. To work with graphic applications and for games, you will need a powerful and expensive computer.
- When purchasing parts for a future computer, check with the seller whether certain parts are compatible with each other. All parts, first of all, must be compatible with the computer case and motherboard.
Computer assembly instructions:
1. Prepare a Phillips screwdriver or screwdriver and clear the area for assembling the computer.
2. Let's start assembling with the body. Depending on the housing design, remove the side housing cover or the overall housing cover. At the same time, the empty space of the case will open to you.
3. Lay the computer on its side so that it is convenient for you to insert the necessary spare parts into it.
4. Open the package from the motherboard - this is the largest board from the computer. All devices of your computer are connected to the motherboard and install the motherboard on the inner side of the computer, so that the connectors located on the end of the board fit into the rear holes of the computer case. And the internal connectors looked inward.

5. Attach the motherboard to the computer case.
6. Remove the processor from the packaging and carefully, strictly according to the instructions included in the kit, insert it into the motherboard connector. Using the special glue included with the processor, firmly glue the cooler (fan) to the processor.
7. Now install the power supply into the computer case.

8. Screw the required number of screws onto the outside of the housing.

9. Connect power to the motherboard.


10. Insert the hard drive into the case.

11. Connect the hard drive to the motherboard. Two cables - one power cable, and the second for exchanging information with the motherboard.

12. Insert the CD-ROM from the front of the case.

13. So inside case, connect it to the motherboard. Plug one end of the cable into the CD-Rom socket, and plug the other end into the motherboard.


14. Now you need to connect power to the CD-Rom

15. Similarly, you can connect other devices to the computer (Floppy drive, another CD-Rom). The number of connected devices is limited by the number of corresponding ports and cables on the computer.
16. In accordance with the instructions, using the included wires, connect the motherboard with additional connectors (Audio, USB...)
17. If you have an “external” video card, break off the protective insert on the computer case opposite the corresponding slot on the computer case.

18. Insert the motherboard into the dedicated slot

19. If you are going to remove it, do not forget that when you inserted the video card, the board snapped into place. Therefore, before disconnecting the video card, remove the fuse

20. In the same way, you can connect other devices - in this case, a modem is connected.

21.Insert the RAM card or cards into the appropriate slots on the motherboard. To do this, move the fuses to the sides and carefully insert the board into place. Be careful when doing this, because... the notch in the middle of the RAM should match the bulge of the slot on maternal memory. Press the RAM evenly and it will snap into the mother memory slot.

22. Close the computer case.
23. Well, it looks like we have assembled the main part of the computer, now all that remains is to connect the peripherals and power. To do this, connect external devices to the appropriate ports. These ports are located on the back of your personal computer.

24. Plug in the green socket - the green plug from your speakers or headphones. If you connect a microphone, you will need to connect it to the pink socket.
25. If you have the local network, then connect the power cable to the appropriate socket

26. Connect the computer to the monitor; to do this, plug a wire with a large blue plug into the special connector on the computer. If your computer has a built-in motherboard, then you can easily guess where to connect this cord. And if there are two video cards, i.e. one is built-in, and the second is additional, then plug the cord into the additional video card, now it will process graphics.

27. You need to plug the other end of this wire and the power wire into the monitor.

28. Now connect the power cable to the computer's power supply - its plug is located at the back and top of the case. Move the switch from position (0) to position (-), the same may need to be done with the monitor.
29. Plug the computer and monitor power cables into the power adapter
30. On the front of the case, press the large button

32. If the message appears on the monitor, then you have successfully assembled your computer!
33. Now you have to install operating system and other programs necessary for operation.
Hello friends! If you are a computer enthusiast, then learn on your ownAssembling a computer will not be difficult for you.
When I wrote this article, I immediately showed it to a person who had never assembled a personal computer. He read it carefully and began asking me questions, from which I realized that the publication urgently needed to be supplemented with many little details, only then would it become understandable to beginners. As a result, I almost completely rewrote the article several times and only now am I offering it for your consideration.
In my last publication, I explained to you, but today we will independently assemble a classic PC.It is best to assemble a computer on a table so that you can see everything and be as comfortable as possible. Let's start withapplying thermal paste to the processor and installing it into the motherboard socket, then we assemble CPU cooler and connect it, after that we insert the RAM modules into special connectors on the motherboard, then mount the power supply into the case and tighten the wires, secure the SSD, HDD in the system unit, and only after that install the motherboard in the case...
First, we need to buy thermal paste and apply a thin layer to the processor. It is inexpensive and is usually sold together with a special hard card, with the help of which it is literally smeared over the surface. Why do you need thermal paste? During operation, the processor heats up very much and, with the help of thermal paste, effectively removes heat from itself to the cooling radiator.
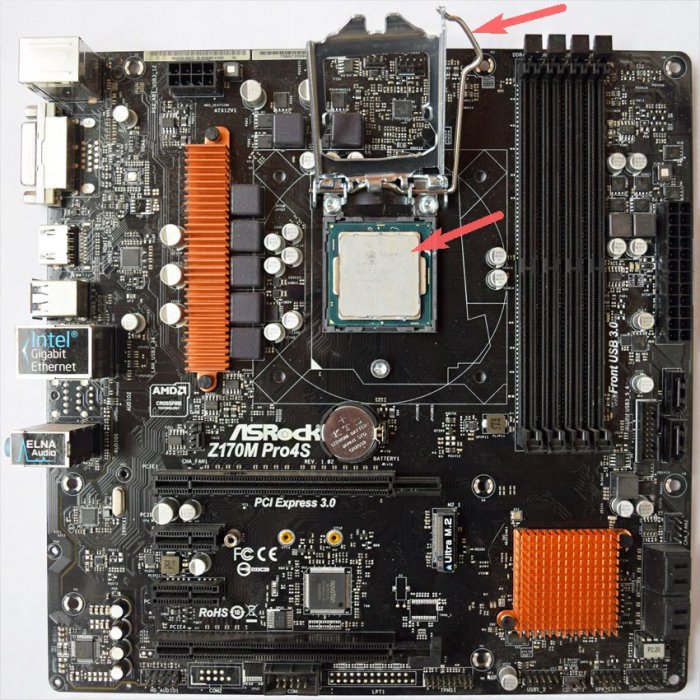
Installing the processor into the motherboard
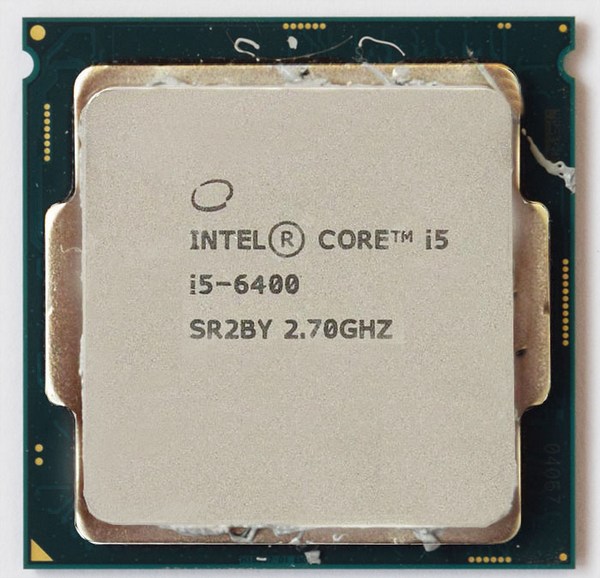
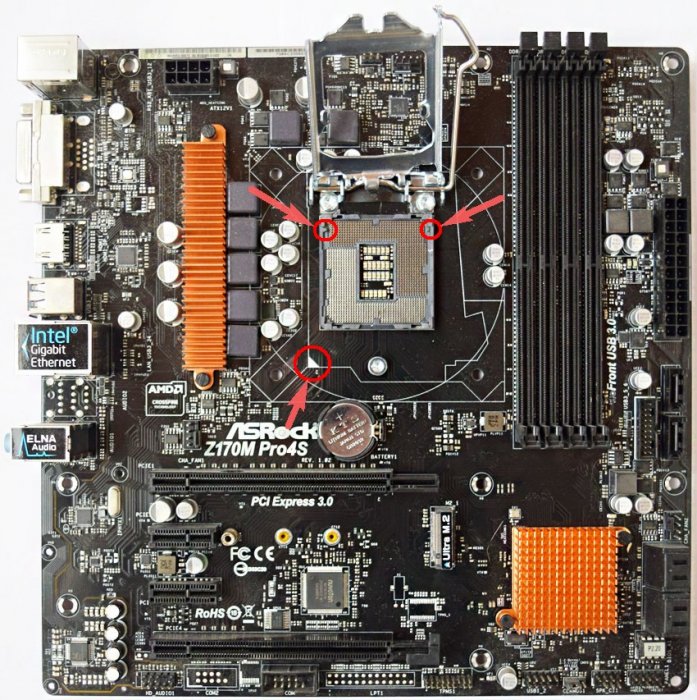
Now let's install processor in, in my case i5 6400 and Asrock z170m pro4s. Install the processor into the socket very carefully and carefully so as not to damage it. This especially applies to AMD processors, since unlike Intel processors, which have contact pads, first there are so-called “legs”, bending which the processor will stop working. So, we open the socket on the motherboard using the side latch and look at the keys that show us how to insert the processor correctly.

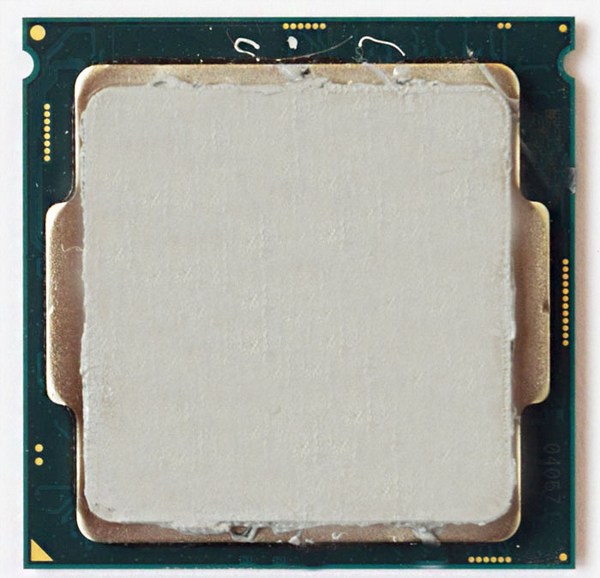
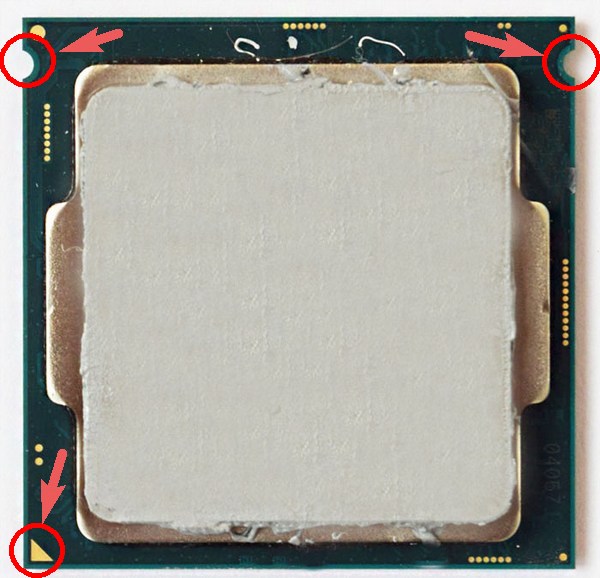
We take the processor in our hands and see that it has corresponding recesses and a triangle in the corner, thanks to which it will be difficult to make a mistake during the installation process.
With a gentle movement of your hand, simply place the processor in the socket,
We make sure that it does not hang out there and close the side latch.

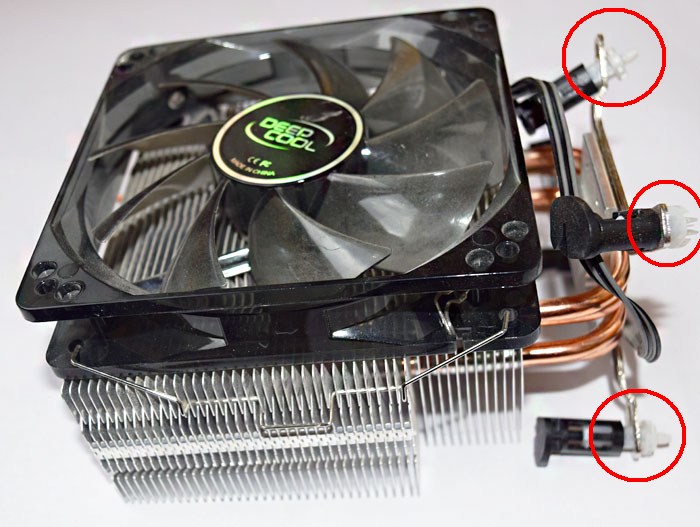
CPU cooler
Next, I prefer to outfit the motherboard with full program and I install RAM on it immediately, outside the case, because personally, with my big hands, doing this in a tight space (inside the case) is problematic.
So, we look at the motherboard and see special connectors for mounting the cooler, and that’s where we’ll install it.

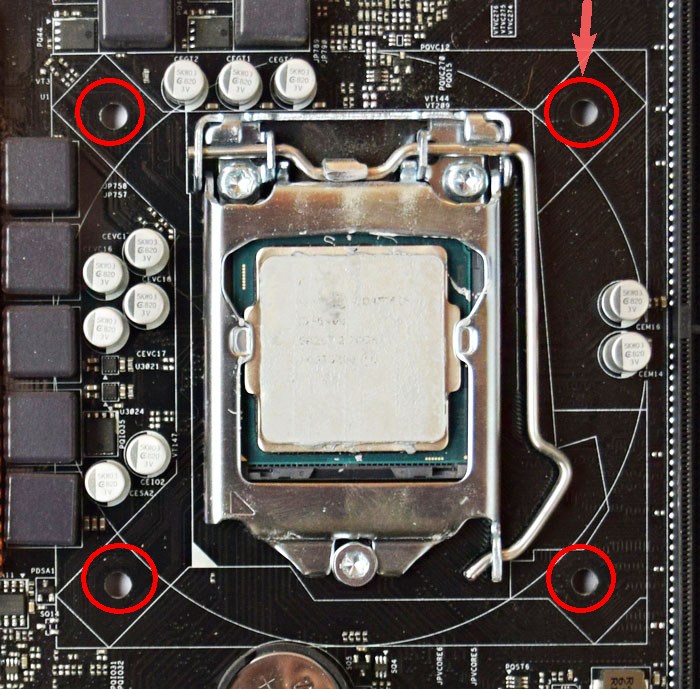
This is done simply, take the cooler, put the special legs into the holes and snap them into place.
After installation everything will look like this.
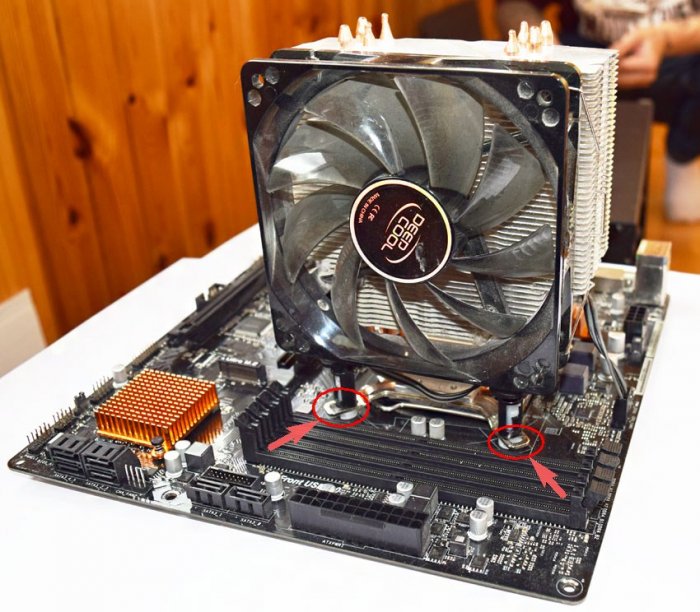

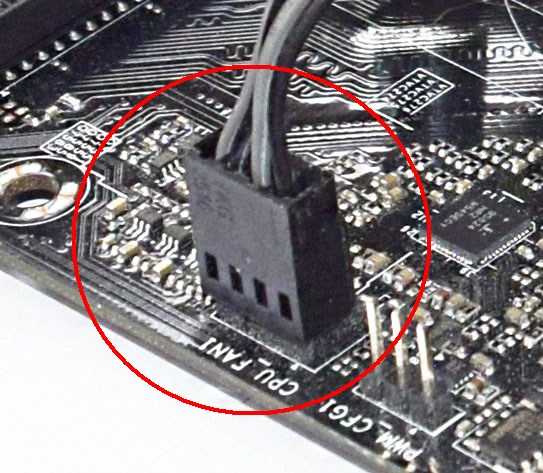
Don’t forget to also connect the cooler’s power to a special connector on the motherboard called CPU FAN.
RAM
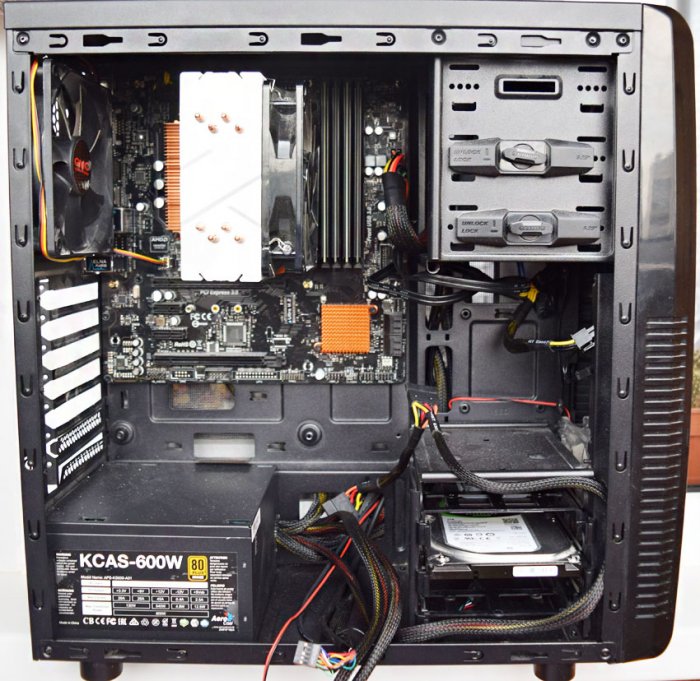
power unit
Now that the motherboard is fully charged, we proceed to installation in the case. Many people advise installing the motherboard into the case first, but I prefer and recommend that you start with the power supply, because if you follow my advice, you can stretch all the necessary wires properly and avoid damage to the motherboard, since the unit is usually very large and takes up a lot of space . One awkward move and you can easily damage the microcircuits - goodbye motherboard. In my case, the GMC Forge case and the Aerocool KCAS 600W power supply.
Installing the unit is a very simple process. We install, stretch the wires as desired and screw the screws into special holes on the back of the case.


I would like to note that the power supply is always installed so that the fan is directed downwards when the unit is mounted at the bottom. Inside the case you can tell your own microclimate and temperature, so it will be better if the power supply draws in cool air from the outside, rather than warm air from the inside.
SSD and HDD
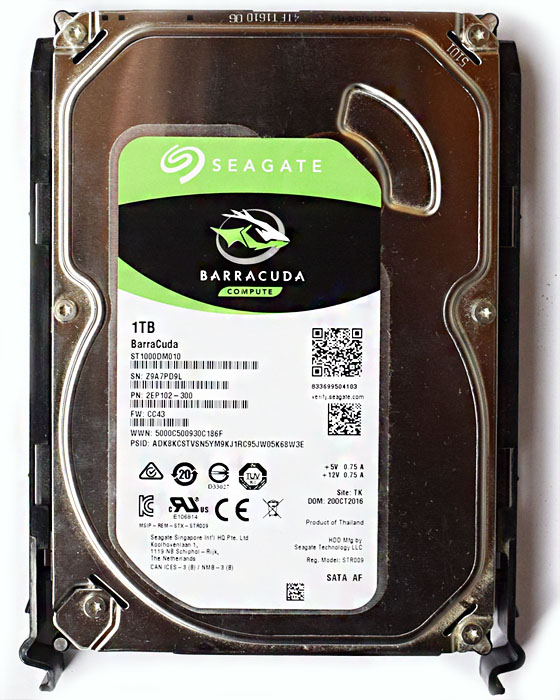
Now before installing the motherboard for the same reason as with the power supply. We insert the solid-state drive and hard drive into the corresponding cages, if they exist; if they do not, then simply screw them to the case. I will have a Patriot Spark 128gb and a Seagate Barracuda 7200 1000gb working hard on my system.


Motherboard
Let's move on to installing the motherboard into the case. The mother itself has special holes for fastening; depending on the model, the number of these holes may vary. We insert the motherboard into the case in accordance with these fasteners and tighten it with the screws that are included with the case.

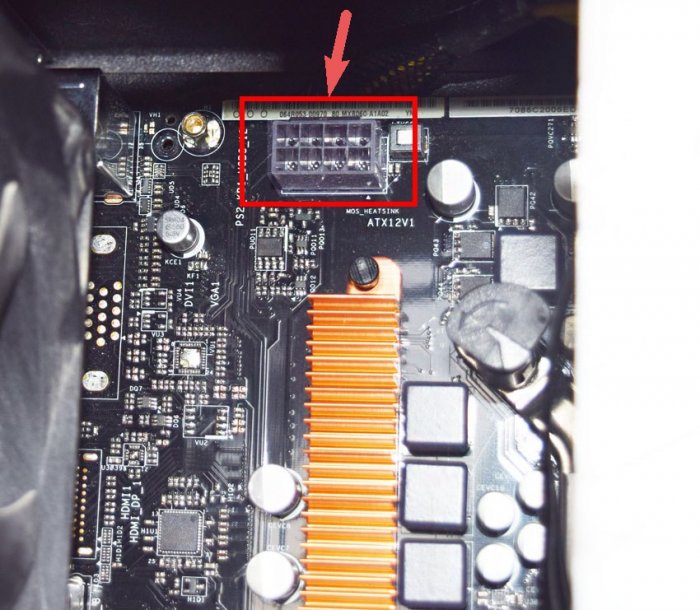
CPU power
And finally, all we have to do is connect all this stuff together. Let's start with powering the processor. The power connector can be 4pin or 8pin and is usually located directly next to the processor. We find the corresponding cable at the power supply and connect it.

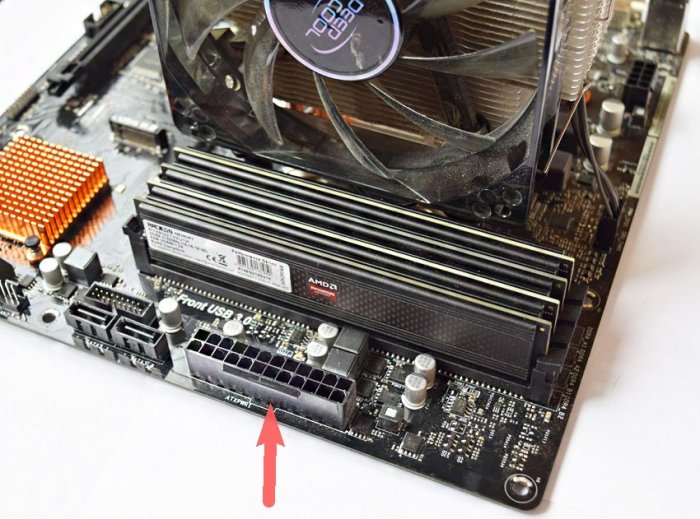
Motherboard power

Case cooler
Let's move on to connecting case coolers for injection/exhaust. They are connected to the corresponding connectors on the motherboard with the name CHA FUN or SYS FAN or similar.


Now let's connect our drives using SATA interface cables to the corresponding slots on the motherboard.
Don't forget to connect additional power to our drives. In my case, this can be done from the back of the case.

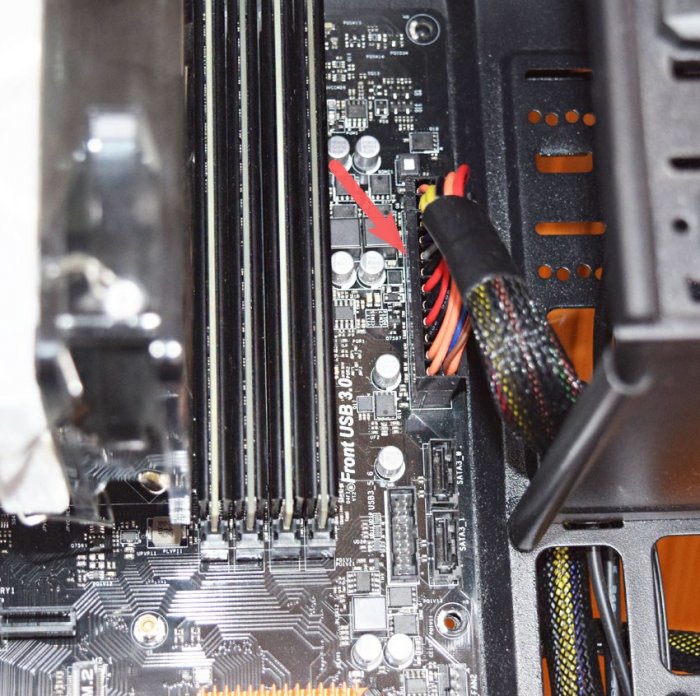
Connecting Front Panel Cables to the Motherboard
And finally, I decided to leave the most difficult thing, which causes some problems for most users, namely connecting the power to the front panel. All connectors are located at the bottom of the motherboard. Let's start with the audio outputs. Take the wire with the name AUDIO and connect it to the connector with the same name.
Article001 - How to assemble a system unit from components yourself (v.1.1)
This article will describe how a person with relatively little knowledge of computers can assemble a system unit (SU) from components.
The reason for writing this article is this - there is a type of computer user who is generally quite good at (or beginning to understand) computers, but they themselves have never assembled a computer and have the desire, but do not have detailed guide how exactly to do this (i.e., “theoreticians” and “beginners”).
The author does not claim the uniqueness and “correctness” of the method of its assembly, since there can be many assembly options, depending on various conditions. An experienced assembler can assemble a computer in a slightly different way. This can be compared to different options for solving a mathematical problem, where the result is generally the same.
As a rule, a standard computer consists of:
Monitor;
Keyboards and mice;
From the title it is clear that the methodology for assembling the “system unit” will be explained. Moreover, the case is of the ATX form factor.
Any microATX, flexATX, mini-ITX, BTX are not considered.
The standard system unit consists of nine components. Here they are:


5. CPU cooler

6. hard drive (aka hard)

7. DVD drive (or any type of optical disc drive - further, for simplicity, we will assume that this is a DVD drive)

8. power supply (aka PSU)


So let's get started. The SB assembly consists of three parts. Let's look at each in detail. I won’t describe absolutely everything - there are instruction books for the motherboard and the case for that. I will dwell on the important details.
I. Preparing the body.
First of all, we take the body.
1. [Columns (pegs)]
The case comes with a plastic bag that usually contains the following things:
1.1. There are two types of fastening bolts (with frequent threads and with rare threads.
The photo below clearly shows that on the left there are bolts with sparse threads, and on the right - with frequent threads.

1.2. Hexagonal bolts with a screw hole at the back (the so-called “pins” - for simplicity, I will continue to call them “columns”).
Their cuts also come in two types - with frequent and rare threads. This is clearly visible from below.

1.3. It is also worth checking the following in advance - do the internal threads of the post fit a bolt with a rare or frequent thread?
Bolts with a wide (large) head are good for securing the motherboard - they are easy to tighten and they provide better and more reliable clamping. That's why all the photos show exactly the same bolts.

1.4. PC speaker (aka "tweeter").
[I'll add a photo later]
In top-end cases, the equipment may be richer - additionally included are ties, branded case mounts and holders for hard drives and drives, adapters from 5.25" to 3.5"/2.5", stickers with the name of the manufacturer, additional USB3 ports. 0 and e-SATA and much more...
This bag is needed - you will need columns.
1.5. We take the motherboard and place it on the case tray in the place where it is attached (i.e. the motherboard).
We remember by the holes in the motherboard those places (holes) where the posts need to be secured, then we remove the motherboard so that it does not interfere. Immediately mark the required holes with a marker.

1.6. Then tightly screw the posts in the pallet with pliers or another suitable tool in the marked places.
Sometimes it happens that the posts were already pre-installed - in this case they should, if necessary, be moved to the desired hole and/or screwed tightly to the end.
There should not be any extra posts on the pallet - they will interfere with the installation of the motherboard and may damage it. Usually there are 9 holes (and therefore posts) in an ATX form factor board.

2. [Stub]
2.1. The motherboard package includes a plug for the motherboard connectors.
She looks like this.

2.2. There is a corresponding place at the back of the case for the plug.

2.3. We take the plug and secure it from the inside of the case by pressing hard, very hard :)

3. [Hard drives + DVD drive]
After this, the hard or hards are secured in the body. In conventional cases, the hard drive is fixed with four bolts (two on each side), which are screwed into the holes provided for this purpose:
The hards are secured with thinly threaded bolts.

In top-end (and not so top-end) cases, the manufacturer has the right to change the method of mounting hard drives, guided by the following goals:
Simplification (rarely - complication - for good reasons) of the fixation method to save time and nerves;
Reducing vibration and noise from hard drives;
Using your hands yourself, without the participation of various kinds of tools - pliers, screwdrivers...
In my case, these are special screws with a rubber washer in the middle - they are screwed in by hand.

And we fix the DVD drive with four bolts with rare threads. As a rule, in the uppermost 5.25" slot of the case.
The power supply in modern power supplies can be located either at the top or at the bottom. Although there is a tendency towards a “lower” location of the power supply. It is also secured with four thinly threaded bolts.
Moreover, if the power supply is at the top, there is only one fixation option for it - with the grille facing down. In this position, it takes in hot air from below and passes it through its “insides” to the outside of the body.
If the power supply is at the bottom, it can be fixed either with the grille down or up. Typically, the case manufacturer chooses only one of these two options for fixing the power supply - which one can be determined by the corresponding holes for the bolts.
But there are also often such options when the assembler himself is given a choice - and he can fasten as he wishes, since in this case there are twice as many “holes” - “fasten as you want.”
The answer is simple - because the power supply has a bunch of cables that often interfere with “digging” in the system unit. This saves time, although... this is not so important.
The two photos below show that with two different positions of the power supply, the holes are also in different places.
Fan below:

Fan on top:

II. Preparing the motherboard.
1. [Processor]
We take the motherboard in our hands and place it on the table, first placing a layer of soft material under it - a towel, a thick layer of newspaper or paper - to protect the legs on back side fees.

Then we open the socket and carefully remove the dark plug designed to protect the “legs”. Before doing this, carefully read the instructions for installing the processor on the motherboard several times. Then you should calmly and slowly, clearly “place” the percent on the socket and close the socket. The percent is placed in the only correct way, since there is a “key” on the side and there is no other way to place it.
But why am I signing here? In the motherboard manual, everything is very clearly explained how to do this, and even with photos.


2. [RAM]
So, the processor is in place. Next comes the installation of RAM sticks. To do this, in the slot for the strips, open the latches on the side, of which there are two pieces per strip. Then we take the bar and gently press it into the “socket”. As soon as the bar drops into place, the clamps on the side will move down and “grab” the bar on both sides. We perform this operation for all planks. This operation is also described in more detail in the manual.
They also told me that it is now fashionable to mount the dimmocks on one side - I don’t know whether it’s convenient or not.


The cooler is used to cool the processor during operation. The cooler is “docked” into the surface of the processor not just anyhow, but through a “thermal interface” - thermal paste, which, by filling the unevenness of the “docking” of two metal surfaces, ensures better heat transfer.

In fact, the process of attaching a cooler to a processor with a motherboard deserves a separate article, since this is a rather difficult task (and an extensive/controversial topic) for a beginner, since several important factors must be taken into account (in relation to a top-end cooler):
CPU cooler, method of mounting it, mounting fans, backplate and others;
The thermal paste itself, its thickness/viscosity, thermal conductivity (in relation to the evenness of the cooler base);
Amount of thermal paste applied;
Method of applying thermal paste to both surfaces;
Method of fixing the cooler to the motherboard.
Although it seems that everything is simple - take it with your finger and smear it. For me personally, not everything is so ordinary.
We placed the cooler after the memory sticks because in some cases an already installed cooler interferes with the subsequent installation of the sticks.

III. Final assembly.
1. We bring the case prepared in the first part (with hard drives, drive and power supply) into a horizontal position.

The motherboard prepared in the second part (with a cooler and RAM) Carefully place it in the right place and secure it with bolts.

2. [Wires, cables, cables]
Before connecting the video card, you should connect the power cables, interface cables, case fan wires, USB cables and wires, audio, power, reset and led. All this is again described in detail in the motherboard manual.
2.1. We connect the 24-pin power wire of the motherboard and then the 4-pin (or 8-pin) power wire of the processor to the motherboard.

2.2. We connect the thin wires power, reset, power led and hdd led (according to the pictures in the manual), as well as the USB2.0 and USB3.0 connectors (if any) and the audio wires of the connectors on the front of the case;

2.3. Then comes the turn of SATA interface cables - from the motherboard to the corresponding connector on the hard drives.
Don’t forget about the wires of the case fans (we also connect them to the corresponding connectors on the motherboard according to the manual).

2.4. And last are the power cables for SATA hard drives - from the power supply to the corresponding connector on the hard drive.

3. [Video card]
The last thing we connect is the video card. We take it in our hands, carefully bringing it closer to the PCI-E connector on the motherboard and pressing it until it goes in completely. And we fix it on the left with two bolts for reliable fixation.
Don’t forget to connect additional power cables from the power supply to the video card. Usually they are either. "pin" is the number of pins on the power connector.

And finally, when finished, we get the following picture:

Iron used:
Intel processor Core i5 2500K, 4600 MHz, 1.35 V
Cooler ThermalRight Archon, TR TY-150 x 1000 rpm, TR TY-140 x 1300 rpm
Thermal interface Arctic Cooling MX-2
Motherboard ASRock P67 Extreme6 P67 (bios P1.60)
Memory DDR3, 2 x 4 Gb, 1333 @ 2133 MHz, HMT351U6CFR8C-H9, 10-11-10-30-2T, 1.59 V
Hard drive 500 Gb, WD5000AAKS (SATA2, 7200 rpm, 16 Mb)
1.5 Tb, WD15EARS x 3
2 Tb, WD20EARS x 2
640 Gb, WD6400AADS x 1
160 Gb, Seagate ST3160815AS (backup OS/off)
1.5 Tb, Seagate ST31500541AS
2 TB, Seagate ST2000DL003
2 Tb, Samsung HD204UI
Lian Li PC-A70FB case, and 4 original built-in fans.
Reobass Zalman ZM-MFC1 Plus
PSU AeroCool Strike-X 1100 (1100 W, 80+ Gold)
Video Inno 3D Geforce GTX570 (732/1464/3800, 1,000 V) - reference CO replaced by Zalman VF3000F
Monitor 24" Acer P246H 1920*1080
Favorites