Before you start setting up Internet distribution from your laptop/computer, you need to make sure that the Wi-Fi adapter is turned on. On most laptops, the WLAN adapter activity indicator is present on the case; otherwise, you should enable the adapter in the Network and Sharing Center.
Set up Internet distribution using a wireless Wi-Fi network on your computer/laptop.
One of the ways to organize Internet distribution via Wi-Fi is to create a Wi-Fi network computer-computer using Windows (Don’t rush to do this!!!). Let me immediately explain that this method has a slight drawback, the fact is that you will not connect an Android tablet or iPhone smartphone to such a network, only another computer/laptop with the Windows operating system installed. This is due to the fact that you are creating a point in Ad-hoc mode (also called: point-to-point, computer-to-computer, peer-to-peer network) and devices with a different operating system (Android, iOS) will not see your network or will not be able to access connect to her. You need Soft AP mode (also called: access point mode, soft Access Point, virtual WiFi, virtual router) and how to do this is written in the second part of the article.
The first step is to get to the Network and Sharing Center. To do this, you can right-click on network icon in the lower right corner of the screen and select "Network and Sharing Center."
Another way is to go to “Start” - “Control Panel” - “Network and Sharing Center”.

No matter which method you use, you will eventually see the Network and Sharing Center window. Click "Set up a new connection or network."

In the Setting up a connection or network window, select “Set up a wireless computer-to-computer network” and click “Next”.

Read the information window and click “Next”.

In the next window you need to enter the details of the network you are creating:
Network name- Wi-Fi network name (SSID), which will be seen by other computers/laptops. Enter any name.
Security key- password for connecting to a Wi-Fi network, I recommend using a complex password of at least 8 characters, consisting of letters, numbers and special characters (!@#$).

In the next window, click the "Turn on Internet Connection Sharing" button and click the "Close" button.

At this point, setting up a Wi-Fi network between computers can be considered complete. Now if you go to the Network and Sharing Center you will see your Wi-Fi network.

On other computers you can see and connect to the created network.

In order to delete a computer-to-computer connection, go to the Network and Sharing Center, select “Manage wireless networks” and delete the created network.

Set up Internet distribution on a laptop for a computer/laptop/tablet/smartphone.
If you want to distribute the Internet not only to computers and laptops, but also to tablets and smartphones, the method described below will suit you.
We launch the command prompt with administrator rights, to do this, click “Start” - “All Programs” - “Accessories”, right-click on “Command Prompt” and select “Run as administrator”.

Another way is to click keyboard shortcut
On the command line you need to run the command:
netsh WLAN set hostednetwork mode=allow ssid=“point name” key=”password”
For example:
netsh WLAN set hostednetwork mode=allow ssid=site key=Pa$$w0rd

After this, you need to enable the network, to do this, run the command:
netsh WLAN start hostednetwork

The next step is to provide Internet access to all connected devices; to do this, go to the Network and Sharing Center and select “Change adapter settings.” In the connections window that opens, select the connection that has access to the Internet (it doesn’t matter what the Internet Source is - a 3G/4G modem, a provider cable or a Wi-Fi network with access to the global network), for this you can change the view to “Table” and see next to the connection “Internet access”. In my case it is "Local Area Connection 2". The orange line marks the network that we created; the line Microsoft Virtual WiFiMiniport Adapter will tell you about it (remember the name of the network, it will come in handy later).

Right-click on the connection and select "Properties".

In the properties window, select the "Access" tab, check the box next to "Allow other network users to use this computer's Internet connection", below select the connection you created, in my case it is Wireless Network Connection 2 (the connection marked with an orange line in the picture above).

At this point, setting up the Wi-Fi network can be considered complete. It should be noted that after restarting the computer distributing the Internet, you will have to run the command again since it will not work automatically . If you want it to start automatically every time you boot your computer, you need to create a batch file and add it to startup. To do this, create a text document and enter the command into it netsh WLAN start hostednetwork, save the document. Further change the extension from txt to bat and add the file to startup (Start - all programs - startup).
In order to delete a Wi-Fi connection, run a command prompt with administrator rights and use the command:
netsh WLAN set hostednetwork mode=disallow ssid=“point name” key=”password”
For example:
netsh WLAN set hostednetwork mode=disallow ssid=site key=Pa$$w0rd

That's all. If you have any questions or suggestions, write in the comments.
You can easily connect your phone, tablet or other device to the high-speed Internet connected to your home through a Wi-Fi router (router). However, such a device is not always at hand (for example, you went to the country, taking a laptop and a wireless USB modem with you). In such cases, you can use the Internet on a mobile gadget through a laptop computer, assigning the functions of a router to it. Let's look at how to make a laptop a Wifi access point.
Methods for creating a wireless access point
Any modern laptop is equipped with a wireless adapter that can be used as a Wi-Fi router. To do this, you need to create a kind of virtual bridge connecting network equipment (Wi-Fi adapter and network card).
To obtain such routing, you can use the following tools:
- using standard Windows OS tools (the graphical application “Network Center ...”, the command line or a bat file);
- additional software.
Whatever method is chosen, the following conditions must be met:
Creating a Wireless Access Point Using the Windows Menu
The easiest way to create a virtual router is to use the “Network Center...” function built into the OS. To do this you need:

After a virtual router has been created, in order to successfully use the Internet through it, you may additionally need to enable public access. This is done as follows:

After all the steps have been completed, turn on Wi-Fi on the mobile gadget and start searching for available networks. In the drop-down list, select the name of the network that was specified when creating the virtual Wi-Fi router, and indicate the specified key.
Creating Wi-Fi access via the command line
To connect your phone to the Internet via a laptop, that is, using a virtual router, you can also use the command line. This procedure may seem complicated to an inexperienced user, however, by strictly following the instructions, you will be able to turn on the Wi-Fi hotspot in just a few minutes.
To start distributing wifi from your laptop to your phone, you need to:

To distribute the Internet via a laptop computer to a phone or other device, you need to enable shared access to the newly created Wi-Fi point. To do this, go to the “Network Connections” section and call up the properties of the network through which the Internet is connected to the laptop. After that, in the “Advanced” tab, check the box next to the corresponding item, and in the drop-down list, select the name of the created virtual router. 
Using a bat file
Creating a Wi-Fi access point via the command line is inconvenient because every time you turn off the PC you need to re-enter all the commands. Therefore, this method of turning a laptop computer into a router can only be used for a one-time Internet connection to a phone.
The execution of the above commands can be fully automated. To do this, you need to write a small script in a standard Windows text editor, and then save the document on your laptop desktop under any name in .bat format. To start distributing Wi-Fi using a virtual router to your phone, you just need to run this document with administrator rights. An example of a script is shown in the figure, where YourSSID and YourPassword are the name of the wireless connection and the access key to it. 
Creating a virtual router using additional software
If none of the above methods helped activate Internet distribution on your phone, you can try creating a virtual Wi-Fi router using special software. There are quite a lot of similar utilities on the Internet, but among them the most convenient are:
- MyPublicWiFi;
- Connectify.
Wi-Fi distribution using MyPublicWiFi
This application is absolutely free and has a user-friendly interface, although in a foreign language. With it, you can make a Wi-Fi access point in just a few clicks:

Creating a Wi-Fi hotspot using Connectify
The MyPublicWiFi utility may experience problems if the Internet is connected to the laptop not via a cable, but via a USB modem. In this case, it is better to use the Connectify application. There is a paid and free version of this program. For periodic use, the second option is sufficient. To enable Wi-Fi distribution from a PC to a phone using Connectify, you must:

Possible difficulties when creating a Wi-Fi access point
When creating a new Wi-Fi access point, users often encounter minor difficulties. The table shows the most common problems that can prevent you from distributing the Internet from a laptop, and possible solutions to solve them.
| The essence of the problem | The reason behind this | Possible Solution |
| The phone cannot locate the Wi-Fi network, although it is running | Blocking the connection by an installed antivirus or firewall | Temporarily disable your firewall or antivirus program |
| The Internet does not work on the phone, although Wi-Fi is connected | The user forgot to enable sharing when setting up | Go to Network and Sharing Center and turn on sharing |
| The connection is blocked by a firewall or antivirus program | Disable online protection temporarily | |
| The message “The network could not be started” pops up. | The wireless adapter is disabled on the laptop | Turn on Wi-Fi in your laptop settings |
| Drivers for the adapter do not work correctly | Update drivers using the disk that came with your PC or the Internet |
The more tablets and smartphones appear, the more acute the question arises related to their connection to the World Wide Web using a computer or laptop. If you have a router at home, then there are no special problems. All devices that are at home are connected to it and several family members can be on the Internet at the same time. What to do when you don’t have a home router, but there is an urgent need to connect your smartphone or tablet to the Internet? This problem can be solved quite simply. It is enough to force your laptop, like a router, to distribute Wi-Fi. In Windows 7 and Windows 8, the developers initially included the necessary functionality for this in the operating system.
For laptop or PC there is 2 ways way out of this situation:
- You can use already built-in Windows tools.
- Using third-party programs that create a virtual router on a PC or laptop.
Wi-Fi distribution using built-in Windows tools
For this we need a wireless adapter. If it is not there, then you can use a card that supports MS Virtual Wi-Fi technology. Today, all modern adapters support this technology.
Instructions for a laptop for distributing Wi-Fi
If you have done everything correctly and consistently, then you can connect your smartphone or tablet. But that is not all. Next we will additionally need to enable and configure sharing. Here you need to take the following steps:
- Go to the properties of our network connection and click on the button "Enable Internet Connection Sharing".
- After that, click on the “Close” button.
Sharing enabled. All that remains is to make the necessary settings. To make them:

If you still have questions about how to set up Wi-Fi distribution from a laptop using built-in Windows tools, watch the video below.
Distributing Wi-Fi from a laptop using the command line and “netsh”
And so, what needs to be done.
- At your discretion, in any text editor, it is best to use Notepad, create a new text file. In this file you need to write the line:
netsh wlan set hostednetwork mode=allow ssid=”My_virtual_WiFi” key=”12345678″ keyUsage=persistent, where after the word “ssid” We write the identifier of our wireless network, and after the word “key” we write our password.
- We save the file with the line written in it.
- Next, change the extension of the above file. To do this, you need to right-click on this file. Then select rename. We make an extension for the file instead .txt - .bat.
- Then we need to run the created and renamed file. Do not forget that you must run it with administrator rights. It's easy to do. Right-click on our file. A small window opens in which we select the “Run as administrator” function.
- By running the file, we will begin installing the “Virtual Wi-Fi Adapter” driver, and in the network connections menu, if the above steps are performed correctly, a new “Wireless Network Connection” should appear.
At the next stage, we need to connect the network we are creating to the Internet. To do this you need:
- Go to the “Network and Sharing Center” and select the connection through which you are going to connect to the Internet. Here we select “Properties”.
- Find the access tab "netsh-wlan-start-hostednetwork-2" and check the box “Allow other network users to use this computer’s Internet connection.”
- Let's move on. In the “Home Network Connection” application, we find the new network connection we created and click on it, and then on the “OK” button.
- Your new Wi-Fi connection is ready to go. All that remains is to launch it.
- We launch using the command "netsh wlan start hostednetwork" . To stop it running use the command "netsh wlan stop hostednetwork" . And in order to see the current state, use the command "netsh wlan show hostednetwork" .
If you still have questions about how to set up Wi-Fi distribution from a laptop using the command line, watch the video below.
Setting up Wi-Fi distribution using “Connectify”
![]() Now let’s look, using the “Connectify” program as an example, to see how to install it and configure it for Wi-Fi distribution. This option for a laptop can be used as an alternative, in particular, if for some reason you were unable to start distribution using MS Virtual WiFi.
Now let’s look, using the “Connectify” program as an example, to see how to install it and configure it for Wi-Fi distribution. This option for a laptop can be used as an alternative, in particular, if for some reason you were unable to start distribution using MS Virtual WiFi.
- At the initial stage, you will need to download and install the Connectify program on your laptop. On the Internet you will find two versions of this program: free (Free, despite the fact that its capabilities are limited, it is completely suitable for home use) and paid (PRO).
- We downloaded, installed, and now we are launching the program. If you download a free program, which is most likely the case, then you will not be able to change the SSID in any way, therefore, in the window that opens, we skip this item. In the “Password” field, enter the password for your Wi-Fi.
- Then, in the “Internet to share” field, you will need to select a connection through which we can access the Internet. On the free version, don’t even try to share 3G/4G, it still won’t work.
- After that, go to the “Share Over” field. The Wi-Fi value should already be entered in it, and in “Sharing Mode” select WPA2 and click on the “Start Hotspot” button.
- Your laptop is now fully configured for distribution. We connect other devices and enjoy their work.
If you still have questions about how to set up Wi-Fi distribution from a laptop using the Connectify program, watch the video below.
In this article you will find all the necessary information on setting up an access point on Windows 8 And Windows 8.1. We will set up Internet distribution from a laptop that runs on Windows 8 and connect our phone, tablet, another computer, TV, etc. to this laptop via Wi-Fi. Our computer will act as a Wi-Fi router.
I have been meaning to prepare this article for a very long time, as this is a very popular topic at the moment. The article received a lot of views and comments. Yes, and even, also popular.
Briefly about what we will do and why we should launch an access point on a laptop.
For example, you have a laptop (possibly a personal computer with a Wi-Fi adapter), there is wired internet (or Internet via 3G/4G modem), and devices that can connect to the Internet via Wi-Fi. Modern smartphones, tablets, laptops, TVs, almost all have this capability. Do you have Internet via cable, or from a USB modem?
We connect the Internet to a computer that has Wi-Fi and launch an access point on it. In this article we will do this using Windows 8 as an example. That's all, our laptop receives the Internet via cable and distributes it via Wi-Fi to the devices we need. That's the whole scheme :) If you don't want to spend money on buying a Wi-Fi router, or you just don't need one (for example, Wi-Fi is very rarely needed), then this method is what you need.
Setting up Internet distribution on Windows 8 is practically no different from setting up on Windows 7 (link to instructions is at the beginning of this article). But, I understand that it is much easier to do everything according to the instructions that are written specifically for the operating system that is installed on your laptop. And since Windows 8 (8.1) is actively gaining momentum, this article will be useful.
What should you do before setting up an access point?
- You need to connect the Internet to your laptop. By cable or via USB modem. There may be some nuances with a USB modem, see the article if you have Internet via a modem. There's an article for Windows 7, but that's okay. If the Internet is connected via a network cable, then there should be no problems. The Internet must work, sites must open in the browser.
- Make sure that your laptop has Wi-Fi and the driver is installed on it. If you have previously connected to wireless networks from this laptop, then everything is fine, it means the driver is installed. If you do not know whether the driver is installed on the wireless adapter, then go to Control Panel – Network and Internet – Network Connections, and see if there is Wireless network. If there is, then everything is fine. If not, then download the driver for your model and operating system from the website of the manufacturer of your laptop (adapter) and install it. Driver for wireless Wireless LAN adapter.
That's all, you can start setting up.
Setting up a Wi-Fi access point on Windows 8 using the command line
This is the first method in which we will not use third-party programs, but will make everything standard features of the operating system. This method is a little more complicated than the second one, which you will find below. But sometimes it’s even easier to configure everything through the command line. Yes, problems can arise through third-party programs.
Right click on the lower left corner (or keyboard shortcut Win+X), and select Command Line (Administrator).
In the command prompt window, enter the command (you can just copy and paste):
Where “f1comp” is the name of the network, it can be anything. In English letters.
And “12345678” is the password for the network. You will need to enter it on the device that you will connect to Wi-Fi. Please enter a password of at least 8 characters. You can use numbers and English letters.
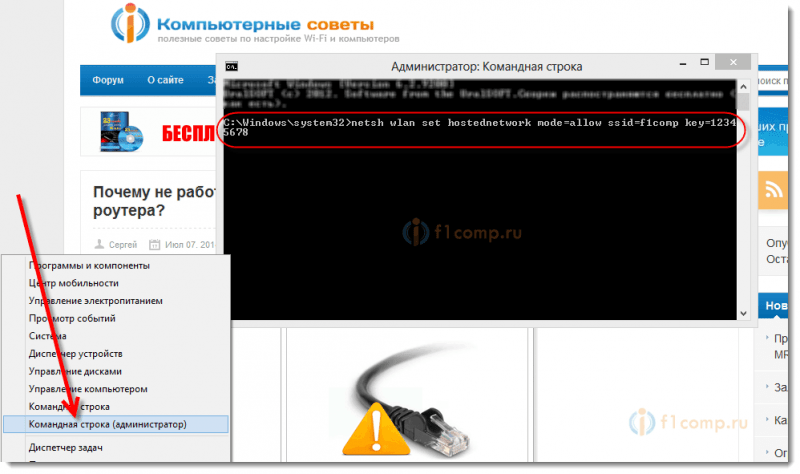 Click Enter.
The launch result should appear with information that the network name and password have been successfully changed.
Enter another command:
This is the command to start the access point. Click Enter, and we see this result:
 It should say that the hosted network is running. If you have the same result as me in the screenshot above, then you can continue. The command prompt window can be closed.
If you see an error Failed to start hosted network, then run two commands in turn:
netsh wlan set hostednetwork mode=disallow
netsh wlan set hostednetwork mode=allowGo to Device Manager, open in the list Network adapters, right click on Hosted Network Virtual Adapter and select Turn on.
We execute two commands to start the network, which I wrote about above:
netsh wlan set hostednetwork mode=allow ssid=f1comp key=12345678
netsh wlan start hostednetwork
Allowing the use of public Internet access
Right-click on the connection icon in the lower right corner. Select an item Network and Sharing Center.
In the new window, on the left, click on the item Change adapter settings. Further attention! Right-click on the connection through which you receive internet ( For me it’s Ethernet, since it’s just a network cable connected to the laptop), and select Properties.
In the new window, go to the tab Access. Check the box next to the item Allow other network users to use this computer's Internet connection.
Below in the list, select the network that appeared after starting the access point. Most likely, it will look something like the screenshot below.
Click OK.
You can take your device and connect it to the Internet via Wi-Fi, which is already provided by our laptop.
You can see instructions for connecting to Wi-Fi: , .
The most popular problem is when the device connects to an access point created on Windows 8, but the Internet does not work. Sites do not open. Or when problems arise with obtaining an IP address.
Solution: completely disable your antivirus, antivirus utilities, firewalls. Most likely, they are blocking the connection. If everything works after disabling the antivirus, then you need to add the connection to the antivirus exceptions.
Also, check your Internet sharing settings, as in the screenshot above.
How to start the network after rebooting the laptop?
You probably have a question, how to restore the wireless network after rebooting the laptop.
You just need to run the command:
netsh wlan start hostednetwork
As we did above in the article. There is no need to enter the network name and password again. Just start the network.
We distribute the Internet in Windows 8 using the MyPublicWifi program
This is an easier way. We will launch the network not through the command line, but using the program MyPublicWifi. This is a free, small program with a clear interface, although without the Russian language. Instead of MyPublicWifi, you can use Virtual Router Plus, Connectify and the like. Their operating principle is the same.
Download and install MyPublicWifi. Version 5.1 can be downloaded from this link (I took the file from the official website http://www.mypublicwifi.com).
The installation is standard. After installation, reboot your laptop and launch MyPublicWifi. If an error appears during startup, right-click on the MyPublicWifi shortcut and select Run as administrator.
Select an item Automatic HotSpot configuration.
In field Network Name (SSID) specify the name of the network to be created.
In field Network Key specify the password that will need to be specified on the device to connect.
Put a tick next to Enable Internet Sharing and select from the list the connection with which your laptop is connected to the Internet.
Click on the button Set up and Start Hotspot.
You can already connect devices to the created network. If again, there is a network connection, but the Internet does not work, then check the Internet sharing settings (I wrote about this above in the article) and disable antivirus, firewall and other programs that may block the connection.
In the MyPublicWifi program, on the tab Clients you can see the devices that are currently connected to your network.
And on the tab Management You can further customize the program. For example, by checking the box next to the item Enable Firewall… we will prohibit devices that connect to your network from using to download and distribute files through clients such as Torrent and the like.
And if you check the box next to MyPublicWifi Will be launched on every system start, then the program will start automatically when you turn on the computer.
All is ready! You can use the Internet.
We set up Internet distribution via Wi-Fi from a laptop on Windows 8 and Windows 8.1. Setting up an access point updated: February 6, 2018 by: admin
Hello, friends! I recently wrote an article in which I talked about . But as it turned out, the method I wrote about in that article is not suitable for connecting mobile devices such as phones, smartphones, tablets, etc.
And if we take into account the fact that a lot of people want to set up a laptop for Wi-Fi distribution and connect a mobile device to it, then I decided to correct the situation. This article can be considered a continuation of the previous article.
In order to make the laptop turn into a router and connect a mobile device to it, we will use the VirtualRouter Plus program. This is a small, simple program that is very easy to configure, which is what we will do now.
If you do not understand what we are going to do now and have not read the article linked above, then I will quickly explain.Let's say you have a laptop and some other mobile devices that have Wi-Fi. And your Internet is connected, say, via cable and only to your laptop. There is no Wi-Fi router. Do you want to connect your phone or tablet to the Internet? So, we will force the laptop to take the Internet via cable (or in another way, for example via a USB modem. Just not via Wi-Fi) and distribute it via Wi-Fi. The laptop will be the access point.
There are several ways to set up distribution. You can use special programs such as VirtualRouter Plus, Connectify Hotspot, or through the command line. I really liked the free VirtualRouter Plus program, so I’ll show you how to set it up. With her help, everything worked out the first time.
What do we need?
We will need a laptop (netbook, desktop computer with adapter) which has Wi-Fi. Internet, which is connected using a network cable, or a USB modem. VirtualRouter Plus program (I'll give you a link later) and the device that we will connect to the Internet (phone, tablet, etc.).
Everything is? Then let's start :).
Setting up Wi-Fi distribution from a laptop
Let me remind you once again that the laptop must be connected to the Internet using a cable and not via a wireless network. Something like this:

And the connection status should be like this:

If everything is connected, we can continue.
Setting up the VirtualRouter Plus program
First download VirtualRouter Plus you can download version 2.1.0 (on which I configured) via the link, or . Links have been verified.
Download the archive and extract it to a folder. Run the file in the folder VirtualRouterPlus.exe.

A window will open in which we need to fill in only three fields.
Network Name (SSID)– in this field, write a name for your wireless network.
Password- password. The password that will be used to connect to your network. Specify a minimum of 8 characters, in English.
Well, on the contrary Shared Connection select the connection from which the Internet will be distributed. My Internet connection is via cable, so I left “Local Area Connection” as is.
That's it, press the button. Start Virtual Router Plus.

All windows will become inactive and the Stop Virtual Router Plus button will appear (you can use it to turn off virtual Wi-Fi). You can minimize programs and it will hide in the notification panel (bottom, right).

Connecting the device to Wi-Fi
Now take your phone, tablet, or whatever you want to connect (I have, for example, an HTC Android phone), turn on Wi-Fi on it and look for an available network in the list with the name that we set in the Virtual Router Plus program.
I have this network:

Click on this network, enter the password (which we specified when setting up the program) and press Connect. It should look something like this:

You can already try to access sites from your phone (or other device), which receives the Internet via Wi-Fi from a laptop. But the connection is there, but the Internet may not work. This is true:). Just some more tweaking to do.
The device connects to Wi-Fi, but the Internet does not work
Return to your laptop, open the program in which we configured the distribution and press the button Stop Virtual Router Plus. Then right click on the connection status and select Network and Sharing Center.

On the left select Change adapter settings. Right click on the adapter LAN connection and select Properties. Go to the tab Access.
Check the boxes like I have in the screenshot below. In field Connecting your home network you need to select an adapter. Everything works fine for me when installed Wireless network connection 3 (You may also have a Wireless network connection 2, or another). Experiment.

Then in the Virtual Router Plus program we launch our network again. The phone should now connect automatically. The Internet should already be working. Everything worked for me, the sites opened!
Converting a laptop into a router was successful :).
Advice! You can add the Virtual Router Plus program to startup so as not to constantly launch it manually. I wrote about how to do this in