If you want to format a data disk, for example, a flash drive or drive (D:), then this can be done using standard Windows tools. However, if you want to format the system disk, that is, the disk on which Windows is installed, you will not be able to do this using standard means.
In order to format the drive (C:), you will need Acronis Disk Director. With her help boot disk You can boot through the BIOS and format the drive with Windows.
How to format a drive in Windows
To format a disk in Windows using standard tools, follow these steps:
1. a) In Windows XP, go to the menu Start - Control Panel - Administrative Tools - Computer Management.
b) In Windows 7, go to the menu Start - Control Panel - System and Security - Administration - Computer Management
2. In the left part of the window that appears, select Disk Management.
3. Right-click on the drive you want to format. In the context menu, select Format.
4. A window for selecting formatting options will appear.
In field Volume Label Enter the name of the drive that will be displayed in Explorer. This field can be left blank
Select file system NTFS. Leave the cluster size Default.
Check the box Quick formatting so that formatting takes place in express mode. Essentially, in this mode the “disk table of contents” is simply cleared and it becomes clean. This saves a lot of time when formatting a disk.
Click OK. After a warning that all information on the disk will be deleted, the disk will begin formatting.
How to format a Windows disk using BIOS
To format drive C, that is, format a Windows drive, you need to burn an Acronis Disk Director boot disk and boot from it through the BIOS.
From the boot disk menu, select Acronis Disk Director 11 Advanced.

In the Acronis Boot Agent window that appears, select Launch management console.

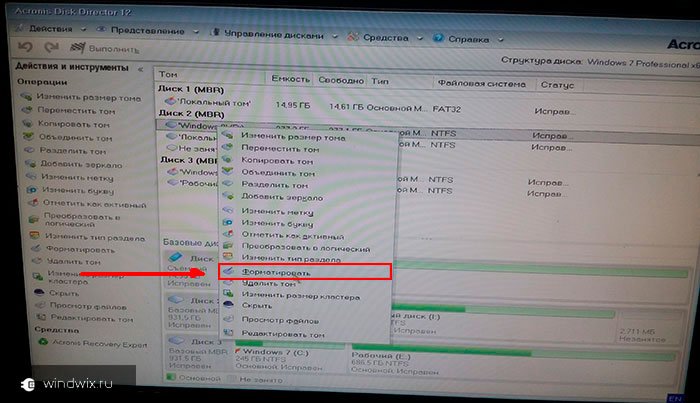
The window that appears displays all physical hard drives and logical partitions on them.

Right-click on the drive (C:) and select from the context menu Format.

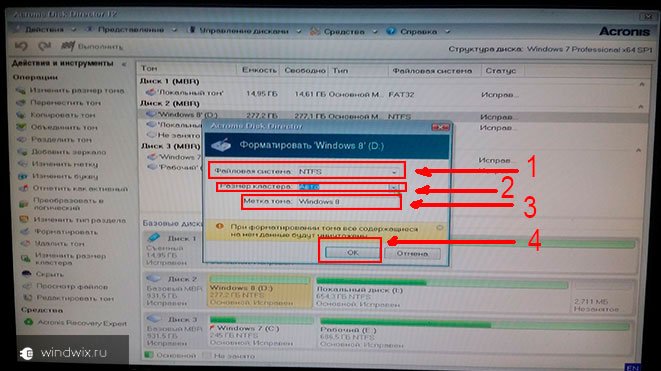
On the list File system select NTFS, leave the cluster size Auto The volume label is the name of the partition that will be displayed in Explorer. You can leave this field blank. Click OK.

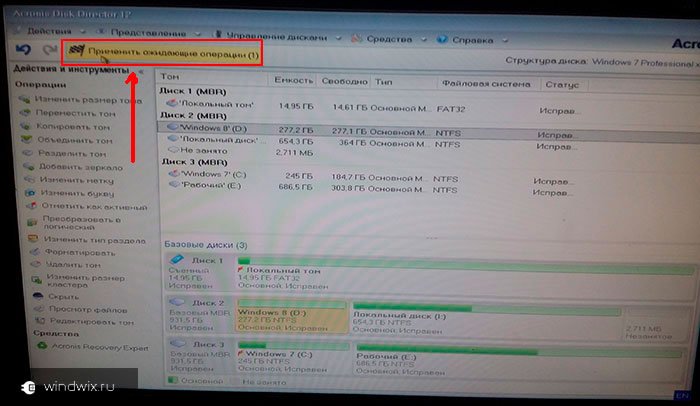
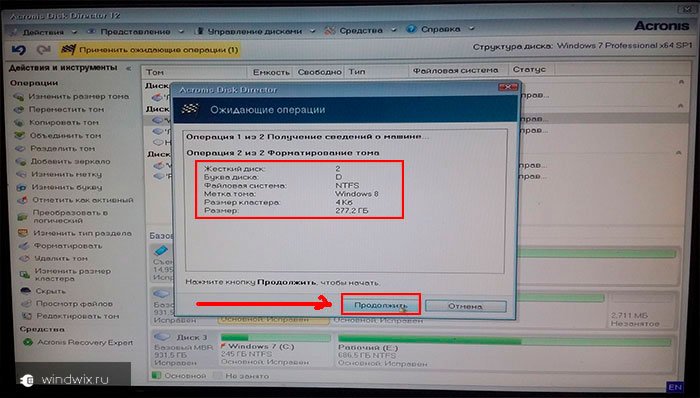
Now click the button Apply scheduled operations.

A window will appear with a list of operations that will be performed on the disk. Click Continue.

The formatting process will begin. When it finishes press the button Close.
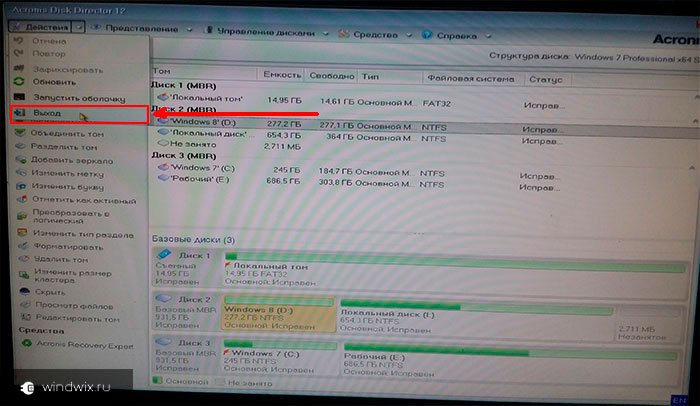
The disk is formatted. Now close the program window and click the Restart button to restart your computer.
Greetings to all readers of my blog, Denis Trishkin here.
Using a computer for a long time, sooner or later there will be a need to re- Windows installations. This can be done in several ways. The correct one is the one before which you need to do formatting hard drive. In this article I will tell you exactly how this happens, and also introduce you to the main concepts.
So what is formatting? Even at school, this process was presented as a division into sectors and tracks, with the loss of all information previously recorded on the storage medium. In the realities of today's technological world, formatting is the process of marking an electronic storage medium, regardless of its shape and structure, be it optical or HDD, memory card, flash drive.
To put it simply, the process involves erasing all existing files in a specified area. At the same time, when new ones appear, they are already placed on top in a seamless manner. Because of this, access to them will be easier in the future, and, consequently, the speed of processing requests will decrease. The OS and individual programs will run faster.
File system types( ^)
Before moving directly to familiarization with the process itself, it is important to introduce you to such a concept as file system and its types. So, it is a table that indicates the order of storing, recording and naming information on media. In other words, it is responsible for all processes related to transferring and reading data.
There are several most famous and used types:

Formatting process( ^)
We immediately need to clarify that we are talking about formatting before installing Windows. Therefore, we will talk about working with hard drives, and not with other data storage devices.
Formatting methods before installing a new system( ^)
There are only a few ways to format before installing a new Windows:
using built-in capabilities;
command line (use the same tool);
third-party programs (most often these are Acronis Disk Director);
use another computer.
Step-by-step instructions for formatting with built-in capabilities( ^)
It should be noted right away that I will talk about Windows 7, 8, 10, since Microsoft no longer supports previous versions. So, when, during the installation of a new operating system, you reach the disk selection point, you need to:

The built-in tool allows you to format the disk only in a quick way.
However, it does not provide additional functions. This is why many specialists use special programs for formatting, which work even without an installed operating system. The above is considered the most convenient Acronis Disk Director. This application is paid, although there is the possibility of temporary use.
Formatting using Acronis Disk Director( ^)
To use the application you need:
1 Download the program image file using a torrent tracker.
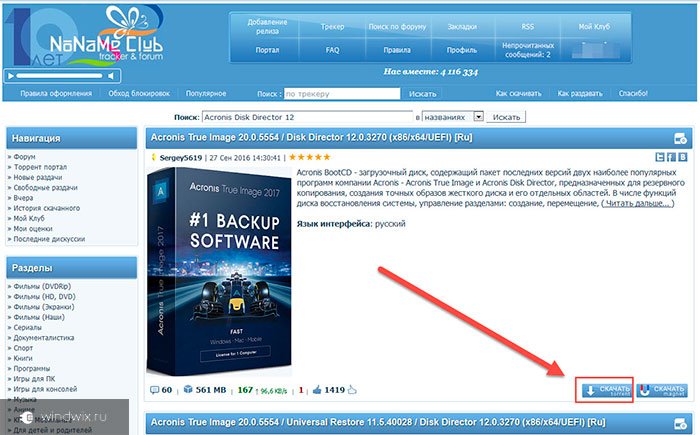
increase
2 Write the downloaded image to a USB flash drive

increase
3 Using the BIOS, check that the system boots first from the flash drive, press the F10 button and agree.
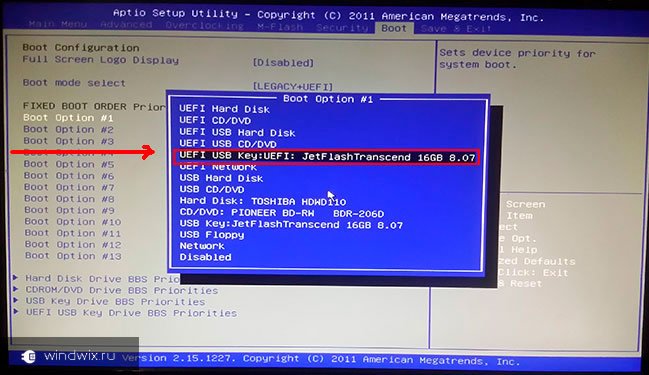
increase
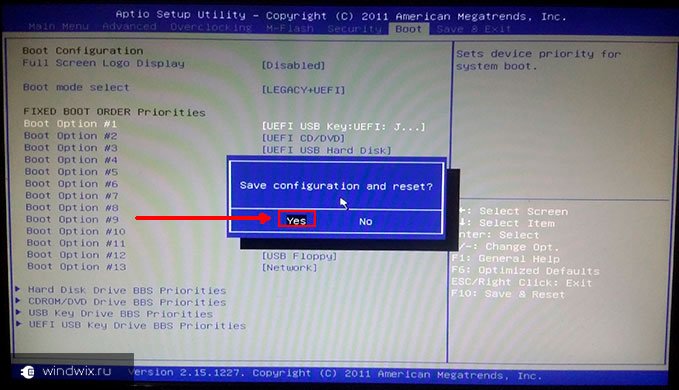
increase
4 After rebooting, confirm working from the flash drive.
5 A black screen appears where you need to select full version Acronis Disk Director.
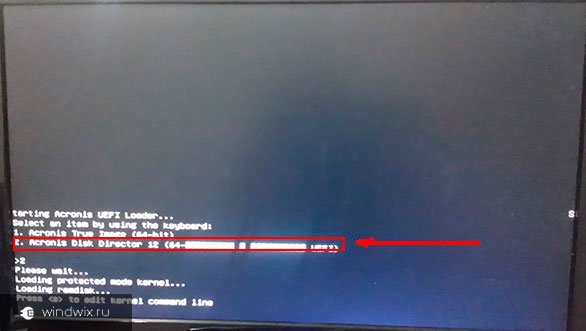
increase
6 On the pop-up window, mark “manual” mode.
7 After this, select the section and click on the item in the left menu.
increase
increase
9 After this, the program sends us to the initial partition selection window. This is necessary to make additional changes. But since we are only formatting the disk on which Windows will later be installed, we click on the checkbox.
increase
increase
10 We are waiting for the process to complete. After this, you can exit the program and continue installing the OS. In this case, there is no longer any need to format the disk with the built-in program.
increase
Formatting via the command line( ^)
Almost no one uses this method, since the methods described above are sufficient for most. But sometimes there are still situations when he remains the only one.
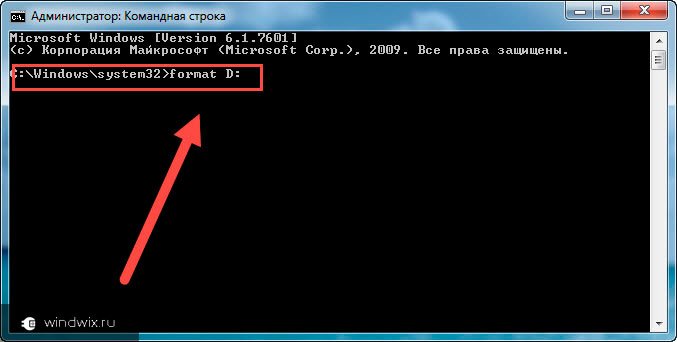
To call the command line, before copying a new one Windows versions to your computer, when the first installation window appears, press the key combination “ Shift+F10" After this, a black window will appear. It contains the command “ format" along with the letter of the partition that needs to be formatted (this could be C, D, E and others). After this you need to confirm the action: “ Yes" Or write " No» if you made a mistake with the letter of the section or simply changed your mind.
The situation can be resolved using a third-party computer. The infected hard drive is connected to it and cleaned in a standard system. To do this, after booting the system in the section " My computer“You need to select the damaged partition, right-click on it, and then select the appropriate menu. Specify the file system, cluster size, and volume label.
increase
After formatting, the hard drive is installed on the original computer and Windows is installed. Sometimes during this, the system requires you to re-divide the partition into sectors and tracks. Don't worry - this is normal.
Formatting your hard drive before installing Windows is an important step. If you don't do it, a new version will work with errors and most likely not for long.
I hope this article will clarify for you the main issues that are associated with the formatting procedure. Subscribe, recommend me to your friends and along with you become computer literate.
Question from a user
Hello.
I want to completely delete all content on the disk, and then reinstall the system. I have two drives ("C:" and "D:") - I was able to format one, but there is a problem with the "C:" drive. Can you tell me how I can format the system hard drive (on which Windows 8 is installed)?
Good day to all!
In general, on today’s modern system, formatting a disk is not a difficult operation, I would even say simple (not like it was 20 years ago). Perhaps, questions arise only in cases where Windows does not see the disk, errors appear during formatting, or when trying to format system disk(as in your case).
In the article below I will discuss several formatting methods - depending on your tasks and the specific problem, choose the one you need. So...
Important: After formatting the drive, all information on it will be deleted! Make a copy of the necessary files from the disk to third-party media in advance.
From under Windows
Via My Computer
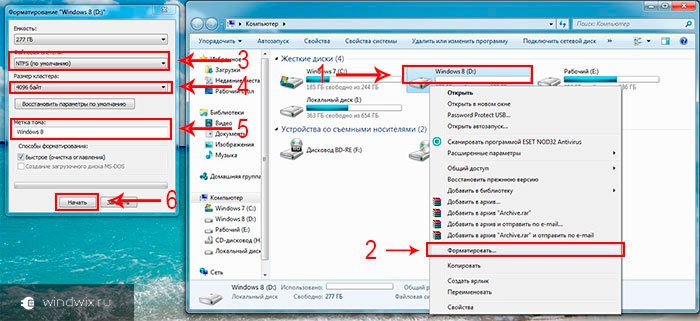
Probably the classic and easiest way to format a disk is to go to “My Computer” (or “This Computer”, depending on the version of your OS), and find the desired disk partition in it. Then select this section, right-click on it - and select the required one in the context menu (ie formatting, see screenshot below).
Note: if the "My Computer" icon is not on the desktop, and you do not know how to open it, press the button combination WIN+E- Explorer will open: in the menu on the left, select the link to “My Computer/This Computer”.

Format disk // This PC // Windows 10
- file system: FAT 32, NTFS, exFAT, etc. In most cases, the most best option for a hard drive - use NTFS;
- allocation unit size: 4096 bytes (optimal);
- volume label: disk name, you can enter any (I recommend using the Latin alphabet, as some programs do not read Russian font correctly).

In general, the default settings will usually suit most users - you can immediately click the "Start" button. In a few minutes you will receive a “clean” disk...
Via Disk Management
In cases where you go to “My Computer” - and it simply does not show your connected disk (this often happens with new disks that have not been formatted) - then you need to use either special utilities, or use the Disk Management tool built into Windows.
To open Disk Management you need to:
- press a combination of buttons WIN+R to open the Run window;
- enter the command diskmgmt.msc and press Enter. The Disk Management application should open.
Next, you will see not only all connected disks, flash drives, memory cards, etc., but also what partitions were created on them - i.e. the entire structure. Select the desired section and right-click on it - in the context menu, click on the item "Format..." (see red arrows in the screenshot below).


Via command line
In cases where Explorer freezes (for example), also in the event of various types of errors, you can try formatting the disk using command line.
First you need to open it as an administrator. For this:

format G: /FS:NTFS /q
G: - letter of the drive to be formatted (specify carefully!);
/FS:NTFS - select a file system;
/q - quick formatting.

Basically, the disk must be formatted.
In Windows 10, by the way, a small “error” may appear - the system will ask you to specify the volume label for the disk, and then write that “The specified disk label is invalid” (although you seem to have specified everything correctly, example below).

In this case, do the following...
First, open the drive you want to format in a command prompt, for example, drive G: (see screenshot below).

Team VOL- look at the volume label
Next, enter the formatting command again, and in the disk label field - the label that we found out in the previous step (in my case - Windows 8). Next, you will be warned that all data will be destroyed during formatting (you agree by entering y and pressing Enter ).
In the next step you will be prompted to enter a volume label - now you can enter any name (32 characters). You can simply leave the field empty by pressing Enter. Actually, that’s it - the disk will be formatted (screenshot below).
With the help of special utilities
The best programs and utilities for working with a hard drive:
There are now hundreds of different programs and utilities for working with hard drives. Operations such as formatting, partitioning, defragmentation, etc. can be done in more convenient programs than those built into Windows. The link to the article with the best of them is given above.
In my opinion, one of those that deserves attention is AOMEI Partition Assistant.
AOMEI Partition Assistant
It allows you to quickly, safely, and easily carry out the most necessary operations with disk drives:
- change their partition size (including without formatting);
- move partitions;
- merge sections;
- format drives;
- change labels and much more!
What’s also captivating is that the program has many different step by step masters- they will help solve the problem even for those users who have only recently become acquainted with a PC. Well, for example, you can convert the FAT 32 file system to NTFS without losing data, transfer Windows from a hard drive to a newfangled SSD, etc.
Via BIOS
(for formatting system partitions, for example, on which Windows is installed)
If you want to format a partition on which Windows is installed, you won’t be able to do it just like that. The bottom line is that you need to boot from another medium - for example, from another hard drive (on which Windows is installed) or from a bootable USB flash drive, and then format your disk.
Naturally, you need to prepare such media in advance (for example, an installation flash drive with Windows) - since after formatting the system partition of the drive, Windows will no longer boot from it (until you install it again. I explained it chaotically, but in general outline, I think it’s clear ☻).
Using a Windows installation flash drive
The easiest way to format the system partition of a disk is to use a Windows installation flash drive. You can learn how to create and prepare it (if you don’t have one) from my previous articles (links are provided below).
Utilities for creating bootable USB flash drives with Windows -
Creating a bootable Windows 10 USB flash drive -
Creating a bootable USB flash drive for installing Windows XP, 7, 8, 10 (UEFI and Legacy) -
The easiest way to boot from a flash drive is to use a special boot menu - BOOT MENU, which can be called up immediately after turning on the computer/laptop (or by changing the boot priority in the BIOS). In order not to repeat myself here, I will provide a couple of links to detailed articles about this.
Hotkeys to enter the BIOS menu, Boot Menu, restore from a hidden partition -
How to configure the BIOS to boot from a flash drive or disk (CD/DVD/USB) -
Next, after booting from the installation flash drive, you need to go to selecting a partition for installing Windows. In this step, you can format the entire disk (delete all partitions and create them again), as well as its individual partitions.

If you have difficulties and you don’t know how to get to this step when installing Windows, I recommend reading this article:
With the help of special programs
Take the same AOMEI Partition Assistant that I recommended using when working under Windows, just above in the article. She has an excellent tool in her arsenal for creating a special emergency flash drive from which you can boot when your system crashes (or it is not installed on the disk at all).
I have an article on programs for working with hard drives on my blog:(including information about AOMEI Partition Assistant).
To create such a flash drive, you need to run the program on your working PC "Master/Make Bootable CD Master".


To boot from such a flash drive, use also Boot Menu, links to instructions were given above in the article, in the previous step. When you boot from the emergency flash drive, the menu and operation of the program will be similar to that running under Windows. Also click on the desired disk and perform the necessary operation (screenshot below).

AOMEI Partition Assistant - formatting a partition
That's all, a separate merci for additions.
Very often, a personal computer user has a question about how to format a hard drive through the BIOS. It’s worth noting right away that you won’t be able to format a hard drive through the BIOS, since the BIOS only serves as a tool for creating the basis for formatting. That is, with the help of a system utility we can call program elements that will allow us to achieve our main goal. The question itself means that the user wants to format the hard drive without loading the operating system Windows systems. And this is a very real task, which we will now consider.
Formatting is the complete destruction of data and cleaning internal memory hard drive. This operation destroys all bits of data that were previously written to the disk. This procedure is done for the purpose of complete cleansing, which allows you to reinstall the operating system without fear of errors, malfunctions and other unpleasant moments.
So, how to format a hard drive using BIOS? There are several ways to solve this problem:
- formatting using external system media;
- formatting through the Windows installation boot panel;
- formatting via the system command panel;
- formatting using a special program.
The listed methods allow you to format a disk without any special difficulties or special tools. It is worth considering that to perform these actions you will need a disk with a boot boot option, external media (flash drive, external hard drive) and a notepad to write down a special set of characters for the system command line.
Formatting using external media

If you have a flash drive with Windows recorded and a boot option (a special option that allows the system to read data from the flash drive without loading the main Windows), then you are already close to solving the problem. You just need to insert the flash drive into the computer (using the special Alt+F command indicated on the boot screen) and go to the Boot tab. In this tab you must go to the Boot Device Priority option and in this option in the 1 st Boot Device menu set the name USB-FDD.
System names in BIOS may be different. For example, in a later version of the system utility, you need to install USB-FDD in the First Boot Device menu, which is located in the Advanced tab. you can right-click on the desired media and format it. It is worth considering that the external media should not contain files for installing Windows; Windows itself should be installed on it (be sure to take this note into account).
Formatting through the Windows installation boot panel
You can format a hard drive through the operating system installation panel only if you have the physical Windows installation media itself or a flash drive with files with the boot option. You insert the media into the computer, the data verification process begins, after a few minutes you will see a window asking you to select a disk for installation. At the bottom you can find the “format hard drive” function. It is with the help of it that you can clean the desired hard drive.
Formatting via the system command panel
To be able to format via the command panel, you will again need physical installation media or a USB flash drive with Windows data. After the language selection screen appears, you need to press the Shift+F10 button combination. This will bring up the system command panel. Next, you should enter the following combination of commands in it: “wmic logicaldisk get deviceid, volumename, size, description”. This will allow the panel to be initially configured for hard drive operation. But to format the hard drive through this panel, you need to use two more commands:
- format /FS:NTFS X: /q (will allow you to format the hard drive to NTFS);
- format /FS:FAT32 X: /q (will allow you to format to the FAT 32 system).

Formatting can also be done using the installation tool. Windows disk— the assembly contains a regular command line
In these commands, X is the name of your hard drive that needs to be cleaned. This method is the most reliable and provides maximum security for your hard drive. The method will not allow viruses to penetrate your hard drive, and will also protect it from unexpected system failure.
Formatting using a special program
To format a hard drive using a program, you must first burn a program called HDD Low Level Format Tool v4.30 onto the media. Then you must enter the BIOS, go to the Boot tab in the Boot Device Priority menu and set the name of the CD/DVD. After this installation, the system will first begin to load data from the media, that is, the program itself will start. Again, it is worth considering that you should install the program on disk, and not write its files for installation.
After launching the program, you will be able to intuitively understand what to do in it. HDD Low Level Format Tool v4.30 is a comprehensive program in Russian with a built-in assistant that will allow you to understand every function of this software. This method is the most comprehensive, since it allows you not only to format the hard drive, but also to save and transfer data, restore damaged sectors, and emulate data.
So we looked at all the main ways to clear a hard drive from data. Each method is unique in its own way and will definitely help you cope with the problem that has arisen. Now, when you or your friends have a question about how to format via BIOS, you can immediately give a lot of examples in order to achieve the desired result. Once again, carefully study the hard drive formatting methods and choose the one that is most suitable for you.
Quite often, users have problems with formatting. Especially if you need to do it with the system hard drive ( usually, but not always, this is C). In this case, the usual methods will not work.
If the hard drive ( or its section) without system files, then use the formatting method in the system itself.
In my instructions, I will show you how to format a hard drive with a system (there, where is windows installed) and without. I'll start with the simplest thing.
Formatting a non-system hard drive or partition
These methods are practically no different from. It can only be done on those hard drives that do not have system files ( usually D or E).
No need to worry about formatting the system drive. There is no way to do it this way. You will see a warning that the action is not possible.
Open my computer ( conductor). In it, select the disk, open the context menu and select formatting.
In the window that appears, leave everything as it is ( can be removed quick way, but then you will have to wait a very long time).

The process will take a long time ( depends on volume). You may think that nothing is happening and the computer is just frozen. But in most cases this is not the case.
The same can be done in the disk management window. Use this method if for some reason the first one did not work.
Go to Start >> All Programs >> Administrative Tools >> Computer Management.

In the window that appears, select the hard drive and “Format” in the context menu as in the image below.

There is 1 more method on the command line. Administrator rights are required.
Go to Start menu >> Run ( or Win+R) to open the progress bar. Then go to the command line.

Enter the command there:
Explanation: E is the hard drive letter. NTFS- file system. Q- quick formatting.

Formatting the system disk
When you try to format your system hard drive using the above methods, you will see the error shown below.

Why does this happen? It's simple. Windows cannot format itself. This will cause the system to malfunction and the error provides protection against this.
In addition, even if Windows was installed on another hard drive, the system files necessary to run the OS can be stored on the local one. In this case, the BIOS check will begin with it ( C).
It turns out that this is only necessary for future installations new system. Otherwise, you will simply make the computer unusable. Before this you need to prepare a little.
You will need another media with the operating system you plan to install. This method works on any version. I'll demonstrate it on Windows 8.
Set it in advance. First you need to find out its letter. It may be different from "C:" so check this in advance. Now I’ll show you how to do this right during installation.
Press the key combination Shift+F10. On other versions operating systems This keyboard shortcut works the same way.

A command prompt window should appear. In it, enter the command notepad, which will open a notepad. From there you can further view the necessary information.

The Notepad program will open. In it, go to File >> Open or press CTRL+O.

Explorer will open. Go to the “This PC” tab and look at the drive letter you want to format. In my case D. It is designated as local.

Now go back to the command line and enter the command:
Where /FS:NTFS- file system. D:— drive letter. /q- quick formatting.

You can also use the utility directly during the installation process and not use the command line.
Select the language, click on the install button and in the window where you need to select the partition to install, you need to select formatting. See how it looks in the image.

It can also be done using any ( almost) LiveCD. This is the media from which the system boots instead of booting from the hard drive. You can format it directly in Explorer, similar to methods with non-system hard drives. This is possible because most of the data is in random access memory and this does not prevent the computer from starting.
There are also many programs, but they are paid and their use will be unnecessary for such tasks. This information should be sufficient.
If something was not clear to you, then watch this video. It clearly depicts all the actions with detailed comments and you will have no questions left.
Were you able to format your hard drive?