Convenient distribution of disk space on a computer is one of the fundamental actions for comfortable operation and performance of the operating system. After purchasing a new PC or reinstalling the operating system, the question arises - how to properly divide HDD? The standard division into two volumes C and D will not be enough when large size Winchester. 100-150 GB are usually allocated for system files; the rest of the disk space will be correctly divided into several parts. This simple action will guarantee the performance of the OS by reducing the rate of fragmentation of the system volume. There are three simple ways division into parts in the Windows operating system:
- Installation of a separate software.
- Using internal Windows services.
- Separation when installing/reinstalling the operating system.
When using a separate program to partition a disk, you need to prepare, namely:
- make a backup copy of important personal files;
- free up additional space on your hard drive;
- check the hard drive for possible errors.
Protecting your personal files from loss during further work is the user’s primary task. Photos, contacts and other files should be copied to an external storage device (hard drive, flash drive) or use a file storage cloud on the Internet. After backing up your data, you should ensure that you have free space to create a new partition. To do this, just go to “Control Panel” - “Add or Remove Programs”. View the list and remove unnecessary software, which will provide additional disk space.
Once you have enough space for the new partition, you need to check the hard drive for errors. Go to “My Computer”, select the desired drive and go to “Properties”. Then select the “Service” tab and click “Run check”, check both boxes and wait for completion. At the end of the check, the OS will ask you to restart the PC - confirm. The disk properties interface in Windows 7 and XP is identical, so there will be no difficulties.
Working with partitioning programs
The program interface is configured mainly to solve one problem - how to divide the hard drive into convenient parts. Most software works with different versions Windows 7 and XP, there are both paid services and for free use. It would be more correct to use programs for free use with a Russian interface.
The following are very popular: “Partition Magic”, “Acronis Disk Director”, “Aomei Partition Assistant”. Each uses a standard menu for working with the disk. All that remains is to select the disk that needs to be divided into parts. Then set the volume for the new partition, its name and file system. Any of the programs will offer two file system options: FAT 32 and NTFS. The first is installed when working with Windows 95/98 or Millinium Edition. Starting from XP, NTFS should be selected. For stable operation of the OS, a prerequisite is that all hard drive partitions must be formatted under the same file system.
How to partition a hard drive without installing software
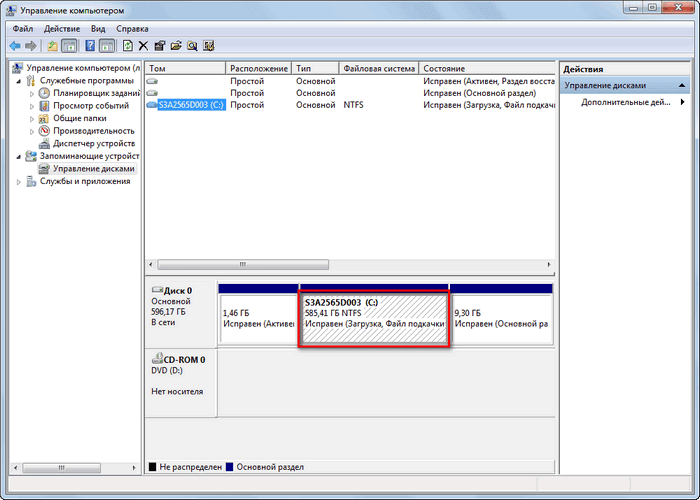
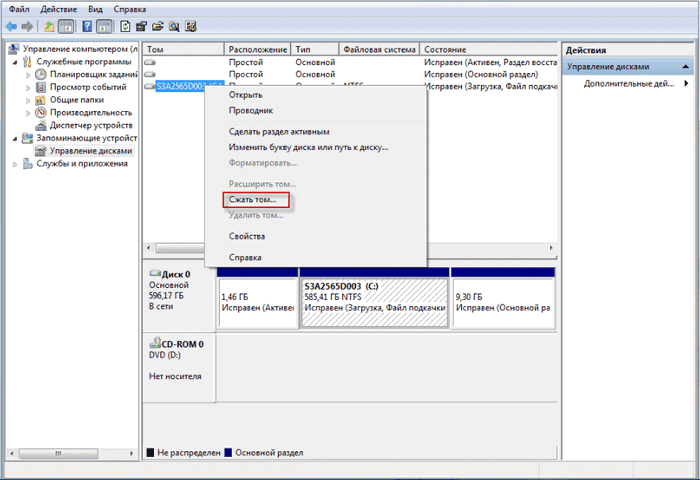
The ability to divide the hard drive into partitions using system services is provided in versions of Windows 7 and higher. To do this, find the “Management” item, located in the “My Computer” folder. In the “Computer Management” menu that opens, open the “Disk Management” tab. A list of disks that are on the PC will appear, as well as a hidden “System Reserved” section - a recovery system disk. We select drive C or the one that we will divide into two or three parts - additional containers. Open the list of disk functions: right button - “Volume compression”. In the window that appears, select the location where you want to compress the disk. Provided that the hard drive was not previously divided into separate parts, the system will offer to divide it into parts approximately equal in volume. Can be installed desired value. If a miscalculation is made, you can return the partition to its previous sizes by selecting “Uncompress volume” in the disk functions. The system disk will be compressed and a new partition will be displayed called “Unallocated”. Open the list of functions and click “Create a simple volume...”. The “Create a Simple Volume Wizard” window will appear on the screen and prompt you to designate the new partition with a letter and give it a name. This is followed by the process of formatting into a file system. Having decided on the option, click “Continue”, and in a few minutes the work on creating a new section will be completed.
Partitioning the hard drive when installing or reinstalling the operating system
Partitions should be created at the moment when the OS installation reaches the point of selecting the partition in which it should be installed. Further actions:
- Create a partition for the OS, let it be drive C, and enter its size. If the hard drive initially has 1 TB of memory, you can allocate 100-120 GB for the operating system - that’s enough.
- Next, the computer will ask you to allocate a little more space for backup files, you need not to skimp, but click the “Agree” button.
- Create a second partition: look for the line “Free disk space”, click “Create”. Next we set the size for it. We call it drive “D” and the button “Apply”. So, there are already two sections.
- To create the third partition, proceed in the same way as described above: “Free disk space” - “Create”. We indicate the entire size remaining from the original one.
- Click on the “C” drive, which is allocated for the OS and click “Next”. The installation of your Windows 7/8 continues.
Conclusion
As you can see, there is nothing complicated about dividing a hard drive into several departments. Even a novice user can handle this simple process. The main thing is to carry out everything clearly according to the written points, and you will succeed. If done correctly, you will have several disks, in each of which you can store certain folders, files, etc. This will eliminate the problem of constantly searching for the necessary information on the computer.
The second important advantage of partitioning the hard drive is that when reinstalling the OS, for some reason, all information during the formatting process can be destroyed. And if the computer has the OS on one disk, and all the files on others, the process of destroying the contents will affect only one partition of the hard drive. And the speed of the system itself will be faster, the computer will not freeze, thanks to less “cluttered” departments. Ideal option: two to four sections, depending on the size of your hard drive.
How to partition a hard drive in the Windows operating system - there are two answers to this question. The disk can be divided into several partitions using operating system tools, or using third-party software.
The process of dividing a hard drive into two or more parts is no different in the operating systems Windows 7, Windows 8.1 (Windows 8), or Windows 10.
Manufacturers of computers, especially laptops, often create only one partition of the hard drive on which the operating system is installed and all the user’s files will be located there in the future.
For more convenient use of the computer, you can create another hard drive partition on which the user will store his files - music, videos, documents, and other files. This will make it easier for him to find the necessary files, because if all the files are on one disk, then it will be quite difficult to find the necessary folders and files.
If the operating system fails, files located on another drive will not be lost during the process of reinstalling the operating system.
You can divide your hard drive into partitions using a tool in the operating system Windows 7, Windows 8 or Windows 10. More advanced operations with hard drive partitions can be done using programs specifically designed for this, such as, for example, Acronis Disk Director, EASEUS Partition Manager, MiniTool Partition Wizard.
Keep in mind that when partitioning MBR on a hard drive, the disk can only be divided into 4 main partitions. If you already have 4 such partitions created on your disk, then you will not need to perform this operation, since the new, created partition will not be displayed in the operating system. This is often encountered by laptop owners, because manufacturers often create hidden partitions on the disk for system recovery and for storing individual programs and drivers.
Modern computers use the GPT partition style, in which you can create required quantity sections. There is no such restriction here.
How to partition a Windows 7 hard drive
In order to partition a Windows 7 hard drive, you need to enter Disk Management under account administrator. In a similar way, you can divide a hard drive in Windows 8.1 or Windows 10; the process of dividing the disk into parts is no different.
After you open Explorer => “Computer”, then you will see the partitions of your computer’s hard drive.
In this image you can see that the hard drive has two partitions: " Local disk(C:)", which will need to be divided into sections, and a protected partition - "Microsoft Office 2010 (Q)", which cannot be changed.
Here you can see that the hard drive is already about half full of data. The partition itself, on which the operating system is installed and the files are located, is named after the brand of the hard drive installed on the computer.
A new hard disk partition will be created from the free space of the “Local Disk (C:)”.
To partition your hard drive, you need to go into Disk Management. First, you will need to go to the Start menu and then right-click on the Computer button. In the context menu that opens, select “Management”.
This will open the Computer Management window. Next, on the left side of the window, select “Disk Management”.

Information about your computer’s disks will appear in the “Disk Management” tab. This image shows that the computer has one drive - “Logical drive (C:)”, which is named after the brand of hard drive (hard drive). The disk has an NTFS file system. I will divide this section into two parts.
Also on the hard drive there are also two special protected partitions that were created by the laptop manufacturer - the “Recovery Partition” (it is not displayed in Explorer) for system recovery, and the partition with Microsoft Office 2010.
On a desktop computer, there may not be such additional partitions if you did not buy a computer from a well-known manufacturer. These protected partitions will not be needed to solve our problem - dividing the hard drive into two partitions.
There is another way to enter Disk Management. To do this, you need to go to the “Start” menu, enter the expression “diskmgmt.msc” in the “Search” field, and then press the “Enter” button on the keyboard. This will open the Disk Management window.
The contents of this window are identical to the contents of the Disk Management tab in the Computer Management window.
In order to divide a hard drive into two parts, you need to select a disk that will be divided into two parts. To do this, you will need to move the mouse cursor over the disk that is to be divided, in this case it is the “(C:)” drive, and then in the context menu that opens, click on the “Compress volume...” item.
This will open the Request Compression Space window, informing you that it is polling to determine available compression space.

In my case, there was already data on the hard drive occupying a size of 342 GB.
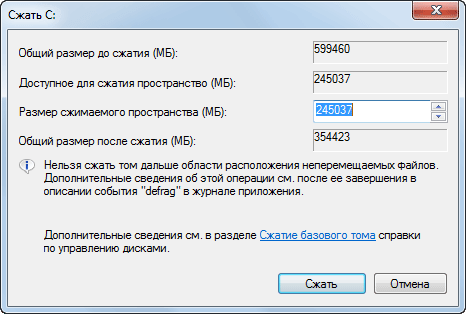
After completing the survey process, the “Compress From:” window will open, which will indicate the following parameters: the total volume of the hard drive before compression (599480 MB), the space available for compression (245037 MB), the size of the compressed space (245037 MB), as well as the total disk size after compression (354423 MB).
You can change the size of the shrinkable space. The "compressible space size" is the size of the future second disk that will be created after splitting the hard disk into two parts. “Total size after compression” is the size of the “Logical drive (C:)” after the hard drive has been split into parts.
When using the Windows operating system tool, you will not be able to split your hard drive more than in half. Please note that the sizes of the disks should not be the same, they should differ in size from each other. Read more about this at the end of this article.
After this, the compression process begins. After it is completed, you will see that a new partition has appeared with unallocated space.


After this, the “Create a Simple Volume Wizard” window opens, in which you will need to click on the “Next” button.

In the next window, “Specifying the volume size,” click on the “Next” button.

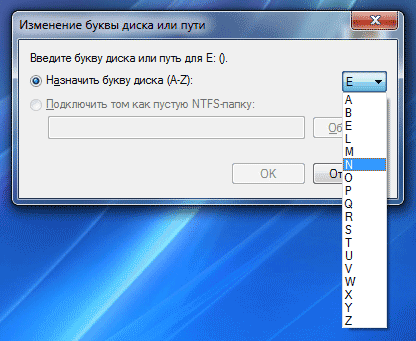
In the “Assign a drive letter or path” window, you need to select a letter for the new disk partition. If the computer already has a disk designated by the letter “C”, then it would be better to assign the following letter of the alphabet to the second disk: “D”. Then you should click on the “Next” button.

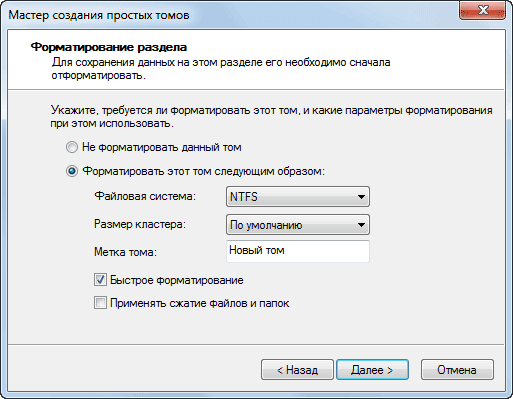
In the “Format Partition” window, some settings are already selected by default - file system, cluster size and volume label, and the “Quick Format” item is activated.
By default, the volume label is named "New Volume". You can delete this name and do not fill in anything in this field, then the second partition of the disk will have the name “Logical disk (D:)”. In the future, if necessary, the section title can be corrected.
Then formatting of the new hard drive partition begins.

After completing the formatting process, in the next window “Completing the Create Simple Volume Wizard” you will be informed that the creation of a new hard disk partition has been completed. You can view the parameters of the created hard disk partition.
After this, you need to click on the “Done” button.

In this image you can see that a new hard drive partition has appeared - “New Volume (D:)” with the NTFS file system.

After opening Explorer, you can see a new hard disk partition created, which is still free of files, as well as the “Local Disk (C:)”, which is full.

Now you can change the names of the hard drive partitions, if you have not done this before, to others that are more understandable.
To do this, you need to right-click on the disk that you want to rename, and select “Rename” from the context menu. Then you should enter a new name for the hard drive partition, and then press the “Enter” button on the keyboard. It is not necessary to change the partition names; you can continue to use the partition names already on your computer.
After renaming, the hard drive partitions will have more understandable names. In this image, you can see that I have already moved some of the files from “Local Disk (C:)” to another, just created disk - “Local Disk (D:)”.

If you have an operating system installed on your computer Windows system 8, then you can partition the hard drive in the same way as described in this article.
How to change the drive letter
The DVD optical drive on the computer was labeled "D". Since I was going to divide the disk into two parts, I changed the drive letter in advance.
This is done so that the hard drive partitions have letter designations in the order of the letters in the alphabet, for more convenient use and perception. For example, in Explorer, the hard drive partitions will first be indicated, then the CD/DVD drive, and then connected drives, memory cards and disks.
To change the drive letter, you need to go to “Disk Management” and right-click on the CD/DVD drive. In the context menu, you need to click on the item “Change the drive letter or path to the drive...”, and in the window that opens “Change the drive letter or path for D:” (your letter name may be different) click on the “Change” button.
In the “Change drive letter or path” window, you must enter a different letter to change, and then click on the “OK” button.
It is not necessary to change the drive letter. A new hard disk partition can be designated by any letter of the alphabet not yet occupied.
Solving the problem with the RAW file system
After partitioning your hard drive using the Windows operating system, if you made the hard drive partition sizes the same, a problem with the file system may arise. After formatting, you may find that the new disk partition was created not in the NTFS file system, but in the RAW file system.
I myself encountered this problem when I was partitioning a hard drive in Windows 8 on my daughter’s laptop. In order to avoid this problem, in the process of creating a new hard disk partition, the created partition must have a different size than the “Local Disk (C:)”.
To resolve this issue, you need to re-run the Create Simple Volume Wizard process. In the “Specify volume size” window, in the “Simple volume size (MB)” item, you need to slightly reduce the partition size, and in the “Format partition” window, uncheck the box next to the “Quick format” item.
Formatting will take some time, which will depend on the size of the hard drive partition. Once the formatting process is complete, the problem will be resolved, the new disk partition will now have the NTFS file system.
Conclusions of the article
Using the operating system tool, you can easily split your hard drive into two parts in Windows 7, Windows 8, or Windows 10.
How to split a hard drive into two partitions without data loss, provided that there is one partition converted to the main volume with the letter (C:), the operating system is installed on it and nothing should happen to it, how do you like the problem?
- Note: If you have a new operating system installed, you can divide your hard drive into partitions using the operating system itself, without resorting to third-party programs, here is the article, if something doesn’t work, use the universal one and free program in Russian.
- If you are on Windows 7, read here. If you have a new laptop, then you need this article.
Such problems are very easy to solve special programs for disk management, for example: Acronis Disk Director, Paragon, I have to work with all of them. The fact is that when working with such programs it is easy to damage the partition table hard drive, then the computer will not be able to determine, among the new volumes created by you, the location of the main partition with operating system, what then? That's right, you simply won't be able to boot into Windows. Acronis, also working from a boot disk, sometimes confuses partition letters.
- Therefore, before working with Acronis Disk Director, you need to insure yourself as much as possible and create a backup of all partitions of your hard drive. Every user should be able to create a backup of the operating system and, if necessary, deploy it back.
I do not want to intimidate you in any way, but simply warn you to be very careful when working with software for working with computers. hard disk partitions. I remember in the old days, when everything was just beginning, I always had several floppy disks in my pocket with the Partition Magic program in bourgeois language, yes, floppy disks, it worked from them, you insert it into the floppy and you always don’t know how it will end, but I will say Honestly, I only let you down a few times. And then I met Acronis and have not left since then, although now I carry a large suitcase with me and there are always several boot disks with this program. Well, it's time to get down to business, otherwise you'll run away from the site and won't partition your hard drive.
How to split a hard drive into two partitions
As I said, we have the Windows XP operating system, but everything that will be said below can also be applied to Windows 7. The operating system has one system partition-disk (C:) with a capacity of 111.8 GB, which we will use divide into two sections, as a result we will have another drive (D:), don’t worry about your files on drive (C:) nothing will happen. Here it is our drive (C:), all alone.
Let's launch our program

In the main window of the program, our hard drive is visible as one partition-disk (C), with a capacity of 111.8 GB. Let's go with you to Actions and tools, and then Resize volume


change the size of a volume of 111.8 GB, for example, to 55.8 GB, so we will have a logical volume (D)


We have some unallocated space and we will convert it later into a logical volume (D)
Apply pending operations


Friends, now you can create the second partition you need, right in the operating system, go to Computer->Manage->Disk Management, right-click on the unallocated space and select Create Partition from the menu. Or you can use our program again.
We run our program again, select unallocated space with the mouse and click Create Volume

Select the type of volume to be created: Basic

Specify unallocated space
Partition the disk into partitions - what is this for? What are disk partitions? What size should the partitions be? How does all this relate to Windows and its installation? Have you perhaps come across the phrase “more than 90% of users do not know how to install Windows correctly”? And you probably thought: “this is a lie.” So, I undertake to prove this to you and to discover the most main secret correct Windows installations.
Correctly partitioning the disk into partitions is the most important issue in installing Windows. It is the correct creation of disk partitions that allows you to realize almost all the possibilities for increasing the security of user data. As well as all the possibilities for improving the ease of maintenance of the system and some of the possibilities for speeding up PC operation. But first things first.
What users know about installing Windows
Let's first look at the Yandex statistics wordstat.yandex.ru and ask the most frequently asked questions such as:
“Installing Windows” - 297,448,
“How to install Windows” - 342,280.
The numbers you see next to search queries, reflect how many times a month these combinations of words were requested in Yandex search. The total is 639,728, which indicates a very high interest in the topic of installing Windows.
Now look there at the most frequently asked questions such as:
"how to partition a disk" - 21,032,
"how to partition a disk" - 17,533,
"disk partitioning" - 5,429,
"disk partition" - 45,078.
You see how few such questions are asked. We sum up the results and get a total of 89,072 per month.
This is 7 times less number requests from those who want to know “how to install Windows in general.” And those who want to learn how to partition a disk already know something about disk partitions, but most likely they are not interested in how to do it correctly, but in what programs or methods this can be done. So the result for these queries alone is almost completely included in the statistics, but that’s not all.
Let's now ask a direct question "section Windows disk" and we see 15,889, this is only 2.5% of the total number of requests for installing Windows.
It turns out that only 2.5% understand or rather feel the importance of creating disk partitions when installing Windows. And they are looking for an answer to the question “how to properly partition a disk.” So it turns out that we can safely say that “97% of users do not know how to install Windows correctly.” When you want to check, the numbers will be slightly different, since the statistics change at least once a month, but in percentage terms, little will change.
You may ask, “what super important connection or dependency exists between disk partitions and the operation of Windows?” We will now begin to clarify this issue.
To begin with, I would like to remind you that Windows is an operating system (OS), just like many other operating systems, designed to ensure correct user operation with disks, files, folders, programs and various devices computer.
A little theory

Now let's get acquainted with the theoretical part and find out what disk partitions are , what are they for, what sections are there. And then we’ll decide how to properly partition the disk.
“Disk partitions” - this phenomenon generally exists on its own, regardless of Windows, since it concerns the disk itself, and not Windows. That is why few people are interested in it, few people know about it, and even fewer who associate it with the quality of Windows. And indeed, disk partitions are created not only for Windows, but in general when preparing any hard drive to work with any operating system.
A little history
Back in the days when there were no hard drives, but only floppies (soft or floppy disk drives), with one drive per PC, DOS (Disk Operating System) and the data were on one disk (more precisely, a floppy disk). Floppy disks were very unreliable means of storing information and often failed. If a floppy disk malfunctioned, the data on it became inaccessible or simply lost. Floppy disk failures occurred not only due to physical reasons, but also as a result of DOS crashes. It was possible to restore system files only by system formatting the floppy disk. This is when formatting allocates space for the system at the beginning of the disk. System files are written there in a certain order. It was not possible to restore the system by simply copying it. And when formatting, as you understand, all the data on the disk was lost. Therefore, we had to constantly create backup copies of floppy disks, and more than one.
Even then, it was noticed that floppy disks with the Operating System spoiled much more often than without it. They were simply sawed by the drive much more strongly. Since the OS constantly accesses both memory and disk during any operation. Which leads to rapid wear of the working layer of the floppy disk and, accordingly, to its failure. For ease of operation and increased data security, 2 disk drives began to be installed on PCs. One for the OS and its utilities (maintenance programs). The second one is purely for data. When the system was damaged, only the system floppy disk was replaced or reformatted. But floppy disks with data were no longer in danger. It was then that the rule was born: “OS separately, user data separately.” Well, you understand it like cutlets and flies.  Partition the disk 01
The first hard drives were only ten times the size of a floppy disk. Compared to a floppy disk, they had a lot of space and could hold several operating systems. The idea arose of dividing the disk into partitions, where each partition could be formatted for the required OS. From the picture on the left you can see that Microsoft had already implemented the ability to create DOS and non-DOS partitions on the same disk. And also the ability to create several sections. This is how a tool appeared to split the disk into partitions.
Continuation of the theory
Well, now the essence of the “Logical Disk Structure”: creating at least one partition is a mandatory and necessary condition for preparing the hard drive for formatting. A disk on which no partition has been created cannot be formatted. And accordingly, nothing can be installed (written, saved) on it. From the story described above, we learned that the OS and data should be in different sections. This means that there must be at least two partitions on the disk.
According to the developers' idea, you can create only 4 (Four) partitions on the disk. (For some reason, the Americans and the British like to limit everything. Probably this is required by the business strategy. Perhaps there will be no restrictions and there will be no business. This is true, thoughts out loud.)
And so the sections are: “ Basic" And " Advanced" or " Additional».
Six mandatory rules about sections:
1 – there must be at least one “Main” partition on the disk . This required condition disk activation, in addition Only the "Main" partition can be bootable (the operating system is loaded from it);
2 – no more than 4 (four) partitions can be created on the hard drive (if 4 “Main” sections are created, then it will no longer be possible to create an “Additional” section);
3 – "Main" sections are not divisible (they exist within the entire volume that you allocated to them when creating);
4 – Only one “additional” partition can be created (if you are going to create an “Additional” partition, then there should be no more than 3 “Main”);
5 – "Additional" partition divisible – within its scope, you can create a large number of logical volumes with a variety of sizes, each logical volume will be assigned its own letter as a separate drive;
6 – Before creating an “Additional partition”, you must create at least one main one .
Now you know the basic rules of how to partition a disk. In fact, the conversation on the Internet is around these rules. And there is no clear idea of whether the disk needs to be divided into partitions at all. But using the rule “OS separately, data separately” create one main partition and one additional or two main ones . This is enough to solve all problems.
Results of practical research "How to properly partition a disk"
 Partition the disk into partitions 02
 Most users believe that it is enough to create one main disk partition and that’s it. Why bother, it’s simple and fast, and a larger volume is generally more valuable. This is exactly what Microsoft did when automating the Windows installation process. But we already know that there should be “The OS is separate, and the user data is separate” .
Divide like this, divide - some say and divide the hard drive in half. Imagine you have a 1 TB disk and it’s great (large capacity is always good). You have divided it into two halves. You now have two logical drives of 500 GB each. Say: “Does this make you feel better?” I think you still don’t quite understand what problem might be waiting for you in such a situation. Let's figure it out and simulate one of the worst situations.
What happens if the disk is not partitioned correctly?
Imagine that as a result of your work, you have accumulated 300 GB of information on both disks. That is, 200 were left free, for a total of 400. The system crashed. The computer does not boot. You quickly install Windows without formatting and want to transfer 300 GB of your invaluable information from the system drive to a second one, but only 200 GB is free there. And where will you be interested in putting the remaining 100 GB? Write to DVD? So you will need about 20 of them. Looking for flash drives or a removable hard drive? Multiply all this by the price. Add the time required for searching and recording. You will receive approximate losses and these are only one-time losses. The situation will be almost better if you have four partitions of 250 GB each. But all this can be avoided.
Problems maintaining a large system disk
By the way, have you ever tried to maintain a disk with a capacity of 250 - 500 GB? You can’t even imagine how huge this volume is and how long it will take to maintain such a disk. This is not one hour, and maybe more than a dozen hours. But system drives require fairly frequent maintenance, at least once a month. It is necessary to optimize disk space, check the disk for errors, check for viruses.... Therefore, there is no need to leave such huge disks for the system. Much smaller volumes are suitable for the system. But which one exactly?
System partition sizes from experience
Let's proceed from the necessary sufficiency. From experience I know that installing XP with programs will require at least 10 GB. To this add 5-10 GB for the technical needs of XP itself. Plus about 5 GB of reserve for unforeseen circumstances. And that turns out to be a maximum of 25 GB. To install Windows 7 - 10 along with programs you will need 25-35 GB. Plus 15-20 for technical needs and about 10-20 GB reserve for Windows needs. We'll talk about the technical needs of Windows itself, depending on the PC configuration, later. In total it turns out to be approximately 50-75 GB. As practice has shown, this volume is quite enough for any Windows, regardless of bit depth. Let's call the volume of such a section universal. Since there is enough space in it to install both XP and modern monsters 7 - 10.
Ideally, all programs should also be installed on another drive. Then the size of the system disk could be reduced to 25-30 GB for Windows 7 - 10 and to 10 GB for Windows XP. Which would further increase the stability and performance of the system. Considering the fact that almost all modern programs are registered in Windows registry, and after reinstalling the OS do not work, they must also be reinstalled again. I prefer to install programs on the C: drive in the \Program Files\ folder. On the second disk I install only programs with databases and programs independent of Windows. Those that do not require installation.
Some users claim that the system disk needs 100 GB. For many years, 50 GB has been enough for me. If you don’t use the system disk for your needs, then it won’t reach the critical minimum free space (200 MB). By the way, 50 GB for maintenance is also a very large amount. And you shouldn’t increase it just like that, unless absolutely necessary.
Changes for Windows 10
There have been some changes since the release of Windows 10.
Firstly Microsoft forcibly began to distribute it as an update. If there is not enough space on the system disk, the update procedure does not complete. And only 25 GB is missing. The worst thing is that once the update procedure has started, it is not possible to cancel it. A situation arises when a message constantly appears about the need to restart the computer to complete the installation of updates. But the update cannot be installed due to lack of space and canceling the installation is not possible.
As a result, it is not possible to accept new updates until the installation of the current one is complete. And in addition, a message constantly looms before your eyes about the need to restart the computer. Of course, we managed to overcome this situation. But if drive C were 25 GB larger, this would not have happened.
Secondly programs after adaptation to Windows 10 have grown significantly in size. And with my requests, 50 GB was not enough. It’s not that there’s not enough, but there’s very little free space left on the C drive. Now, taking into account the changes, when installing Windows 10, we set the minimum system disk size to 75 GB.
Results
To summarize, it turns out that on any modern hard drive you need to create mandatory at least 1 primary partition of 50 GB for the system. This volume is enough for all types of OS and for all their needs. And if you are going to install a huge number of programs, you can increase the gigabyte by 10-25. And the rest of the volume, no matter how much it is, is at your discretion. I recommend not dividing the remaining portion, but leaving it as a whole. Unless you are going to install another operating system. I leave one primary or secondary partition intact as one disk. I'm quite happy with this. I’m not going to divide even 1000 GB into parts, based on the considerations described above ( a whole large volume is much more valuable than several small ones ).
If you have 2 or more physical disks
If there are several physical disks (2-4), is it necessary to allocate a primary partition for the system on all disks? The answer here is simple. It is very convenient to keep several operating systems, even of the same type, on different disks. If one operating system fails, you boot the OS from another disk and continue working. And you will restore the damaged system in free time in a quiet environment. The amenities are enormous, and the price is only 50 GB and the time to install another system. In addition, there are still programs that do not work in all operating systems. And then you need to install a special OS specifically for this program (or programs).
Well, we finally sorted out the volumes. Now let's look at how, with what and when you can split the disk into partitions. Since there are several directions here and there will be many pictures, I propose to consider the material in parts.
- . Step by step detailed instructions"How to partition a disk during Windows XP installation."
- . Step-by-step detailed instructions "How to partition a disk during installation of Windows Vista/7-10."
- . Step-by-step detailed instructions "How to create, delete and resize disk partitions using Acronis Disk Director"
Answers on questions
How much memory should be created on hard drive C for 1 terabyte before installation
As I already said, the capacity of the C drive does not depend on the capacity of the hard drive. It depends on the need to install programs and update the OS. For normal operation of the system, a 50 GB C disk is sufficient. If you install a lot of programs, then you need to increase the size of drive C to 75 GB. But there is no need to make it too big unless absolutely necessary. This makes it very difficult to maintain the system disk and slows down the system.
New computer technology usually comes with a solid hard drive. However, before you start using it, it is better to split it into at least two autonomous sections. This is due to the fact that using the same disk space for system installations and storing personal information, you risk losing the latter in the event of an unexpected failure in the OS. There are other reasons for the need to partition a disk. But the procedure always looks the same and consists of a couple of simple steps.
The easiest way to make two disks from one is to use the wizard built into the operating system. To run it on platforms Windows versions older than XP, activate the context menu from under the “My Computer” section (it can be located directly on the desktop, or look for it in the “Start” menu) and go to “Manage”, and then to the “Disk Management” line. In Windows 8, the option is located directly in the Start menu. If you use Windows XP, then go straight to point 7 of this article. Before you begin, it is advisable to completely defragment your disks and back up particularly important files. Once in the disk manipulation window, select the one you are going to split. In most cases it will be labeled "C:". Hover your mouse over it and press the key, select “Shrink volume” in the pop-up menu field. Once you start compression, you will be asked for the amount of memory you want to assign to the new partition. Sometimes it doesn't appear right away because the computer analyzes the disk space first, so in this case, just wait. When you see the request window, enter the digital value that suits you in the appropriate field. Keep in mind that the size here is indicated in bytes. As a rule, the system already sets preliminary compression capabilities, so it will be convenient for you to navigate. Having dealt with the numbers, press the “Compress” button. If the outcome is favorable, two sectors appear in the disk management field: the C: drive, which has lost its half, and a new disk with the note “Not allocated.” Click on it with the mouse and in the list that appears, go to the “Create simple volume” item. After the Volume Creation Wizard opens, be prepared to go through 4 tables in sequence. If you do not intend to create more disks in the future, then in the first one we leave everything as it is and click “Next”. In the second, we assign the new disk a letter from the proposed list. In the third, we indicate the priority file system - for Windows it is always NTFS, and give the section a name. We confirm all our actions in the last window. Now we have two full disk spaces, which we can verify by going to the “My Computer” folder. If desired, by clicking on the name of the new disk, you can rename it. The Windows XP OS version is not equipped with the function to multiply disks directly from under the platform. Therefore, to get multiple partitions on this system, you will have to resort to third-party software products. The most popular among them are the Acronis Disk Director application and software from the Partition company (Partition Wizard, Partition Manager Professional, etc.). By installing such a program, you will be able to carry out any manipulations with your disks, including partitioning. At the same time, the application interfaces are almost the same as those of the built-in wizards, and in some ways even simpler, so it will not be difficult for beginners to master them along the way. The GParted utility, designed for similar operations in the Linux environment, works in a similar way. It is called by the Administration line from the System menu and requires knowledge in English, because it is not Russified. Extensive Russian-language manuals for use available on the Internet can help you work with it.When dividing your hard drive into parts, allocate a small area to the partition with the operating system, and store your entire archive in other volumes. Then, if the system is damaged, you can easily format the disk and reinstall the OS without losing valuable data.