Ski trips- favorite view winter holiday. Even an inveterate lover of hot summer will not refuse to breathe fresh air in a snow-covered forest. What can we say about those who cannot imagine their life without skis!
It should be noted that currently skiing in our country actively developing, and the stores offer a wide range of equipment for different types. Some people prefer cross-country skiing, while others, on the contrary, like leisurely walks. There are also those who find the flat terrain boring and ski from the mountains. Mention should also be made of tourists who go on winter ski trips.
For all these activities needed different types skis, and the higher the level of the athlete, the more stringent his requirements for equipment. The smallest nuances are taken into account, which beginners and amateurs may not even be aware of.
In the available variety of skis and related sports, everyone can choose the most suitable one for themselves, and ordinary cross-country skis will surely win the palm.
Still, fans of alpine skiing need to look for places where they can ski, and amateur ski tourism is not for everyone. But treadmills can be used in the nearest park or forest, and do this at least every weekend. Those who are especially adventurous can even take part in some local competitions!
So, to diversify your winter leisure time, it’s enough to buy the necessary clothes and equipment: skis, poles and bindings. It’s worth dwelling on them in more detail.
Ski bindings and their types
Fastenings- this is very important element ski design. They transmit forces from the leg to the ski and set the direction of sliding. Older generation I probably remember my grandfather’s models: a belt clamp was attached to the ski, which secured the leg at the back with an elastic band. The only advantage of such “inventions” is that they could be worn on any shoes, even felt boots. And if we compare the described samples with modern ones, then the importance of the role of fastenings will be completely obvious: they provide comfort and stability at any move.
Three main types of cross-country ski bindings:
Nordic Norm 75mm, or the so-called welted. This is an outdated model that is gradually falling out of use. Connoisseurs of such antiques and the extremely low price prevent them from finally saying goodbye to it.
NNN system from Roteffella appeared later and has two longitudinal guides that stabilize the boot. In terms of functionality, it is in no way inferior to the previous version.
 SNS system from Salomon, with one longitudinal guide. This is a modern fastening standard high level. The soles of boots for such fastenings allow the foot control the ski during any move.
The last two systems are now the most popular, but there are no obvious advantages or disadvantages compared to each other, so you can choose any. In terms of price, they will cost more than NN75, but they are much more convenient and practical, and You can save on installation these fasteners. Usually the instructions recommend seeking help from specialists, but it is quite possible to perform such an operation on your own. All you need is a little confidence and the right tools:
- Skis and bindings;
- Template for marking;
- A screwdriver with a blunt Phillips bit and drill bits;
- Ruler;
- Marker;
- PVA glue.
- Awl;
Procedure for installing fasteners
 For all types of bindings, you first need to find the center of gravity of the skis. On some models, the manufacturer has already marked this place, but usually it is advised not to trust the factory branding. Such balancing is necessary for normal comfortable riding, when the ski does not “weigh” in any direction. Finding the center of gravity it is done very simply. You need to place the ski on the edge of, for example, a ruler, and move it along it until the “scales” freeze parallel to the floor. The ruler in this case will indicate the center of gravity, which will need to be marked with a marker.
So, the desired point has been found. In modern models, the line of the center of gravity coincides with the axis of the boot bracket fastening, so you need to attach the front part of the binding to the ski and Mark its correct position with a marker. If it is necessary to install Nordic Norm 75, then there should be two screws of the fastening bracket on the marked line. In other words, you need to place the device so that the edge of your big toe is on the balance line.
An important step is marking the holes. For him, the ideal option would be to use a special jig, which allows you to accurately find the position of the fasteners. If there is no such conductor, then A paper template will also work, which is usually supplied with fastenings. If this is not there, you will have to mark the ski with an awl through the holes in the mount attached to it. By the way, since the fastening consists of elements that move relative to each other, you should use it assembled for marking, so that later there will be no mismatch in size.

Check for self-control. A drilled ski cannot be restored back, so an extra check will not hurt. Having measured the distance between the holes on the mount, you need to compare them with similar parameters on the finished marking.
Drilling holes according to the marks made. Usually the instructions indicate to what depth the screws need to be drilled, and what length and diameter the drill should be. If there is no suitable length, you can take any and wrap it with electrical tape on top, leaving only the necessary millimeters. Using a drill at low speeds, you need to drill holes in the marked places.
Filling with glue. Blow the finished holes to remove dust and fill them with glue. Sometimes it may come complete with fasteners, but if it is not there, then simple PVA will do. This will help fill the cracks formed during drilling, waterproof and provides more reliable fixation. Sometimes it is recommended to use epoxy for this purpose, but it is better not to do this, since the solvents in the resin can damage the ski. By the way, there is an alternative opinion that claims that glue is not needed, but everyone will decide for themselves. In any case, this is not difficult to do, and the glue will not interfere.
Assembly of the structure. You need to attach the mount to the ski again and start tightening the screws, first not completely, to make sure that the installation is even, and then finally, so that there are no backlashes. For NN 75 you will have to first insert the boot and check its alignment on the ski. Wait for the glue to dry. After the fasteners are installed, you need to wait another 10-12 hours for the glue to completely dry.
This video explains in detail how to install the SNS mounts.
Installing ski bindings yourself is doable. The main thing is to have self-confidence and the right tools.
And we made the purchase we had long dreamed of. And now you can’t wait to ride them! There is only one small problem - you need to install bindings on the skis. How to properly install bindings on skis? Let's figure it out.
Installing ski bindings
- First, decide on the type of skis and bindings. You can have classic or skate skis. The installation of the bindings on them will be the same, but some people on skate skis shift the position of the bindings a little back so that the skis “run” faster. If you are not a pro in this matter, then it is better not to take risks and install the bindings relative to the center of gravity of the skis. Whether you will use old or new fasteners is your personal choice, but it depends on what means are best to use to secure them.
- Read the instructions. If it is clear to you and no questions arise, then act strictly on it. If not, then read the article further.
- How to properly install bindings on skis? Determine the center of gravity of each ski. How to do it? Turn the ski over with the sliding surface up and place it on a sharp edge of some object (knife, ruler, etc.) so that the edge is in contact with the middle of the ski. The ski should be in a position parallel to the floor. By carefully moving the edge along the ski, find a position in which the ski will be in balance. Secure it with a pen, marker or something sharp on the outside of the ski (opposite the sliding one). The center of gravity has been found.
- Usually, along with the mount, a template is included in the kit, which is used to determine the holes for the fixing screws. However, in Lately Manufacturing companies are moving away from this. Therefore, when purchasing mounts, check if these templates are available. If not, they can be purchased separately. Consistent with the center of gravity, attach the template to the ski and mark the places where the screws are attached.
- Drill small holes, slightly smaller than the length of the screws. In the resulting holes you need to pour a little epoxy resin or special glue, which is included in the kit.
- After this, the fasteners can be screwed on. To make the mount fit the size of the boot, you can remove the extra sections of the mount. If the thrust pad is screwed on separately, then determine its position based on the size of the ski boot.
- If the thrust bearing is attached with a plastic pin according to the instructions, it can be replaced with a self-tapping screw for reliability. If you are using new fastenings, the heel can be glued with special glue, which is included in the kit. The most important thing is to press it well. If the fasteners are old, it is better to use a more powerful glue. For example, "Uranus". In this case, both the mount and the place to which it will be attached must be thoroughly cleaned of dirt and grease and warmed up thoroughly. The glue should be spread in an even layer on both sides and wait 1-1.5 minutes until a sticky thick surface forms. After this, the mount must be firmly pressed against the ski.
- When you have finished installing the fasteners, wait at least a day. And then you can start riding!
Here are the basics on how to properly install ski bindings.
If you are afraid of ruining your skis and bindings and are not sure that you will do everything correctly, it is better to contact a specialist. Some stores offer on-site installation of fasteners for an additional fee; as a rule, this is not particularly expensive.
Published: February 5, 2016.How to choose cross-country ski boots
When choosing boots for cross-country skiing, you need to decide how often and what style you plan to run. If you plan to go skiing only a few times a season, is it worth spending serious amounts on equipment? And vice versa, if you plan to ski quite often or even play sports, then you need to approach the choice of boots more seriously.
In both cases, you can choose decent and high-quality boots and bindings. In general, the price when choosing boots and bindings plays far from main role. The most important thing is that the sports shoes you choose are comfortable to run in. But you should think about fastenings only after you have already chosen your boots. This is because they are manufactured for a specific type of mount.
Many companies produce boot models specifically designed for men and women, as well as children's models. This diversity is dictated by differences in anatomical structure. Men have much wider feet than women. In addition, women's and children's shoes make them more elegant.
Since the choice of ski boots and bindings for them are interconnected, it is worth learning a little about ski bindings.
What types of ski bindings are there?
For felt boots, ski bindings are soft, made of leather straps. For other shoes, fastenings can be semi-rigid or rigid. The mounts have been like this for a very long time. And today they are no longer used for cross-country skiing. Today no one skis in felt boots.
Today everyone skis in ski boots. But boots are also different. After all, they are made for certain fastenings. What types of them are used today?
Types of ski bindings
There are four types of ski bindings in use today:
- NN 75
Let's take a closer look at each type of fastening.
NN 75 or Nordic Norm 75, where the numbers indicate the width of the mount. This is already a little used type of mount. It is a metal body in the form of a horseshoe with three rods - protrusions. It uses a boot with a sole protruding slightly forward. It is installed on the mounting rods with the protruding part of the sole, in which there are respectively three holes.

Then the front, protruding part of the sole is clamped with a metal bracket and latched with a special latch. A boot with this type of fastening does not fit tightly enough on the ski and may wobble a little. It is not suitable for skating at all. But just twenty years ago, it was precisely these bindings and boots that everyone rode on.
But progress does not stand still. And a Norwegian company Rottefella improved her creation, and without further ado, she called it NNN, adding another letter to the old name.
NNN or New Nordic Norm. The mount is made in the form of a plate that is attached to the ski. It has two longitudinal guides that secure the boot from lateral movement. On the sole of the boot there are two longitudinal recesses for fastening guides. A transverse rod is mounted in the front part of the sole of the boot, with which it snaps onto the mount.

This way the boot is fixed in the longitudinal direction. And so that it does not dangle on this rod, its front part rests against a special elastic band - a stop. By selecting the rigidity of this elastic band, you can control the rigidity of the entire fastening. Rottefella fasteners are used by the following: well-known companies like Rossignol, Fischer, Alpina, karhu.
NlS or Nordic lntegrated System appeared in 2005, all in the same company Rottefella. The mount is placed on the skis without the use of screws. However, skis must be specially prepared for this. They must have the NIS platform installed. Otherwise, the fastenings are almost the same as the previous version.
This type of fastening is used by such giants of sports equipment as Rossignol, Alpina and Madshus. Accordingly, the price of such mounts is higher.
SNS or Salomon Nordic System - cross-country ski bindings developed, as the name suggests, by the French company Salomon. The boot is fixed to the ski using one longitudinal guide. The front of the boot is secured with a rubber stop.

The company produces 2 models of fastenings: Pilot And Profile. The first type of fastenings are specialized and are intended only for use during skating. Because of this, they have two guides, and spring stops are used instead of rubber stops. And the Profil model is universal and traditional for the company. Salomon fasteners are used by Adidas, Atomic, Spine, and Salomon itself.
Which cross-country ski bindings are best?
It is impossible to say unequivocally which ski bindings are better. But let’s try to figure this issue out.
The outdated NN 75 mount, although used less and less, is significantly cheaper than other types. And, despite its shortcomings, it still finds fans. In addition, it is often bought for children. Its price is relatively small, and a growing child will have to change the shoe within a year or two.
The NIS type mount is used mainly by professionals and enthusiastic athletes. This is primarily due to its price. But the benefits are not so obvious. Therefore, the most common mounts are NNN and SNS.
Ski mount NNN and SNS and their differences from each other
Both types of fasteners are similar in shape to each other. There are also few fundamental differences. The main difference is that the SNS type uses one longitudinal guide, while the NNN type has two longitudinal guides. For a skier they are approximately equivalent. Both are used by professional and amateur athletes.
How to choose ski boots by size
In order for boots to fit comfortably on your feet, they must be the correct size. To do this they need to be measured. You need to try them on wearing the socks you are supposed to wear them with.

If the skier already has some experience, then good. If not, then it’s better to play it safe when choosing socks. Or do you want your feet to get cold? And if not, then you can purchase thermal socks specifically for this case. Grandma's wool socks will also work. In extreme cases, you can wear several pairs of socks.
After the boots are put on, they are laced. If possible, you need to walk around a little here and there. If you are choosing classic shoes, then try standing on your toes, as if pushing with your foot. If you are choosing shoes for skating, then place your foot at an angle, simulating a skating move. If everything is good and your leg is comfortable, then you can buy.
How to choose ski boots depending on your running style
The choice of boots and bindings also depends on whether you plan to skate with skating or classic skating. Different styles present and different requirements to boots and bindings. So, for example, for skating, boots are made higher and stiffer. For the classics, shorter and softer. All major companies producing Sports Equipment, offer boots for both skate and classic.
How to choose cross-country ski boots for skating
For skating, boots are produced higher. This is done in order to fix the ankle joint. The skating style of running assumes that during the push the leg is placed at an angle and the ski is on the edge. And in order not to twist the joint and reduce the load on it, it is fixed with a high boot.

A denser sole is used here. The boot itself fits more tightly on the foot. It is manufactured taking into account anatomical structure legs. For skating, you can use boots with both types of bindings: SNS and NNN. In addition, there are combination boots. This is something between classic and skate. And to fix the ankle, they use a removable cuff.
How to choose classic ski boots
Ski boots for classic skating, whether a product from Fisher, Salomon, Alpina or another company, are slightly shorter than for skating. There is no need to fix the ankle joint here. But, nevertheless, classic boots are manufactured by leading companies, taking into account many of the requirements for skate boots.
The classic boot is slightly lighter than the skate boot. They use a softer sole. Mounts are used by both SNS and NNN. Only if preference is given to the SNS type, a small nuance should be taken into account. Boots with Profil bindings do not fit on Pilot bindings. On the contrary, it is quite suitable. But don't forget that the Pilot is designed for skating only.
How much do ski boots and bindings cost?
Modern ski boots from well-known companies are made from high-quality synthetic materials and from high-quality genuine leather and down. Therefore, they are very light and warm. Accordingly, they cost significantly more than products from less well-known companies.
The price range is very wide. This is understandable. They start from one thousand for simpler boots, to several tens of thousands for a product for professionals. Good ones can be purchased for two to four thousand rubles. Good fastenings also start from a thousand rubles and end in many thousands.
Naturally, skis are one of the most important components of a skier’s equipment, but not everything. You will need bindings and special boots. And their diversity will confuse any beginner in skiing. And in order to decide on the choice of this ski equipment, before going to the store it will be useful to familiarize yourself with what you should look for when purchasing.
Choosing boots
First of all, you should choose the most comfortable boots for yourself, and then look at the appropriate ski bindings. Therefore, we will begin the description with ski boots.Cross-country ski boots, like skis, are divided into three types according to the intended skiing style and four according to the target audience.
Depending on your cross-country skiing style, you will need the following boots:
- for the skating style you need a high boot with a rigid cuff to secure the leg. The load on the leg with this style is higher, therefore the presence of a cuff is mandatory - without it, the skier can damage the leg;
- a low boot with a soft sole is suitable for a traditional style;
- There are also universal boots, they come with or without a removable hard cuff, with a moderately hard sole.
- boots for professionals. These boots are subject to the heaviest load, and therefore, during their production, much attention is paid to reliability and quality. Used on professional cross-country ski boots Newest technologies, so you rarely see leather elements in them - there are synthetic materials that are superior to leather in many respects. Boots for professionals are expensive, but they will last quite a long time;
- boots for sports tourism. These boots also have serious requirements. They are mainly purchased by tourists with extensive experience, as well as climbers. Boots for sports tourism make them comfortable for walking, without skis, if necessary. They are most often made in combination, with a replaceable cuff; the material is genuine leather with synthetic inserts. They must be reliable and durable, shock-resistant;
- boots for recreational skiing. There are no high demands placed on such boots, so there are both expensive and cheaper ones: depending on the materials from which the boots are made;
- boots for children. Children's boots should be comfortable, durable and warm. In addition, they should be both easy to put on and easy to take off.
 Cross-country ski boots primarily use laces. If you loosen the laces on a shoe so that it can be put on freely, the laces should not fall out through the uppermost lacing hole, i.e. be long enough. A properly laced boot, on the one hand, securely fixes the foot, and on the other hand, does not squeeze it. It happens that there is additional linden at the top of the boot - it protects against snow getting into the boot and serves as an additional fixation.
 Under no circumstances should you purchase ski boots without trying them on, and be sure to wear socks when trying them on. This can be either specialized socks for classes skiing, or wool - neither thin nor thick. The ski boot should not press under any circumstances. On the other hand, boots that are too loose will make it difficult to control your skis.
So, when trying on a boot, you need to walk in it, stand, lift your heel off the floor - inside the boot, the heel should fit snugly to the sole and not come off it. MirSovetov also recommends paying attention to the fact that the fold that forms when lifting the heel in the area of the instep of the foot should not put pressure on the toes. If the boots do not meet these criteria, this means that they are not suitable for you.
In addition, if you are choosing boots for skating, the cuff should hold the leg well, but not squeeze or interfere with its movement. In general, as for the stiffness of the boot, for the skating style it is the largest, for the classic style it is the smallest, and for the combi style it is average.
 The structure of ski boots is fundamentally different from the structure of cross-country ski boots. Ski boots consist of two elements - an outer boot and an inner boot.
The outer boot is responsible for the impulse transmitted by the skier during movement - the stiffer the boot, the better the skis handle.
Different companies designate the stiffness of ski boots differently. Some companies characterize them simply: “soft”, “hard”. Others, namely Nordica and Salomon, have introduced absolute value stiffness – kilogram of force per degree of deflection (meaning forward bending). For beginners, MirSovetov recommends boots with a stiffness in the range of 15-60 kgf/deg. For those who have already mastered skiing and have basic skiing skills, this bar rises to 40-80 kgf/degree. Further, when you are already quite confident on your skis, you should take a closer look at ski boots with a hardness of 60-90 kgf/deg. And the hardness of 115 kgf/deg and more is designed for those who engage in skiing professionally; they are not worth taking into consideration for now.
In general, the stiffness of the outer boot can be adjusted - but if the skier is standing on skis for the first time, this, of course, will not help him. The stiffness adjustment is designed for advanced skiers. Depending on the slope or effort applied, it may be slightly modified.
On the front part of the boot there are metal or plastic clips, equipped with length adjustment for a clearer and more comfortable fixation of the leg. The number of clips can be from 1 to 4 per shoe.
In addition to clips, boots can be equipped with screws designed for different purposes. For example, with a folding heel, such a screw is built into a large clip; when it is tightened, the tape securing the leg is tightened inside the boot.
Ski boots may also have a power belt that secures the cuff (shaft) along its upper part.
The cuff itself can be adjusted forward and backward, which serves to more accurately fit the boot to the skier's stance. Additionally, ski boots may have another functionality called canting. This option allows you to change the angle of the boot cuff left/right, adjusting it to the skeletal structure of the legs of a particular person.
At the back of the boot there is an element responsible for improving the transfer of force to the ski.
When walking off-slope it is convenient to top part the boot was loose. For this purpose, there is a “walking-skating” switch, which just frees the leg enclosed in the boot from being constrained.  Another existing difference in ski boots - the principle of entry. In boots with a front entry, the cuff opens at the front, which allows the boot to better fit the foot. Most often, this principle is used for sports and expert models; in such boots, the cuff does not have an adjustment for tilting back. Center-entry boots feature a partially fold-down back of the boot, making it easier to put on and take off. Finally, rear entry boots, which are the most comfortable for beginners, have a flip-up heel, making them fairly easy to put on.
The inner boot in ski boots is made of soft materials. It both eliminates the need to wear a sock under the boot and allows for a more precise fit.
The materials for inner boots differ in their properties. For models intended for beginners, the boot is made in such a way that it takes on the exact shape of the foot within the first minutes. In expert models, this takes time - the inner boot is made of a tougher, more unyielding material. On the one hand, it provides better contact with the ski (as well as the rigidity of the outer boot), but on the other hand, skiers without the proper level of training will find it uncomfortable in such boots. It will be possible to switch to them over time.
Choosing boots for mountain skiing is more difficult. Regarding the size, there is one elementary rule that should be followed: if the foot is wide, it is better to take half a size larger, because under load it will definitely become even wider. For the same reason, you must try on shoes while standing.
Try it on with a thin elastic sock. It should be perfectly even and smooth, without any folds, and end above the end of the cuff.  You need to understand that it is useless to rely on a manufacturer when choosing - each of them produces boots with their own characteristics - with a wider or narrower toe or heel, with different insteps, and so on. The price for a ski boot is also not the most accurate indicator. The most expensive boots are expert ones and will be very difficult for a beginner. It is extremely important to choose comfortable boots - if there is even a little pressure when trying them on, you should not take them - on the slope this discomfort will intensify many times over, which can cause a spoiled holiday (at best).
When trying on a boot, you need to fasten all the clips. You should start fastening the boot with the second clip from the toe, the one that tightens the arch of the foot, thereby fixing the heel. After this, you should listen to the sensations - are your toes resting on the toe, is it possible to move them a little; The heel should not dangle or come off the insole when tilted. You need to move your leg back and forth, from side to side.
Now you can try to tighten the clips as much as possible. There is a pitfall here: do not forget that the inner boot has not yet collapsed, and that later you will need to tighten the clips more. And if, when trying them on, they are already tightened as much as possible, then later, when it is really needed, the clips cannot be tightened.
If it seems that the shoe is still too small, MirSovetov recommends putting half a size larger on the other foot and again listening to the sensations of which foot is more comfortable. When trying it on, you need to sit down - if it throws you back, it means the boot is too stiff. It’s better to spend 15-20 minutes in your boots, stand, and walk a little. Having bought boots, you don’t have to put them away before skiing - you can wear them at home, preparing your feet for the slopes...
As for companies producing ski boots, there are many of them. Rossignol, Salomon, Fischer, etc. have proven themselves well.
It is useful to know that, along with typical target groups, manufacturers distinguish ski boots for carving and women's models.  There is no need for carving boots for beginners; they are designed for athletes who have been skiing for a long time and have a strong footing. The differences between these models are as follows:
- on the one hand, increased rigidity of the outer boot in the lateral direction and, conversely, weakening of the resistance of the cuff when tilted back and forth;
- Along with the usual “walking-skating” switch, there is a third one (“soft”, “carve”), which is responsible for the soft resistance of the boot when bending forward or backward.
- this model almost always uses a “platform” that lifts the skier’s foot higher above the surface of the ski.
Selection of mounts
 There are three types of cross-country ski bindings:
 - front (Nordic 75);
- with a “gutter” (SNS system);
- with “rails” (NNN system).
Let's look at each of the fastenings in more detail.
Front mounts, Nordic 75. As mentioned above, this type is outdated and is almost never used anymore.
 The NNN system has two lugs for mounting, “rails”. This type of binding is preferable for amateurs, since, unlike SNS, the front bracket of the boot is moved back, which allows for better control of the skis.
 There are rubber stops on the front of the NNN mounts. You can easily determine their hardness by their color. Determining the stiffness is important in order to understand which bindings are best for you based on your preferred riding style. For a skating stroke, greater rigidity is required, for a classic one, correspondingly less. The color options for bindings indicating rigidity are as follows: white for the hardest style, green for softer riding, black for standard rubber bands and red for soft ones. Thus, white and green are suitable for skating style, and black and red are suitable for classic style.
Rottefella specializes in such fastenings, and also produces them for other companies. Thus, boots from Alfa, Artex, Alpina, and new items from Rossignol are also suitable for NNN bindings.
 The SNS system differs from the above-mentioned one in that the boot bracket is fixed directly to the toe. As for the color of the rubber stops, they are also different. There are three types, but the rubber bands also have a number stamped on them that corresponds to the hardness. There are yellow ones (with the number 85) - for classics, red (115) - for skates, and universal ones (95) - pink-lilac. It has one protrusion for fastening the “groove”.
 SNS bindings and boots for them are produced by Salomon. MirSovetov would like to draw your attention to the fact that the new models of SNS bindings and boots are different from the old ones, and therefore, when purchasing, you should consult about the compatibility of both.
The following boot brands are suitable for SNS bindings: Salomon, old models Rossignol, Adidas, Karhu, Fisher.
SNS and NNN fastenings suitable for all shoe sizes. Exceptions are for children and youth; special fasteners are produced for them, which are distinguished by a large latch handle and a softer fastening mechanism.
 By the way, there are two types of fastenings:
 - automatic;
- mechanical.
As for installing fasteners, MirSovetov recommends doing this in a specialized place (a service center or a store). The danger is that you can incorrectly determine the center of gravity, accidentally drill through the ski, or make the holes for fasteners too large.
Skiing IN alpine skiing The safety of a skier largely depends on the bindings. Everything is done so that when moving, they securely fix the boot, preventing it from moving, but at the same time, in the event of a risk of falling or injury, they immediately unfasten.
Modern bindings for ski boots are made of heavy-duty materials - titanium, steel or high-strength plastic. The main fastening elements are: the fastening head, the fastening heel, the platform and the ski stop.
Mounting head. This is the front part of the fastening, which is responsible for releasing the toe of the boot when the skier falls - sideways and backwards. Its most important characteristic is elasticity. This is the ability of the head to not open during short impulse impacts, but to return the “left” shoe to its original position. Vertical elasticity can be up to 20 mm, lateral - up to 45 mm. In addition, some models have a TwinCam system, which allows the boot to move sideways by half the sole. If the displacement continues, the head unfastens; if not, it returns the shoe to its place.
Fastening heel. Performs the same functions as the head, only it frees the heel of the boot if necessary. It also has an indicator of vertical elasticity (up to 25 mm).
According to the method of fastening, they are divided into:
- manually fastened;
- semi-automatic - they are set manually and then snap into place when pressed with your foot;
- automatic - the fasteners snap into place when pressed;
 Platform. The part of a ski binding that connects the head and tail. Its main function is to ensure better contact between the binding and the ski, to soften micro-impacts (for example, on an uneven track) and dampen vibration. In addition, a higher position of the boot relative to the sliding surface and edge provides a number of advantages: it allows not to interfere with the flexibility of the ski, contributes to a more convenient distribution of efforts spent on movement, etc.
 Skistop is a system responsible for braking a ski when it falls. Roughly speaking, the bars of metal that slide down the sides of the ski when the boot is released from the binding. Therefore, for skistop to be effective, i.e. was able to slow down the ski when unfastening it after a fall, MirSovetov advises selecting ski stops in such a way that the width is greater than the width of the ski.
It is very important to initially choose the most suitable skis, bindings and boots for them. Because any discomfort while skiing will discourage further skiing. But at the same time, it is very difficult not to make a single mistake when choosing for the first time. The final understanding of what you really need will come only with time, with riding experience. Therefore, if possible, before purchasing your first equipment, try out several different skis, boots, and bindings (for example, renting or borrowing from friends). Then you will be prepared for the purchase not only theoretically.
In the next article, in order to finally prepare you, we will tell you
Today, as a rule, two competing fastening systems are used for cross-country skis of all categories - SNS(the developer is the company SALOMON) And NNN(developer - ROTTEFELLA), as well as their modifications.
Methods for installing bindings of various designs on skis can vary significantly, but when installing any type of binding, the requirements remain unchanged: ensure control of the ski and maneuverability, ensure the reliability of the connection between the ski boot and the ski, and maintain the strength of the ski in the place where the binding is installed.
It is also necessary to take into account that the working properties of the ski depend on the position installed mount and on the quality and reliability of the installation of the ski mount.
Installing bindings on cross-country skis
Both of the above systems have a wide range of different binding models aimed at a wide variety of user groups - from Olympic-level ski racers to children, walkers and ski tourists.
Depending on the purpose of the fasteners, they differ in weight, strength, and rigidity of fixation of the boot. But for all types of fastenings the requirements remain unchanged - ensuring:
- the necessary reliability of fixing the boot and ski,
- maneuverability and ski control,
- maintaining the strength and reliability of the ski.
Almost all modern ski binding systems for cross-country and touring skis provide boot articulation and attachment via a shackle in the sole of the boot that is grabbed by the binding. For traditional types of bindings of all systems - both Salomon SNS and Rottefella NNN, the standard is to install the fastening in such a way that the axis of fastening of the boot bracket coincides with the axis of the center of gravity of the ski.
Ski manufacturers strive to ensure optimal ski properties specifically for the case of mounting the mount at the center of gravity. This ensures maximum strength of the ski, optimal “work” - the ratio of the rigidity and elasticity of the ski, the best balancing and controllability of the ski. Unfortunately, with the continuous production of skis, especially when using natural materials, it is almost impossible to achieve absolute ski identity. Therefore, a big step was the creation of the NIS system, which not only greatly simplifies the process of installing the binding on the ski, but also allows you to find the optimal position of the binding on the ski.
As a rule, modern skis in the area where the bindings are installed have a special platform that provides the necessary strength and reliability of fixing the binding on the ski. But inept actions when installing bindings can damage the internal structure of the ski, which will lead to a decrease in its strength and to unfortunate breakdowns.
To install the ski mount, it is advisable to use a special tool that ensures convenient and reliable operation.
To install the fasteners you will need:
- conductor or sample for marking holes on the ski;
- ruler,
- drill(diameter 3.6mm or 3.4mm),
- drill,
- pencil or marker for marking,
- glue,
- screwdriver
- a pair of skis and a pair of bindings.

Marking

Using a ruler, we find the center of gravity of the ski and mark it with a marker.
To mark holes, it is best to use a special “jig”, which allows you to accurately position the position of the drill. 
We install a conductor that corresponds to the type of fastening - Salomon SNS or Rottefella NNN, so that the marked center of gravity on the ski and the corresponding mark - SKI BALANCE on the conductor - coincide.
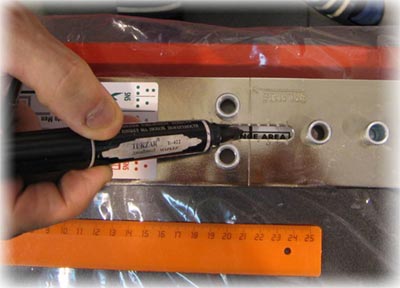
If there is no such conductor, then you can use a paper template. As a rule, fasteners are equipped with the following paper template.
If there is no paper template, then you can simply attach the mount to be installed to the ski in such a way that the marking of the center of gravity on the ski and the axis of fixation of the boot bracket coincide. The holes indicated on the template are marked with a pencil or by lightly pressing an awl through the mounting holes. But this marking method has very low accuracy, so we strongly do not recommend doing this. It is necessary to take into account that modern fastenings have shifting parts and the marking of holes for the screws that fix the platform must be done with the fastening closed and assembled, otherwise you will get a displacement of the holes by 1-2 cm.
When installing, be sure to use a template or jig that matches the type of fasteners. Please note - the picture clearly shows that for the system mounts Rottefella NNN all fastening holes are drilled ahead of the axis of the center of gravity, and on the system fastenings Salomon SNS- the axis of the center of gravity passes under the mount.

Drilling holes
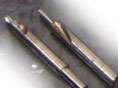
 To drill holes, it is advisable to use a drill with variable speed control and special drills that provide the required diameter and depth of the hole.
When using specialized equipment:
the special drill has an extension that will ensure centering of the drill in the hole of the jig and stopping the drill at the required depth. Drilling is done with light pressure at medium speed.
When drilling with standard drills, a drill bit is used to install Rottefella fasteners 3.4mm, for installing Salomon fasteners drill 3.6mm. Drilling depth - 10mm.
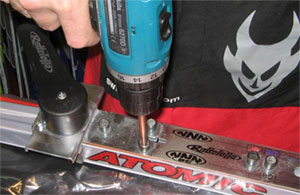
Installing the mount
Before installing the fasteners, the holes must be filled with glue to install the fasteners; the glue fills the cracks left after screwing in the screw and provides waterproofing and additional strength. If the hole is not waterproofed, then when using skis, water will penetrate into the cavity of the ski and lead to rotting internal structures skis and breakdowns, this is especially typical for skis with a honeycomb structure and made using natural materials.
IN service centers special branded adhesives from Salomon and Rottefella are used. It is possible to use PVA glue; it provides the necessary tightness and additional strength.
The use of epoxy resins is highly undesirable, because... Resin solvents can damage ski components, especially skis with foam cores.
The mount is screwed onto the ski with full fixation; backlash is completely unacceptable.
After installation, you need to let the glue dry for 10-12 hours.
Installing bindings on a ski with a pre-installed NIS platform

The use of Rottefella NIS system bindings greatly simplifies the process of installing the bindings, and also allows you to adjust the position of the binding on the ski relative to the center of gravity.
To use NIS bindings you need special skis with an appropriate platform. Today skis are produced by Madshus and Rossignol.
To install the mount on the ski, the mount is inserted along the guides until it “clicks.”
A thrust bearing is also installed along the guides. The thrust bearing is fixed in the desired position using a special key, which is included with each pair of fasteners.

For cheaper mount models, installation of the thrust bearing does not require special tools.

The NIS system allows you to find the optimal mounting position on the ski for each pair of skis, taking into account the current condition of the slopes and weather conditions. Adjustment of the position of the mount can be done before each workout or even during training. The adjustment is carried out with the same special key - the mount is shifted by a specified number of “clicks” and fixed in the new position.

The speed and ease of installation of fasteners in this way increases new level. In addition, you can change the bindings without any damage to the skis.
Sports Line stores employ specialists who, using special equipment, will help you quickly and efficiently install fastenings. When purchasing skis and bindings in our stores, installation of bindings is free.