Colored silk scarves look both elegant and bright, they add zest to the look and help make it unique. Moreover, if we're talking about about products self made, painted using batik technique is various ways applying paint to silk. Today we will do silk painting with a simple step-by-step master class for beginners!
The art of batik has been known since ancient times; Southeast Asia is considered its homeland.
It is no coincidence that batik is also called “Chinese painting” - in this country, craftswomen knew how to paint fabrics back in the 3rd century BC. They used the so-called “hot painting” - they drew the contours of the design using molten wax.

In general, batik is a rather complex art of needlework, requiring a steady hand and the ability to work with paints. Unlike glass painting, you can't easily remove the wrong lines with solvent and start over. But if you have the desire and patience, even beginners can master painting on silk; you can take a master class for beginners using the “cold batik” technique.
Learn how to paint on silk in a simple master class for beginners
To paint on silk using the cold batik technique you will need:- a piece of silk measuring 40x160 cm (it must first be washed in warm water without adding detergents)
- paints and contours for painting on silk (for example, you can use paints from Marabu and Javana)
- transparent reserve composition based on rubber glue and gasoline (this composition is produced by the Gamma company)
- synthetic brushes No. 2, 6, 9
- wide natural bristle brush (preferably squirrel fur)
- stretcher and buttons to secure the fabric
- jar of water
- palette or regular plastic plate
- life-size sketch of the drawing on paper (you can use any image - experienced craftsmen can paint real pictures on silk. For beginners, we offer a floral pattern)
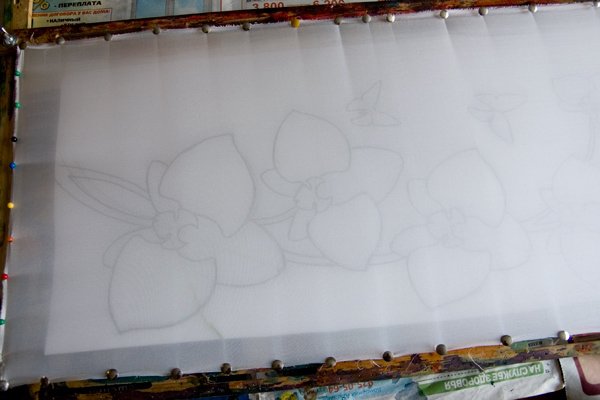
1) The fabric must be stretched onto a stretcher. Make sure that the material does not sag anywhere or form folds. Along the edges of the fabric, you need to carefully secure it with buttons so as not to damage the thin silk - first we secure the corners, and then, after wetting the fabric a little, the centers. Because we use an oblong piece of silk, first we fasten the material on the short side, and then only on the long side.
2) Place a sketch of the design under the fabric and secure it. Natural silk– this is a fairly thin fabric, so the pattern is clearly visible.

3) Now you need to outline the drawing with a reserve compound. We collect the reserve into a tube. This is done with a syringe. The syringe is compressed, placed on the wide end of the tube and the reserve is sucked inside. It will be enough to fill the tube to half the tank.
4) We outline the drawing. The technique is as follows: hold the tube so that the spout is perpendicular to the fabric. You need to move evenly and carefully, without lingering in the same place - there should be no thickenings or drops left.
5) Please note that all lines must be closed. This is done so that the paint with which we will paint the drawings does not leak onto neighboring areas.
6) To check whether all the lines are clearly outlined, you can hold the fabric up to the light. Next, leave it to dry for 50 minutes.

7) We begin to paint the background. Wet it with ordinary water using a wide brush.
8) If there are places left somewhere that are poorly outlined by the reserve, we will immediately detect them, because water will begin to seep through them. In this case, it is necessary to dry the fabric and once again circle these places with a reserve compound.
9) On the palette we prepare the colors for painting the background. Remember that this will only be the first layer of paint we apply to the background, so it's best not to be very bright.
10) You can use several shades for the background, it will be even more beautiful.
11) We begin to paint the flower petals, making transitions from light to dark. Leave to dry.

12) Using a tube and a reserve, we trace the veins on the flowers and the stems.
13) Apply another layer of paint to the background, this time in spots, creating a watercolor effect.
14) When applying several layers of paint, you need to let each spot dry and only then apply the next one - hand painting on silk cannot be rushed!
15) Paint the flower stems.
16) Paint the petals with the second layer.
17) Using a contour, we add details: we draw veins and dots on the petals.
18) For greater expressiveness, the drawings are completed with a thin brush, which should be almost dry.
19) These are the flowers we got.

20) Remove the fabric from the frame and gently iron it through a cloth for 3-4 minutes. Next, leave until completely dry for about a day. To remove the reserve compound, the material can be washed by hand in warm soapy water.
21) All that remains is to hem the edges. This can be done by machine or by hand. The last option is preferable, because in this case the seam will be softer. The scarf is ready! Having already mastered this technique, you will be able to paint not only scarves, but also any other silk products.
For those who have already mastered contour types of painting on silk, you can try free painting. With this technique, the design is applied to the fabric with aniline paints without any patterns using free strokes. This produces very delicate and unusual works with a smooth transition of shades.
Video on the topic of the article
For greater clarity, we suggest watching the following videos, in which the process of artistic painting on silk is demonstrated step by step.
Colored silk scarves look both elegant and bright, they add zest to the look and help make it unique. Moreover, if we are talking about handmade products painted using the batik technique - these are different ways of applying paint to silk. Today we will do silk painting with a simple step-by-step master class for beginners!
The art of batik has been known since ancient times; Southeast Asia is considered its homeland.
It is no coincidence that batik is also called “Chinese painting” - in this country, craftswomen knew how to paint fabrics back in the 3rd century BC. They used the so-called “hot painting” - they drew the contours of the design using molten wax.

In general, batik is a rather complex art of needlework, requiring a steady hand and the ability to work with paints. Unlike glass painting, you can't easily remove the wrong lines with solvent and start over. But if you have the desire and patience, even beginners can master painting on silk; you can take a master class for beginners using the “cold batik” technique.
Learn how to paint on silk in a simple master class for beginners
To paint on silk using the cold batik technique you will need:- a piece of silk measuring 40x160 cm (it must first be washed in warm water without adding detergents)
- paints and contours for painting on silk (for example, you can use paints from Marabu and Javana)
- transparent reserve composition based on rubber glue and gasoline (this composition is produced by the Gamma company)
- synthetic brushes No. 2, 6, 9
- wide natural bristle brush (preferably squirrel fur)
- stretcher and buttons to secure the fabric
- jar of water
- palette or regular plastic plate
- life-size sketch of the drawing on paper (you can use any image - experienced craftsmen can paint real pictures on silk. For beginners, we offer a floral pattern)
1) The fabric must be stretched onto a stretcher. Make sure that the material does not sag anywhere or form folds. Along the edges of the fabric, you need to carefully secure it with buttons so as not to damage the thin silk - first we secure the corners, and then, after wetting the fabric a little, the centers. Because we use an oblong piece of silk, first we fasten the material on the short side, and then only on the long side.
2) Place a sketch of the design under the fabric and secure it. Natural silk is a fairly thin fabric, so the pattern is clearly visible.
3) Now you need to outline the drawing with a reserve compound. We collect the reserve into a tube. This is done with a syringe. The syringe is compressed, placed on the wide end of the tube and the reserve is sucked inside. It will be enough to fill the tube to half the tank.
4) We outline the drawing. The technique is as follows: hold the tube so that the spout is perpendicular to the fabric. You need to move evenly and carefully, without lingering in the same place - there should be no thickenings or drops left.
5) Please note that all lines must be closed. This is done so that the paint with which we will paint the drawings does not leak onto neighboring areas.
6) To check whether all the lines are clearly outlined, you can hold the fabric up to the light. Next, leave it to dry for 50 minutes.

7) We begin to paint the background. Wet it with ordinary water using a wide brush.
8) If there are places left somewhere that are poorly outlined by the reserve, we will immediately detect them, because water will begin to seep through them. In this case, it is necessary to dry the fabric and once again circle these places with a reserve compound.
9) On the palette we prepare the colors for painting the background. Remember that this will only be the first layer of paint we apply to the background, so it's best not to be very bright.
10) You can use several shades for the background, it will be even more beautiful.
11) We begin to paint the flower petals, making transitions from light to dark. Leave to dry.

12) Using a tube and a reserve, we trace the veins on the flowers and the stems.
13) Apply another layer of paint to the background, this time in spots, creating a watercolor effect.
14) When applying several layers of paint, you need to let each spot dry and only then apply the next one - hand painting on silk cannot be rushed!
15) Paint the flower stems.
16) Paint the petals with the second layer.
17) Using a contour, we add details: we draw veins and dots on the petals.
18) For greater expressiveness, the drawings are completed with a thin brush, which should be almost dry.
19) These are the flowers we got.
20) Remove the fabric from the frame and gently iron it through a cloth for 3-4 minutes. Next, leave until completely dry for about a day. To remove the reserve compound, the material can be washed by hand in warm soapy water.
21) All that remains is to hem the edges. This can be done by machine or by hand. The last option is preferable, because in this case the seam will be softer. The scarf is ready! Having already mastered this technique, you will be able to paint not only scarves, but also any other silk products.
For those who have already mastered contour types of painting on silk, you can try free painting. With this technique, the design is applied to the fabric with aniline paints without any patterns using free strokes. This produces very delicate and unusual works with a smooth transition of shades.
Video on the topic of the article
For greater clarity, we suggest watching the following videos, in which the process of artistic painting on silk is demonstrated step by step.


YOU WILL NEED: frame parts for stretching, reserve in a bottle with a screw-on attachment or in a tube, silk paints and thickener, push pins with three teeth for tensioning, various brushes for watercolors.
STEP 1
Stretch a silk scarf on the table using a crepe ribbon, draw a motif with a pencil, and outline it with a reserve. The lines should not be interrupted, because in the future they will be the boundaries between areas made with different paints.
STEP 2
Stretch the scarf over the frame, starting from one corner, then secure the corner diagonally and all the way around. The scarf seems to hang in the air without touching the table. Thanks to this, the colors spread smoothly across the surface of the fabric.


STEP 3
Consistently paint sections of the drawing with a brush. It is best to take a hair brush for watercolor. Depending on the amount of water, the color of the paint can be made more or less saturated.
STEP 4
If you paint an area with one movement of the brush, the paint will lie evenly. And if you brush the paint again, clouds will form on the area, like on hair, and a blurry effect.
STEP 5
A colorless reserve was used for hair and clothing. Warning: the line is difficult to check. The paint will leak into the missing places, as in our case. But this can be seen as a style element.


STEP 6
In relation to areas with clear contours, a watercolor drawing done in a free manner looks contrasting. The result is the impression of a delicate painting. Layers of paint show through.
STEP 7
As soon as individual areas dry (this will take a couple of minutes), you can put the following accents, otherwise the details will merge with each other. In our case we are talking about details on red flowers. Place dots next to them.
STEP 8
Leave the scarf to dry completely and iron through a cotton iron, holding the iron on each area for about two minutes to set the colors. When finished, wash the scarf by hand.
Photo: Judith Crasser; www.tinaberning.de.
TOOLS AND MATERIALS
Silk. Suitable for painting different kinds silk, and each one turns out different results. The projects always indicate the silk used.
Silk dyes, fixed with steam.
They are versatile and easy to work with. The colors are vibrant and can be applied to silk in different ways to create textural effects.
Pipettes. They are used to transfer dye from bottles to the palette.
Etching dyes and brightening agents.
Dyes that can be bleached on silk using a reducing agent (bleaching salt) are called bleached. Dyes that do not change under the influence of a reducing agent are bleached. They are used to apply to the discolored area.
Brushes. Brushes are used soft (large, flat and round) and spongy. It is easier to work with brushes with soft, elastic bristles. They are washed in warm water with a little soap.
Palette. If you don't have a plastic or porcelain palette, you can use an ice cube tray. If you are signing big piece fabrics, use a palette with deep cells or small jars.

Contouring agent and applicators
Transparent water-based gutta-percha. After the dyes have set, they are washed out of the silk. Used as a light contouring product.
Transparent alcohol-based gutta-percha. This liquid latex rubber is used as a contouring agent and is insoluble in water. Remove with a dry, stiff brush or white spirit.
Alcohol-based gutta-percha can be stored in a screw-top jar with a small amount of mineral spirits.
Essence "F". The alcohol sold with gutta-percha is alcohol-based to dilute it to the desired consistency.
Colored gutta-percha and metallic outliners. Sold in tubes or jars.
Gutta-percha can be poured into a special bottle with a tip. Thin nibs are designed for fine lines, thick nibs for metallic outliners and wide contours.
Wire. Used to protect the thin nose of the tip from gutta-percha drying out and clogging the pen.
Materials for creating special effects
Etching gel. Dissolves glucose. Used when working with mixed fabrics made of viscose/silk, as well as with fabrics such as velvet. The gel “burns out” the viscose pile without damaging the silk base.
Grease-repellent agents O. Used when working with silk to prevent dyes from spreading. You can prepare this product yourself by mixing the thickener with water.
Diffuse agent. They are added to dyes to make them easier to apply to silk and to obtain a uniform consistency when mixed. It can also be used instead of water to create a variety of shades of color and applied to painted areas of a pattern to create stains and different textures.
Coarse salt. Helps create vibrant images when sprinkled onto wet, dyed silk and allows for more subtle shades.
Bleaching salt. A reducing agent that “kills” the color.
Thickener. Mix with dyes or bleaching salts and brightening agents to prevent dyes from bleeding. Used as water-based colored gutta-percha.
Equipment for working with wax
Electric potty. Used to melt wax. It maintains the required temperature of the melted wax.
Universal batik wax granules melt in a wax pot and use as a contouring agent. They are sold in specialized stores. You can also use cheaper paraffin wax.
Tianting. Japanese brass or copper instruments with bowl-shaped recesses and thin noses. They are used for painting with melted wax on silk.
Natural bristle brush. Used to apply paint to melted wax
Iron. Used to level wax and smooth the product. Place a clean cotton cloth or newspaper on the ironing board.
Old newspapers. Used to level wax. Do not use fresh newspapers as they may stain the silk.
Paper towels. They wipe brushes and remove excess dye from waxed areas.
Additional tools
Silk is fixed on the frame buttons to prevent it from coming into contact with the work surface during paint application.
Pins for silk with three prongs or ordinary pins and rubber rings. Used to secure silk, especially with non-rolled edges, and velvet to a frame.
Templates with drawings, which are placed under silk, can be protected with polyethylene.
You can paint on silk self-disappearing marker. The lines disappear on their own after a few hours or immediately after wetting. To draw on silk, a soft graphite or charcoal pencil is also used, drawing thin lines, which will then be covered with paint.
Spray. Used to moisturize silk.
Silk being cut scissors or make a notch and then tear it along the fibers.
Brushes are washed in jar of water. While working, you should have at least two jars of water nearby, one of which is used for mixing colors.
USING COLOR
When depicting a flower, carefully mix the dyes different colors more necessary than in writing any other subject. There is nothing sadder than trying to create something extraordinary. purple pansies, when the result is something dirty brown or gray in tone! For beginning artists, mixing colors can be a frustrating process. The most important thing here is to choose the right initial colors.

Primary colors
Use a range of six primary colors: orange-yellow, green-yellow, green-blue, violet-blue, violet-red and orange-red. They can be mixed to create countless shades. All projects in this book use only the primary colors: blue, red and yellow, which must be mixed before starting to create other colors.
ADVICE . You can create shades by adding water or a diffuser to the paint.
Additional colors
If the colors of the spectrum are distributed in a circle (color circle), then complementary colors are located opposite each other: orange and blue; green and red; purple and yellow. These extra "pairs" of colors are very important when painting and are used to create many effects.

Gentle colors
When you mix complementary colors, you get a superb range of browns, grays and even blacks. If you want to weaken or enhance the color, then add an additional shade to it. Try to add a little at a time until you get the desired tone. Never use black - it just drowns out other colors.
Enhance colors
If complementary shades are located next to each other, they usually enhance each other.
Transitional tones
If you create additional pairs of colors (see spectrum) that are close in saturation and tone, you get soft color transitions (you can appreciate them by squinting slightly). With this technique you can achieve amazing effects.
FIXING DYES
After applying the pattern, the dyes must be fixed with steam. Steam treatment allows you to get brighter and more saturated colors, and silk regains its gloss. Even if your item is not washable, the inks still need to be cured to make them lightfast. Dyed silk is wrapped in cotton napkin or paper, then steamed generously to allow the dyes to penetrate into the fibers of the fabric. The steam from the iron is not enough. Sometimes the product is even boiled for this purpose. The process of fixing dyes is very simple and is carried out in several ways. Remember, you need a lot of steam - not water! - to roll up a roll of dyed silk. Always store silk steaming utensils separately from food utensils.
After steaming, rinse the silk in cold water to remove excess paint. If you used clear, water-based gutta-percha, soak the silk for a few minutes. warm water to remove traces of it. Pat the silk dry with a towel or squeeze lightly, then iron to smooth out wrinkles and restore shine.
ADVICE. If you used salt, you need to brush off all the grains before steaming. Water-based gutta-percha sometimes sticks to steamed fabric. Immerse the silk in water for a few minutes and it will come off. Steam treated fabrics can be washed.
1. Cut a piece of clean, dry cloth (thin cotton is ideal). This cut should be larger than the piece of silk you want to steam, approximately 10 cm on each side. Place the silk straightened out in the middle of the fabric and smooth out any wrinkles. Roll the fabric and silk into a loose roll.
2. Roll the roll into a ring.
3. Tie the bundle with rope. Tuck in the loose ends of the rope.
4. Cut four circles of baking foil to fit in the steamer. Place two circles on the bottom of the steamer, place a package on top, and the remaining two circles of foil on top of the package. Fold the foil over the sides of the package into an umbrella shape.
5. Pour 1/2 volume of boiled water into the pan. Place the steamer on the pan and close it with a lid. Steam for 1-2 hours, depending on the size of the piece of silk. If you have to replenish the water level during this time, use boiled water for this. After steaming the silk, unwrap it and rinse it in cold water to remove excess dye.
HOW TO START
Carrying out work based on drawings
If you have no artistic experience or little confidence in your creative abilities, you can use the patterns from this book. Patterns can be transferred to silk with a soft graphite pencil, self-erasing marker, gutta-percha or contouring agent. If you are copying a photograph, remember: the image must be transferred accurately. The design can be changed by adding a flower or eliminating a petal. To enlarge the drawing, use a photocopier. Or you can write on silk right away, without preliminary drawing.
Carrying out work from photographs
Some artists who depict flowers like to work from photographs, because during the painting process, real flowers sway and change, and sometimes wither before the painting is completed. Photos will help you out in the winter months when the flowers are gone. Suitable images You can find them in books on gardening and horticulture, in flower catalogs, or use your own. But first you need to study the structure of a flower.

Drawing flowers from life
I prefer to draw flowers from life. Before applying paint, I make black and white or colored pencil sketches, first creating the silhouette of each flower. I try to express the “essence” of each flower in the drawing. First, you should carefully examine the flower. Twist it and examine the structure of the petals, understand how the leaves are attached to the stem, how the buds open, because all the details in a flower are unique. When you feel that you have grasped the essence, make a linear drawing on a large sheet of paper. Copy the contours of the petals, stem and leaves. While drawing, try to almost never take your eyes off the flower. As your eye traces the contours of the flower, your hand should follow these contours with a pencil on the paper. A quick glance from time to time is enough to make sure that you are still drawing on paper and not on the table. It's amazing how simple and fun this method is, and the results are great.
Now do the second drawing. This time look at the paper more often. As you draw, compare the contours and connections between parts of the flower. For example, pay attention to the distances between leaves and petals and try to immediately mark them in the image so that your drawing is more accurate.
You can paint directly onto the silk or use a paper template.
Silk painting
As you gain confidence and observational skills, you will be able to easily sketch directly onto the silk with a self-fading marker and then, if desired, apply contouring product along the sketch lines; or you can draw directly with a contour tool. Last method requires special care, as irregular lines are difficult to remove. Drawings made in this way are more original and natural than those copied.
ADVICE. If you drew on silk with a self-disappearing marker, then the contour lines must be drawn quickly or lightly outlined with a pencil until they disappear. If you want to shade the background without a contouring agent, then draw on the silk with a pencil - the self-disappearing lines will dissolve when the fabric is first moistened.
Silk painting is a fascinating type of needlework for creative people with good taste. Drawing on fabric using special paints allows you to create amazingly beautiful handmade paintings. Beginning artists will easily cope with the task if they start with painting scarves.
Creating paintings using silk painting technique – ancient art. Craftsmen from many countries, especially Japanese and Chinese artists, have long been famous for their painted scarves. To create handmade masterpieces you will need:
- silk scarf of any size;
- special paints for painting on silk;
- composition for applying barriers:
- nozzles that regulate the thickness of the contours.
It is best to start working with abstract painting. To prevent the paint from spreading in all directions on the scarf, it is recommended to treat the scarf with a salt solution. If this is not done, the colors may bleed, and then the work will look sloppy. The scarf needs to be secured with hooks, then, using brushes of different sizes, draw abstract patterns over the entire surface of the fabric. These can be wavy lines, the simplest geometric figures, ornament in the style of “Turkish cucumber”. Upon completion of the work, you must leave the scarf on the stretcher until completely dry.
Gallery: painting on silk (25 photos)


Silk painting: paintings
 Having mastered the technique of applying paint to fabric and having practiced with the simplest abstract patterns, you can move on to create entire paintings on a certain topic. If possible, it is recommended to attend a master class on painting on fabric. Before you start painting, you need to carefully think through and sketch out a sketch of the future image on paper. Only after this can you begin to implement the idea with paints on the scarf.
The most popular painting subjects are oriental motifs: cranes, cherry blossoms, dragonflies and butterflies. When making a drawing, you should keep in mind that the overall color of the image should be in harmony with the color of the scarf; there should be no dissonance or sharp contrasts.
If the image has big sizes, you need to start from the center, gradually moving to the periphery. Using brushes of different sizes will help convey the subtle play of light and shadow and make the picture more voluminous. Before you start drawing, you need to try the selected colors on a selected piece of fabric. If the drawing quickly fades or blurs, it is better to use other, higher quality dyes to complete a large painting. When making a drawing, you need to be careful and careful, because it is not always possible to correct a mistake without compromising the overall picture.
Silk painting: batik
Cold batik, master class:

Having gained experience in this technique, you can begin to perform work in the technique hot batik. This technique is more complex. But it has more expressive capabilities. The hot batik painting technique received its name because the coloring composition must be heated before use. As a rule, high-quality cotton fabric is used as a material for painting in this technique.
 For those just starting to work with fabric, it is best to use dyes that are fixed with using prolonged drying or ironing with a heated iron. There are special kits on sale for beginners, they include a piece of fabric on which the outline of the image has already been applied, and several dyes reminiscent of watercolors. The color scheme has already been selected. And painting a scarf with a ready-made template is not difficult. Such training provides valuable experience, which will later be useful in independent creativity.
Paints for painting on silk dry very quickly, so you can’t hesitate while painting. But we can’t rush. Because the work requires precision and accuracy. Everything that may be needed at the most critical moment of work should be within reach. Before painting fabric, beginners should practice using paper or canvas.
Silk painting in various techniques is an original type of needlework for those who love to draw, have good taste and dream of realizing their Creative skills. In order to do the job efficiently, you need to decide on the design in advance, and also be as careful and focused as possible.