We bring to your attention 10 amazing magic experiments, or science shows, that you can do with your own hands at home.
Whether it's your child's birthday party, the weekend or the holidays, have a good time and become the center of attention of many eyes! 🙂
An experienced organizer of scientific shows helped us in preparing this post - Professor Nicolas. He explained the principles that are inherent in this or that focus.
1 - Lava lamp

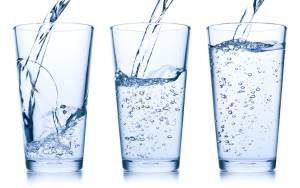
1. Surely many of you have seen a lamp with a liquid inside that imitates hot lava. Looks magical.

2. B sunflower oil water is poured and food coloring (red or blue) is added.

3. After this, add effervescent aspirin to the vessel and observe an amazing effect.

4. During the reaction, the colored water rises and falls through the oil without mixing with it. And if you turn off the light and turn on the flashlight, the “real magic” will begin.
: “Water and oil have different densities, and they also have the property of not mixing, no matter how much we shake the bottle. When we add effervescent tablets inside the bottle, they dissolve in water and begin to release carbon dioxide and set the liquid in motion.”
Do you want to put on a real science show? More experiments can be found in the book.
2 - Soda experience

5. Surely there are several cans of soda at home or in a nearby store for the holiday. Before you drink them, ask the kids a question: “What happens if you immerse soda cans in water?”
Will they drown? Will they float? Depends on the soda.
Invite the children to guess in advance what will happen to a particular jar and conduct an experiment.

6. Take the jars and carefully lower them into the water.

7. It turns out that despite the same volume, they have different weights. This is why some banks sink and others don't.

Professor Nicolas's comment: “All our cans have the same volume, but the mass of each can is different, which means that the density is different. What is density? This is the mass divided by the volume. Since the volume of all cans is the same, the density will be higher for the one whose mass is greater.
Whether a jar will float or sink in a container depends on the ratio of its density to the density of water. If the density of the jar is less, then it will be on the surface, otherwise the jar will sink to the bottom.
But what makes a can of regular cola denser (heavier) than a can of diet drink?
It's all about the sugar! Unlike regular cola, where granulated sugar is used as a sweetener, a special sweetener is added to diet cola, which weighs much less. So how much sugar is in a regular can of soda? The difference in mass between regular soda and its diet counterpart will give us the answer!”
3 - Paper cover
Ask those present: “What happens if you turn a glass of water over?” Of course it will pour out! What if you press the paper against the glass and turn it over? Will the paper fall and water will still spill on the floor? Let's check.


10. Carefully cut out the paper.

11. Place on top of the glass.

12. And carefully turn the glass over. The paper stuck to the glass as if magnetized, and the water did not spill out. Miracles!
Professor Nicolas's comment: “Although this is not so obvious, in fact we are in a real ocean, only in this ocean there is not water, but air, which presses on all objects, including you and me, we are just so used to it to this pressure that we don’t notice it at all. When we cover a glass of water with a piece of paper and turn it over, water presses on the sheet on one side, and air on the other side (from the very bottom)! The air pressure turned out to be greater than the water pressure in the glass, so the leaf does not fall.”
4 - Soap Volcano
How to make a small volcano erupt at home?


14. You will need baking soda, vinegar, some dishwashing chemicals and cardboard.


16. Dilute vinegar in water, add washing liquid and tint everything with iodine.

17. We wrap everything in dark cardboard - this will be the “body” of the volcano. A pinch of soda falls into the glass and the volcano begins to erupt.
Professor Nicolas's comment: “As a result of the interaction of vinegar with soda, a real chemical reaction occurs with the release of carbon dioxide. A liquid soap and the dye, interacting with carbon dioxide, form a colored soap suds- here comes the eruption.”
5 - Spark plug pump
Can a candle change the laws of gravity and lift water up?


19. Place the candle on the saucer and light it.

20. Pour colored water onto a saucer.

21. Cover the candle with a glass. After some time, the water will be drawn inside the glass, contrary to the laws of gravity.
Professor Nicolas's comment: “What does the pump do? Changes the pressure: increases (then water or air begins to “escape”) or, conversely, decreases (then gas or liquid begins to “arrive”). When we covered the burning candle with a glass, the candle went out, the air inside the glass cooled, and therefore the pressure decreased, so the water from the bowl began to be sucked in.”
Games and experiments with water and fire are in the book "Professor Nicolas' Experiments".
6 - Water in a sieve
We continue to study magical properties water and surrounding objects. Ask someone present to pull the bandage and pour water through it. As we can see, it passes through the holes in the bandage without any difficulty.
Bet with those around you that you can make sure that water does not pass through the bandage without any additional techniques.

22. Cut a piece of bandage.

23. Wrap a bandage around a glass or champagne flute.

24. Turn the glass over - the water doesn’t spill out!
Professor Nicolas's comment: “Thanks to this property of water, surface tension, water molecules want to be together all the time and are not so easy to separate (they are such wonderful girlfriends!). And if the size of the holes is small (as in our case), then the film does not tear even under the weight of water!”
7 - Diving bell
And to secure for you honorary title Waterbender and Lord of the Elements, promise that you can deliver paper to the bottom of any ocean (or bathtub or even basin) without getting it wet.

25. Have those present write their names on a piece of paper.

26. Fold the piece of paper and put it in the glass so that it rests against its walls and does not slide down. We immerse the leaf in an inverted glass to the bottom of the tank.

27. The paper remains dry - water cannot reach it! After you pull out the leaf, let the audience make sure that it is really dry.
How to interest a child in learning new substances and properties various items and liquids? At home, you can set up an impromptu chemical laboratory and carry out simple chemical experiments for children at home.
The transformations will be original and appropriate in honor of some festive event or in the most ordinary conditions to familiarize the child with the properties different materials. Here are some simple tricks that are easy to repeat at home.
Chemical experiments using ink
Take a small container of water, preferably one with transparent walls.
Dissolve a drop of ink or ink in it - the water will turn blue.
Add one pre-crushed activated carbon tablet to the solution.
Then shake the container well and you will see that it will gradually become light, without a tint of paint. Coal powder has an absorbent property, and the water returns to its original color.
https://galaset.ru/holidays/contests/tests.htmlTrying to create clouds at home
 Take a tall jar and pour some into it hot water(about 3 cm). Prepare ice cubes in the freezer and place them on a flat baking sheet that you place on top of the jar.
The hot air in the jar will cool, forming water vapor. The condensate molecules will begin to gather together in the form of a cloud. This transformation demonstrates the origin of clouds in nature when it cools warm air. Why is it raining?
Drops of water on the ground heat up and rise upward. There they cool and meet each other to form clouds. Then the clouds also combine into heavy formations and fall to the ground as precipitation. Watch a video of chemical experiments for children at home.
How your hands feel at different water temperatures
You will need three deep bowls of water - cold, hot and room temperature.
The child must touch with one hand cold water, and the other is hot.
After a couple of minutes, both hands are placed in a vessel with water at room temperature. How does water feel to him? Is there a difference in perception temperature?
Water can be absorbed and stain the plant.
 For this beautiful transformation you will need living plant or flower stem.
Place it in a glass of water colored any bright color(red, blue, yellow).
Gradually you will notice that the plant takes on the same color.
This happens because the stem absorbs water and takes on its color. In the language of chemical phenomena, such a process is usually called osmosis or one-way diffusion.
You can make your own fire extinguisher at home
 Necessary actions:
- Let's take a candle.
- It is necessary to light it and place it in the jar so that it stands straight and the flame does not reach its edges.
- Carefully place a teaspoon of baking powder into the jar.
- Then pour a little vinegar into it.
Next we look at the transformation - White powder baking powder will hiss, forming foam, and the candle will go out. This interaction of two substances produces carbon dioxide. It sinks to the bottom of the jar because it is heavy compared to other atmospheric gases.
The fire does not receive oxygen and goes out. This is the principle behind the fire extinguisher. They all contain carbon dioxide, which extinguishes the flames of fire.
What else you should definitely read:
Oranges have the ability to float on water
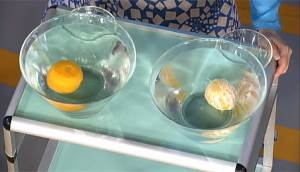 If you put an orange in a bowl of water, it will not sink. Clean it and dip it in water again - you will see it at the bottom. How did this happen?
The orange peel has air bubbles that keep it floating on the water, almost like an air mattress.
Testing eggs for their ability to float on water
 We use jars of water again. Place a couple of tablespoons of salt in one of them and stir until dissolved. Dip an egg into each jar. In salt water it will be on the surface, and in normal water it will sink to the bottom.
Useful tips
Children are always trying to find out something new every day, and they always have a lot of questions.
They can explain some phenomena, or they can show clearly how this or that thing, this or that phenomenon works.
In these experiments, children will not only learn something new, but also learn create differentcrafts, with which they can then play.
1. Experiments for children: lemon volcano

You will need:
2 lemons (for 1 volcano)
Baking soda
Food coloring or watercolor paints
Dishwashing liquid
Wooden stick or spoon (if desired)

1. Cut off the bottom of the lemon so it can be placed on a flat surface.
2. On the back side, cut out a piece of lemon as shown in the image.
* You can cut off half a lemon and make an open volcano.

3. Take the second lemon, cut it in half and squeeze the juice into a cup. This will be the reserved lemon juice.
4. Place the first lemon (with the cut out part) on the tray and use a spoon to “squeeze” the lemon inside to squeeze out some of the juice. It is important that the juice is inside the lemon.
5. Add food coloring or watercolor inside the lemon, but do not stir.

6. Pour dish soap inside the lemon.
7. Add a spoonful to the lemon baking soda. The reaction will begin. You can use a stick or spoon to stir everything inside the lemon - the volcano will begin to foam.

8. To make the reaction last longer, you can gradually add more soda, dyes, soap and reserve lemon juice.
2. Home experiments for children: electric eels made from chewing worms

You will need:
2 glasses
Small capacity
4-6 gummy worms
3 tablespoons baking soda
1/2 spoon of vinegar
1 cup water
Scissors, kitchen or stationery knife.
1. Using scissors or a knife, cut lengthwise (precisely lengthwise - it won't be easy, but be patient) each worm into 4 (or more) pieces.
* The smaller the piece, the better.
*If the scissors do not cut properly, try washing them with soap and water.

2. Mix water and baking soda in a glass.
3. Add pieces of worms to the solution of water and soda and stir.
4. Leave the worms in the solution for 10-15 minutes.
5. Using a fork, transfer the worm pieces to a small plate.
6. Pour half a spoon of vinegar into an empty glass and start putting worms into it one by one.

* The experiment can be repeated if you wash the worms with plain water. After a few attempts, your worms will begin to dissolve, and then you will have to cut a new batch.
3. Experiments and experiments: a rainbow on paper or how light is reflected on a flat surface

You will need:
Bowl of water
Clear nail polish
Small pieces of black paper.
1. Add 1-2 drops of clear nail polish to a bowl of water. Watch how the varnish spreads through the water.
2. Quickly (after 10 seconds) dip a piece of black paper into the bowl. Take it out and let it dry on a paper towel.

3. After the paper has dried (this happens quickly) start turning the paper and look at the rainbow that appears on it.
* To better see a rainbow on paper, look at it under the sun's rays.


4. Experiments at home: rain cloud in a jar

As small drops of water accumulate in a cloud, they become heavier and heavier. Eventually they will reach such a weight that they can no longer remain in the air and will begin to fall to the ground - this is how rain appears.
This phenomenon can be shown to children using simple materials.
You will need:
Shaving foam
Food coloring.
1. Fill the jar with water.
2. Apply shaving foam on top - it will be a cloud.
3. Have your child start dripping food coloring onto the “cloud” until it starts to “rain” - drops of coloring begin to fall to the bottom of the jar.
During the experiment, explain this phenomenon to your child.

You will need:
Warm water
Sunflower oil
4 food colors
1. Fill the jar 3/4 full with warm water.

2. Take a bowl and stir 3-4 tablespoons of oil and a few drops of food coloring into it. IN in this example 1 drop of each of 4 dyes was used - red, yellow, blue and green.

3. Using a fork, stir the coloring and oil.

4. Carefully pour the mixture into a jar of warm water.

5. Watch what happens - the food coloring will begin to slowly fall through the oil into the water, after which each drop will begin to disperse and mix with the other drops.
* Food coloring dissolves in water, but not in oil, because... oil density less water(that’s why it “floats” on the water). The dye droplet is heavier than the oil, so it will begin to sink until it reaches the water, where it will begin to disperse and look like a small fireworks display.
6. Interesting experiments: ina circle in which the colors merge
You will need:
- printout of the wheel (or you can cut out your own wheel and draw all the colors of the rainbow on it)
Elastic band or thick thread
Glue stick
Scissors
Skewer or screwdriver (to make holes in the paper wheel).

1. Select and print the two templates you want to use.

2. Take a piece of cardboard and use a glue stick to glue one template to the cardboard.
3. Cut out the glued circle from cardboard.
4. TO back side Glue the second template onto the cardboard circle.
5. Use a skewer or screwdriver to make two holes in the circle.

6. Thread the thread through the holes and tie the ends into a knot.
Now you can spin your top and watch how the colors merge on the circles.


7. Experiments for children at home: jellyfish in a jar

You will need:
Small transparent plastic bag
Transparent plastic bottle
Food coloring
Scissors.

1. Place the plastic bag on a flat surface and smooth it out.
2. Cut off the bottom and handles of the bag.
3. Cut the bag lengthwise on the right and left so that you have two sheets of polyethylene. You will need one sheet.
4. Find the center of the plastic sheet and fold it like a ball to make a jellyfish head. Tie a thread in the area of the jellyfish's "neck", but not too tightly - you need to leave a small hole through which to pour water into the jellyfish's head.
5. There is a head, now let's move on to the tentacles. Make cuts in the sheet - from the bottom to the head. You need approximately 8-10 tentacles.
6. Cut each tentacle into 3-4 smaller pieces.

7. Pour some water into the jellyfish's head, leaving room for air so the jellyfish can "float" in the bottle.
8. Fill a bottle with water and put your jellyfish in it.

9. Add a couple drops of blue or green food coloring.
* Close the lid tightly to prevent water from spilling out.
* Let the children turn the bottle over and watch the jellyfish swim in it.
8. Chemical experiments: magic crystals in a glass

You will need:
Glass glass or bowl
Plastic bowl
1 cup Epsom salts (magnesium sulfate) - used in bath salts
1 cup hot water
Food coloring.
1. Place Epsom salts in a bowl and add hot water. You can add a couple of drops of food coloring to the bowl.
2. Stir the contents of the bowl for 1-2 minutes. Most of the salt granules should dissolve.

3. Pour the solution into a glass or glass and place it in the freezer for 10-15 minutes. Don't worry, the solution is not so hot that the glass will crack.
4. After freezing, transfer the solution to the main compartment of the refrigerator, preferably on the top shelf, and leave overnight.

The growth of crystals will be noticeable only after a few hours, but it is better to wait overnight.
This is what the crystals look like the next day. Remember that crystals are very fragile. If you touch them, they will most likely immediately break or crumble.

9. Experiments for children (video): soap cube
10. Chemical experiments for children (video): how to make a lava lamp with your own hands
Chemical experiment of bromine with aluminum
If you place a few milliliters of bromine in a test tube made of heat-resistant glass and carefully lower a piece of aluminum foil into it, then after some time (required for the bromine to penetrate the oxide film) a violent reaction will begin. From the heat generated, aluminum melts and, in the form of a small fiery ball, rolls on the surface of bromine (the density of liquid aluminum is less than the density of bromine), quickly decreasing in size. The test tube is filled with bromine vapor and white smoke consisting of tiny crystals of aluminum bromide:
2Al+3Br 2 → 2AlBr 3.
It is also interesting to observe the reaction of aluminum with iodine. Mix a small amount of powdered iodine with aluminum powder in a porcelain cup. The reaction is not noticeable yet: in the absence of water it proceeds extremely slowly. Using a long pipette, drop a few drops of water onto the mixture, acting as an initiator, and the reaction will proceed vigorously - with the formation of a flame and the release of violet iodine vapor.
Chemical experiments with gunpowder: how gunpowder explodes!
 Gunpowder
 Smoky, or black, gunpowder is a mixture of potassium nitrate (potassium nitrate - KNO 3), sulfur (S) and coal (C). It ignites at a temperature of about 300 °C. Gunpowder can also explode on impact. It consists of an oxidizing agent (saltpeter) and a reducing agent (coal). Sulfur is also a reducing agent, but its main function is to bind potassium into a strong compound. When gunpowder burns, the following reaction occurs:
2KNO 3 +ЗС+S→ K 2 S+N 2 +3СО 2,
- as a result of which a large volume of gaseous substances is released. The use of gunpowder in warfare is connected with this: the gases formed during the explosion and expanding from the heat of the reaction push the bullet out of the gun barrel. It is easy to verify the formation of potassium sulfide by sniffing the barrel of a gun. It smells like hydrogen sulfide, a product of the hydrolysis of potassium sulfide.
Chemical experiments with saltpeter: fire inscription
Spectacular chemical experiment can be done with potassium nitrate. Let me remind you that nitrate is a complex substance - salts of nitric acid. In this case, we need potassium nitrate. Its chemical formula is KNO 3. On a piece of paper, draw an outline or a picture (for greater effect, let the lines not intersect!). Prepare a concentrated solution of potassium nitrate. For information: 20 g of KNO 3 dissolves in 15 ml of hot water. Then, using a brush, we saturate the paper along the drawn contour, leaving no gaps or gaps. let the paper dry. Now you need to touch the burning splinter to some point on the contour. A “spark” will immediately appear, which will slowly move along the contour of the pattern until it completely closes it. Here's what happens: Potassium nitrate breaks down according to the equation:
2KNO 3 → 2 KNO 2 +O 2 .
Here KNO 2 +O 2 is a salt of nitrous acid. The oxygen released causes the paper to char and burn. For greater effect, the experiment can be carried out in a dark room.
Chemical experience of dissolving glass in hydrofluoric acid
 Glass dissolves
 in hydrofluoric acid
Indeed, glass dissolves easily. Glass is a very viscous liquid. You can verify that glass can dissolve by performing the following chemical reaction. Hydrofluoric acid is an acid formed by dissolving hydrogen fluoride (HF) in water. It is also called hydrofluoric acid. For greater clarity, let’s take a thin speckle onto which we attach a weight. Place the glass and weight into a solution of hydrofluoric acid. When the glass dissolves in the acid, the weight will fall to the bottom of the flask.
Chemical experiments with smoke release
 Chemical reactions with
 emission of smoke
(ammonium chloride)
Let's conduct a beautiful experiment to produce thick white smoke. To do this, we need to prepare a mixture of potash (potassium carbonate K 2 CO 3) with ammonia solution ( ammonia). Mix the reagents: potash and ammonia. Add a solution of hydrochloric acid to the resulting mixture. The reaction will begin at the moment when the flask with hydrochloric acid is brought close to the flask containing ammonia. Gently pour hydrochloric acid to an ammonia solution and observe the formation of thick white ammonium chloride vapor, the chemical formula of which is NH 4 Cl. The chemical reaction between ammonia and hydrochloric acid proceeds as follows:
HCl+NH 3 → NH 4 Cl
Chemical experiments: glow of solutions
 Solution glow reaction
 As noted above, the glow of solutions is a sign of a chemical reaction. Let's do another one spectacular experience, at which our solution will glow. For the reaction we need a solution of luminol, a solution of hydrogen peroxide H 2 O 2 and crystals of red blood salt K 3 . Luminol- a complex organic substance whose formula is C 8 H 7 N 3 O 2. Luminol is highly soluble in some organic solvents, but is insoluble in water. Luminescence occurs when luminol reacts with certain oxidizing agents in an alkaline medium.
So, let's begin: add a solution of hydrogen peroxide to luminol, then add a handful of red blood salt crystals to the resulting solution. For greater effect, try conducting the experiment in a dark room! As soon as the blood red salt crystals touch the solution, a cold blue glow will immediately be noticeable, which indicates the progress of the reaction. The glow that occurs during a chemical reaction is called chemiluminescence
Another chemical experiment with luminous solutions:
For it we need: hydroquinone (previously used in photographic equipment), potassium carbonate K 2 CO 3 (also known as “potash”), a pharmaceutical solution of formaldehyde (formaldehyde) and hydrogen peroxide. Dissolve 1 g of hydroquinone and 5 g of potassium carbonate K 2 CO 3 in 40 ml of pharmaceutical formalin (an aqueous solution of formaldehyde). Pour this reaction mixture into a large flask or bottle of at least a liter capacity. In a small vessel, prepare 15 ml of concentrated hydrogen peroxide solution. You can use hydroperite tablets - a combination of hydrogen peroxide and urea (urea will not interfere with the experiment). For greater effect, go into a dark room, when your eyes get used to the darkness, pour the hydrogen peroxide solution into a large container with hydroquinone. The mixture will begin to foam (that's why you need to take a large container) and a distinct orange glow will appear!
Chemical reactions in which glow appears occur not only during oxidation. Sometimes the glow occurs during crystallization. The easiest way to observe it is with table salt. Dissolve table salt in water, and take enough salt so that undissolved crystals remain at the bottom of the glass. Pour the resulting saturated solution into another glass and add concentrated hydrochloric acid drop by drop to this solution. The salt will begin to crystallize, and sparks will slip through the solution. It is most beautiful if the experiment is performed in the dark!

Chemical experiments with chromium and its compounds
Multi-colored chrome!... The color of chromium salts can easily change from purple to green and vice versa. Let's carry out the reaction: dissolve several purple crystals of chromium chloride CrCl 3 6H 2 O in water. When boiled, the purple solution of this salt turns green. When the green solution is evaporated, a green powder of the same composition as the original salt is formed. And if you saturate a green solution of chromium chloride cooled to 0 °C with hydrogen chloride (HCl), its color will again turn purple. How to explain the observed phenomenon? It's rare in inorganic chemistry An example of isomerism is the existence of substances that have the same composition, but different structure and properties. In the purple salt, the chromium atom is bonded to six water molecules, and the chlorine atoms are counterions: Cl 3 , and in green chromium chloride they change places: Cl 2H 2 O. In an acidic environment, bichromates are strong oxidizing agents. The products of their reduction are Cr3+ ions:
K 2 Cr 2 O 7 +4H 2 SO 4 +3K 2 SO 3 → Cr 2 (SO 4) 3 +4K 2 SO 4 +4H 2 O.
 Potassium chromate (yellow)
 bichromate - (red)
At a low temperature, it is possible to isolate purple crystals of potassium chromium alum KCr(SO 4) 2 12H 2 O from the resulting solution. The dark red solution obtained by adding concentrated sulfuric acid to a saturated aqueous solution of potassium dichromate is called “chrompic”. In laboratories it is used for washing and degreasing chemical glassware. The dishes are carefully rinsed with chromium, which is not poured into the sink, but is used repeatedly. In the end, the mixture turns green - all the chromium in such a solution has already passed into the Cr 3+ form. A particularly strong oxidizing agent is chromium (VI) oxide CrO 3 . With its help, you can light an alcohol lamp without matches: just touch the wick moistened with alcohol with a stick containing several crystals of this substance. When CrO 3 decomposes, dark brown chromium (IV) oxide powder CrO 2 can be obtained. It has ferromagnetic properties and is used in magnetic tapes of some types of audio cassettes. The adult human body contains only about 6 mg of chromium. Many compounds of this element (especially chromates and dichromates) are toxic, and some of them are carcinogenic, i.e. capable of causing cancer.
Chemical experiments: reducing properties of iron

Ferric chloride III
This type of chemical reaction refers to redox reactions. To carry out the reaction, we need dilute (5%) aqueous solutions of iron(III) chloride FeCl 3 and the same solution of potassium iodide KI. So, a solution of iron(III) chloride is poured into one flask. Then add a few drops of potassium iodide solution to it. We observe a change in the color of the solution. The liquid will turn red-brown in color. The following chemical reactions will occur in the solution:
2FeCl 3 + 2KI→ 2FeCl 2 + 2KCl + I 2
KI + I 2 → K
 Ferric chloride II
 Another chemical experiment with iron compounds. For it we will need diluted (10–15%) aqueous solutions of iron(II) sulfate FeSO 4 and ammonium thiocyanate NH 4 NCS, bromine water Br 2. Let's begin. Pour a solution of iron(II) sulfate into one flask. Add 3-5 drops of ammonium thiocyanate solution there. We notice that there are no signs of chemical reactions. Of course, iron(II) cations do not form colored complexes with thiocyanate ions. Now add bromine water to this flask. But now the iron ions “gave themselves away” and colored the solution blood red. This is how the (III)-valent iron ion reacts to thiocyanate ions. Here's what happened in the flask:
Fe(H 2 O) 6 ] 3+ + n NCS– (n–3) – + n H 2 O
Chemical experiment on dehydrating sugar with sulfuric acid
 Sugar dehydration
 sulfuric acid
Concentrated sulfuric acid dehydrates sugar. Sugar is a complex organic substance whose formula is C 12 H 22 O 11. Here's how it goes. Powdered sugar is placed in a tall glass glass and slightly moistened with water. Then a little concentrated sulfuric acid is added to the wet sugar. Stir carefully and quickly with a glass rod. The stick is left in the middle of the glass with the mixture. After 1 - 2 minutes, the sugar begins to turn black, swell and rise in the form of a voluminous, loose black mass, taking the glass rod with it. The mixture in the glass becomes very hot and smokes a little. In this chemical reaction, sulfuric acid not only removes water from sugar, but also partially converts it into coal.
C 12 H 22 O 11 +2H 2 SO 4 (conc.) → 11C+CO 2 +13H 2 O+2SO 2
The water released during such a chemical reaction is mainly absorbed by sulfuric acid (sulfuric acid “greedily” absorbs water) with the formation of hydrates, hence the strong release of heat. And carbon dioxide CO 2, which is obtained from the oxidation of sugar, and sulfur dioxide SO 2 raise the charred mixture upward.
Chemical experiment with the disappearance of an aluminum spoon
2.JPG) Mercury nitrate solution
Mercury nitrate solution Let's carry out another funny chemical reaction: for this we need an aluminum spoon and mercury nitrate (Hg(NO 3) 2). So, take a spoon, clean it with fine-grained sandpaper, then degrease it with acetone. Dip a spoon into the mercuric nitrate (Hg(NO3)2) solution for a few seconds. (remember that mercury compounds are poisonous!). As soon as the surface of the aluminum spoon in the mercury solution becomes gray, the spoon must be removed, washed with boiled water and dried (wetting, but not wiping). After a few seconds, the metal spoon will turn into white fluffy flakes, and soon all that will remain is a grayish pile of ash. Here's what happened:
Al + 3 Hg(NO 3) 2 → 3 Hg + 2 Al(NO 3) 3.
In the solution, at the beginning of the reaction, a thin layer of aluminum amalgam (an alloy of aluminum and mercury) appears on the surface of the spoon. The amalgam then turns into white fluffy flakes of aluminum hydroxide (Al(OH)3). The metal consumed in the reaction is replenished with new portions of aluminum dissolved in mercury. And finally, instead of a shiny spoon, white Al(OH) 3 powder and tiny droplets of mercury remain on the paper. If, after a solution of mercuric nitrate (Hg(NO 3) 2), an aluminum spoon is immediately immersed in distilled water, then gas bubbles and scales will appear on its surface white(hydrogen and aluminum hydroxide will be released).
Did you know that May 29 is Chemist's Day? Who among us in childhood did not dream of creating unique magic, amazing chemical experiments? It's time to make your dreams come true! Read on quickly and we will tell you how to have fun on Chemist Day 2017, as well as what chemical experiments for children can be easily done at home.

Home volcano
If you are not already attracted, then... Do you want to see a volcanic eruption? Try it at home! To arrange a chemical experiment “volcano” you will need soda, vinegar, food coloring, a plastic glass, a glass warm water.
Pour 2-3 tablespoons of baking soda into a plastic cup, add ¼ cup of warm water and a little food coloring, preferably red. Then add ¼ vinegar and watch the volcano “erupt”.
Rose and ammonia
A very interesting and original chemical experiment with plants can be seen in the video from YouTube:
Self-inflating balloon
Do you want to conduct safe chemical experiments for children? Then you will definitely like the balloon experiment. Prepare in advance: a plastic bottle, baking soda, a balloon and vinegar.
Pour 1 teaspoon of baking soda inside the ball. Pour ½ cup of vinegar into the bottle, then put a ball on the neck of the bottle and make sure that the soda gets into the vinegar. As a result of a violent chemical reaction, which is accompanied by the active release of carbon dioxide, the balloon will begin to inflate.
Pharaoh snake
For the experiment you will need: calcium gluconate tablets, dry fuel, matches or a gas burner. Watch the algorithm of actions on YouTube video:
Colorful magic
Do you want to surprise your child? Hurry up and conduct chemical experiments with color! You will need the following available ingredients: starch, iodine, transparent container.
Mix snow-white starch and brown iodine in a container. The result is an amazing mixture of blue.
Raising a snake
The most interesting home chemical experiments can be carried out using available ingredients. To create a snake you will need: a plate, river sand, powdered sugar, ethyl alcohol, a lighter or burner, baking soda.
Place a pile of sand on a plate and soak it in alcohol. Make a depression in the top of the slide, where you carefully add powdered sugar and soda. Now we set fire to the sand slide and watch. After a couple of minutes, a dark wriggling ribbon that resembles a snake will begin to grow from the top of the slide.
How to conduct chemical experiments with an explosion, see the following video from Youtube: