Everyone knows that whenever a new update is available, Windows 10 automatically downloads and installs it in the background. If a restart is required after an update, Windows 10 automatically schedules a restart outside of the active period.
With default settings, Windows 10 automatically checks for updates and downloads them when they are available. The problem is that you may notice that web pages open slowly while updates are downloading.
Users who have high-speed Internet access may not notice any discomfort, but users with slow Internet connections often complain about this problem. It would be convenient to be able to pause the current download of Windows 10 updates!
On this moment Windows 10 does not offer easy way pause the current update download. If for some reason you want to pause downloading Windows 10 updates, either temporarily or permanently, you can use the tips below.
Important: We always recommend installing updates when they are available. Windows 10 receives fixes and new features through Windows Update, stopping Windows updates permanently is not recommended, we recommend pausing Windows updates for a short time.
Method 1 of 6
Pause downloading a Windows update using the command line.
With a few simple commands, you can disable Windows 10 update services. By running three simple commands, you can easily manage the Windows 10 update process.
Step 1: Open command line on behalf of the administrator. To do this, in the Start menu, start typing “Command Prompt” or “CMD”, right-click the top result and select “Run as Administrator”. If you see a User Account Control prompt, click Yes.
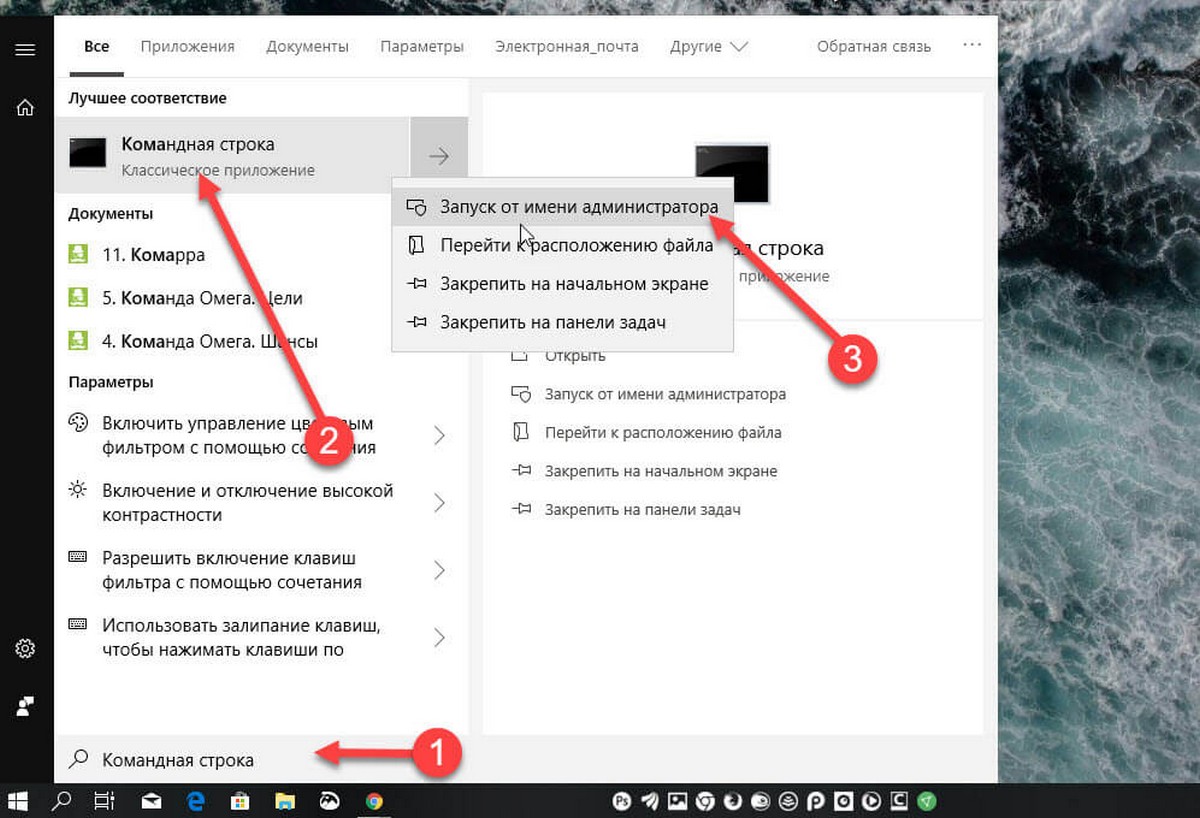
Step 2: Enter the following commands one after another, and don't forget to press the key Enter after each command entered.
net stop wuauservIt may take some time to stop the Windows Update service.
net stop bitsStop the background intelligent transfer service.
net stop dosvcStopping the Delivery Optimization service.

Step 3: Windows Update should now pause and stop installing updates, but you can turn it on at any time.
Enable downloading Windows 10 Updates.
Step 1: Open a command prompt with administrator rights.
Step 2: Run the following commands to start all stopped services and resume Windows update downloads.
- net start wuauserv
- net start bits
- net start dosvc
Step 3: Go to the application " Windows Settings" → « Update and Security" → "Windows Update". You should see Windows updates resume downloading. If not, wait a while.
If Windows 10 does not automatically check for updates when they are released, you may need to clear Windows update cache. Using the built-in Windows 10 OS tool to troubleshoot Windows Update issues.
Method 2 of 6
Enable Metered Connection.
Because Windows 10 does not download updates when enabled Limit connection, you can set your current internet connection as metered to pause downloading Windows updates.
Go to " Options"→ « Network and Internet"→ « Wi-Fi" or "Ethernet", click on the current network, and then enable the option - “ Set as metered connection".


Method 3 of 6
Pause updates using the Settings app.
Windows 10 doesn't offer an easy way to pause ongoing update downloads. Starting with Windows 10 build 14997 October 2018 Update, the system allows you to pause updates. A special option has been added to the Update & Security page of the Settings app. Once enabled, updates will be paused for 35 days.
- Open the application "Options"
- Go to section “Update and Security” → “Windows Update” and click the link "Extra options"(see picture).

- On the page, go to the section "Pause updates" and move the switch slider to position "On."

When the option is enabled, updates will be paused for 35 days. If you are a Windows Insider and your PC is set to receive preview builds of the OS, updates will only be paused for 7 days. Additionally, some important updates, such as Windows Defender definitions, will still be downloaded and installed regardless of the status of the " Pausing updates».
Method 4 of 6
Disable automatic updates (do not check for updates) in Windows 10 using the registry.
Method 5 of 6
Using the Win Update Stop tool.

This tool can stop automatic updates with the click of a button. It offers an easy way to disable updates on any Windows. You don't have to manually make changes to settings or the registry. With just one click of a button, Windows 10 updates will be disabled on your computer. But you can turn them on whenever you want.
Not only Windows 10, Win Update Stop supports all versions of Windows including Windows 8 and Windows 7. So in any version, you can stop all kinds of updates using this tool.
To disable updates, simply click the Disable button. To check that all system updates are disabled, you can go to “Settings” → “Update and Security”. You will be informed that Windows was unable to download the updates, which indicates that the tool is working fine on your computer.
Win Update Stop is undoubtedly a time saver and an excellent convenient utility, on download page you can download Portable version that does not require installation.
Method 6 of 6
Using the StopUpdates10 tool.
StopUpdates10 is a tool that you need to install to block Windows 10 updates. Although there is a manual way to disable updates. But for some users it is too complicated.
This utility has two interaction options:
"Stop Windows updates"- blocks Windows updates, “forced” updates and stops all update notifications.

And the ability to cancel everything by clicking "Restore Windows Updates". After clicking the button, the Windows Update service works as usual.

Additional entries below the button are other tools from the developer.
You might be interested in:
Today, the situation around the automatic update of the “ten” is causing more and more controversy. The fact is that the developers previously stated that no updates would be released, but they are. And updates are installed a little differently. In Home, for example, the user may not even know about it, but after installation there is an unexpected reboot, which often causes an ambiguous reaction. Let's try to figure out how to disable auto-update in Windows 10 forever. In addition, we will consider issues related to devices, the installation of which raises legitimate doubts about the advisability of their use.
How to disable auto-update in Windows 10 Pro or Enterprise in the simplest way
So, let's start with the simplest thing. For now, we will not touch the “home” version (we will talk about it separately), in which the simplest type of control methods do not work, but let’s see what can be done in other modifications.
How to disable auto-update in Windows 10 using the most primitive method? Yes, very simple. To do this, we use the update and security section, which is accessed through the options menu. Here, in the update center window at the bottom, select the line of additional parameters, after which in the new window we will enable the reboot notification line. This will help prevent an unplanned system restart by the user at the most inopportune moment.
Next, you should make sure that the checkbox for providing updates for other Microsoft products is unchecked (sometimes this process can take quite a long time). Then check the box for deferring updates. To go to the next menu, use the line to select how to receive updates, and then disable receiving updates from several places. This, by the way, will be useful for those whose Internet speed is not up to speed. top level. Upon completion of all these procedures, searching, downloading and installing updates will not be performed.
Using the Group Policy Editor
Now, regarding the question of how to disable auto-update in Windows 10 Enterprise, for example, here is another standard method.
To do this, you will need to enter (gpedit.msc command in the Run menu (Win + R)), where through the computer configuration tree you first need to go to administrative templates, and then through Windows components to the update center.

On the right there is an update management line. When entering its menu, the update can be completely blocked (the “Disabled” position). But if you need to manage updates, you can first use the enabled mode and select the necessary parameters in its settings (for example, 2 - warning about loading and impending system restart). Thus, again, unauthorized reboots can be prevented even with installed updates.
Disabling automatic updates through the system registry
Now let's see how to disable auto-update in Windows 10 Home (the method suggested below also works in other versions).
We use the system registry editor, which is called using the regedit command from the same “Run” menu. Here we are interested in the HKLM branch, in which through the SOFTWARE tree we need to go down to the Policy settings and get to the Windows directory.

In this directory, first create a folder WindowsUpdate, and in a new folder - another one, called AU. In this directory on the right, click on an empty space on the screen and create a new DWORD parameter called NoAutoUpdate and assign it the value “1”.
Now our task is to check whether this method works. Go to the update center section again and use the check for updates item. It probably doesn’t need to be said that it will become inactive, that is, searching for and installing updates will never be done again. If for some reason you need to enable updates, you can use the value "0" for the parameter specified above or remove it altogether.
Disabling updates in the services section
How to disable Windows 10 auto-update using another method? Just as simple. Here you will need a services section, which can be entered using the services.msc command, all from the same “Run” menu.

On the right, the update center line is selected, and in the additional menu, the startup type is set to disabled, that’s all.
How to disable auto-updating drivers in Windows 10
Finally, we come to one of the most important problems, when the system itself tries to download driver update packages. Alas, they do not always work correctly. We have already figured out how to disable auto-update in Windows 10. Let's see how to completely disable such processes for drivers.

In the “Run” menu, first enter the command rundll32 newdev.dll,DeviceInternetSettingUi and enter the device installation settings section, where we simply disable the installation and save the changes. After this procedure, the system will only access those drivers that are available in the installation distribution or in the system partition. As a last resort, if the need to update drivers is still ripe, it is better to use utilities like Driver Booster, which search for new versions of drivers and install them into the system much more correctly.
Third party utilities
Basically, that's not all. If you solve the problem of how to disable auto-update in Windows 10, you can also use third-party programs. Let's explain the situation using the example of a utility called Show or hide updates.

In the program itself, after launching, you need to select from the list those updates that you want to exclude and click the continue button. It goes without saying that in order to return you will need to do the opposite.
Is it worth doing?
Of course, disabling updates to some extent will bring peace of mind to the user’s work. But, please note, problems with computers can often begin precisely because the latest update packages are not installed for Windows 10, and they may be required for some new programs to work.
By the way, some people recommend using a metered connection to disable these processes. But this is exactly what you shouldn’t do, because it is fraught with unpredictable consequences.
However, you should only disable it as a last resort. Although core packages are developed solely to patch security holes, sometimes this can affect some important components of Windows. The lack of updates for them in some emergency situations can provoke conflicts at the level of the installed software. Unfortunately, it is not uncommon for various kinds of “screens of death” to appear, indicating early termination of processes and errors in memory segments. So, as they say, it’s better not to take risks. As a last resort, some unnecessary packages that can cause critical errors can simply be isolated so that the system does not constantly look for them.
It's no secret that installing system updates automatically can cause a lot of inconvenience to the computer owner.
Why are updates needed?
We're not saying that system updates are just inconveniences. They are designed to keep the system up to date, which is necessary to protect against virus attacks.
Why do many people disable Windows updates?
Of course, there is a certain portion of users who do not care whether they have all the latest security patches or not. For owners of 4G modems, it is much more important to control the consumption of incoming traffic than to receive cherished updates.
In addition, tedious waiting for updates to download, intrusive notifications, as well as subsequent installation, the requirement to immediately restart the computer at the most inopportune moment, and many other typical reasons push people to disable checking for new Windows 10 update packages.
In this publication, we will look at how to permanently disable scanning, downloading and installation of various Windows 10 update packages.
Why is it very difficult to disable the update completely in Windows 10?
Many users who do not know all the nuances operating system Windows 10 people have no idea how difficult it is to permanently disable the update. There is officially no such setting in the operating system. Microsoft itself has done everything to prevent the user from performing this unsafe operation on the system. In the current version of the operating system, it is impossible to disable the update without using a special software or built-in administrative programs.Please note that using third-party software to disable updates may be unsafe, since very often similar utilities launch malicious processes in the background of the operating system. Therefore, unscrupulous authors of such software recommend disabling the antivirus before use. It is wiser to master methods for disabling updates within the system. software than to trust dubious utilities.
Among all the ways to disable the update, the following can be highlighted:
Firstly, you can use the deactivation of the Update Center.
Secondly, try disabling the update using the Group Policy Editor.
Thirdly, applying metered traffic to the current Internet connection may disable the update
And fourthly, using special software to quickly disable the function of downloading and installing system updates automatically allows you to solve all problems.
Disabling the update by deactivating the Update Center
Probably the easiest thing for an untrained user who does not know how to dive headlong into the jungle of system settings is to deactivate the Update Center.Note that the below option for disabling the update function through the potential of a tool for editing group policies does not work for the home edition of the Win 10 operating system. Specialists from Microsoft considered that home 10 owners simply do not need this administrative tool. If another edition of Win 10 is installed on your computer, then to stop and completely disable the malicious service you need to do the following trivial steps:
- Using the hotkey combination “Win + R”, launch the “Run” utility.
- In the text field, which is intended for entering the command to be executed, enter “services.msc” without quotes. This command will launch Services.
- In the “Services” window, you need to find a service with the corresponding name “Windows Update” or “Windows Update”
- Having found this service, double-click on it, which will bring up its properties window.
- In the new window, select “Stop” to perform the operation of shutting down the Windows Update service.
- The final step is to edit the parameter from the drop-down list named “Startup Type”. There you must select “Disabled” and apply the changes for this system configuration to take effect. Next, we reboot the system.
Disabling updates through the Group Policy Editor
Undoubtedly, this method not available for owners of the home version of Win 10. We recommend this option on a computer that has the Pro or Enterprise edition of this operating system.
The algorithm of actions is simple. It is enough to follow simple steps, namely:
- Using the hotkey combination “Win + R”, we launch the “Run” system utility.
- In the text field intended for entering the command to be executed, enter “gpedit.msc”.
- Find the “Computer Configuration” section and open its subsections.
- We are interested here in the “Administrative Templates” item, in which we open the “Windows Components” directory.
- Then you need to go to “Windows Update” and call “Properties”, where you will be able to select the “Set up automatic updates” option. To disable the update, simply move the switch to the “Disabled” position.
- To approve the changes in the system registry, click “Apply”.
How to disable updates using Registry Editor
Launch the Run utility using the above method and enter the command “regedit”. A utility for editing the Win 10 registry will open. We will need to create a new DWORD key with the name “NoAutoUpdate” and assign it the value “1”, placing it in
HKLM\SOFTWARE\Policies\Microsoft\Windows\WindowsUpdate\AU
Limiting updates by setting a traffic limit for your Wi-Fi connection
Probably the most pleasant way to get rid of the “tens” update is to use the option in which your Internet connection will be limited. This useful setting tells systems that your Wi-Fi connection is limited in the amount of incoming traffic. Using this modification is useful for owners of 4 g-routers with Wi-Fi distribution, for which every GB is worth its weight in gold.In order to assign your connection metered status, you must take the following steps:
- Open the Start menu and click on the Settings icon. Inside the system steam meters configuration section, select the network and Internet settings section.
- Then activate the Wi-Fi connection tab and go to “Advanced settings”. In order for the operating system to consider the connection to this wireless network as limited in terms of incoming traffic, you must set the switch to “Set as metered connection”.
Using utilities to easily disable an update
Of course, using the application to make serious modifications in the system settings of Windows 10 is undesirable from an information security point of view, but for an untrained user this is the only possible variant. Editing the registry by an inexperienced user may lead to a higher risk of causing irreparable damage than using special utilities to disable system updates from third-party developers. Perhaps the most famous of this kind of programs is the Win Updates Disabler software. Downloading this utility does not present any problems, but you should be careful because malicious code may be embedded in it. If you do not want to get into a hopeless situation, then scan this program with the VirusTotal online scanner before starting it.
Tenth version of the operating room Windows systems The update center has undergone major changes; it has been completely replaced by a new application that allows you to postpone updates for a certain period of time, but does not allow you to turn them off forever. One way or another, you have to install fresh drivers, but experienced users are well aware of the dark side of this phenomenon.
If this process is not controlled, updates can result in irreparable failures in the PC. How to disable Windows 10 update, each program has its own hidden “bugs” that may not appear until the update.
The next stack of “improvements” for Windows 10 may not be compatible with the program you’ve been using for many years. As a result, its stability may be at risk, and the worst-case scenario may be software conflicts that cause the entire operating system to crash. It is impossible to foresee this, so the best solution would be to take control of the installation of programs/drivers and choose only what is necessary.
The second important factor prompting you to cancel the update is the extra load on weak computers. The update service means regular calls to Microsoft servers, thereby slowing down the Internet speed. New installation packages require hard drive space and load RAM during download. On modern computers with high-speed Internet access, updates do not affect performance in any way, but owners of outdated models may experience a lot of inconvenience due to constant uncontrolled updates.
How to disable auto-update in Windows 10?
This article will provide several instructions on how to disable automatic updates in Windows 10. We will go from the very beginning. simple way to the most advanced. Let's start with the fact that, for each of Windows versions 10 provides its own update blocking tactics.
Instruction No. 1. Disable a service (compatible with all versions of Windows 10)
- Press the key combination WIN + R.
- In the window that appears, you need to type services.msc
- In the list of services, look for an item called “Windows Update.”
- After selecting this item, press the ENTER button.
- The “status” line indicates whether the service is running or stopped. We need to turn it off by pressing the “stop” button.
- Stopping the service stops searching for updates, but after a reboot it will be activated again.
- The last point is about how to disable updates in Windows 10 permanently. In the same window there is a line “Startup type”, in which you need to change the value “Automatic” to “Disabled”.
Let's see how to cancel a service
This setting is a prohibitive barrier to any attempts to connect to the update center. Any operations requiring access to this center will be accompanied. If you need to enable updates on Windows 10 again, follow procedures 1-4, reaching this window again, select “Startup type” - automatic and click the start button - the service will resume.
Instruction No. 2. Windows Update Blocker utility.
According to the principle of operation, this set of scripts performs the same manipulations that were described in instructions No. 1. The program is freely available and absolutely anyone can use it.
- Download Windows program Update Blocker on your computer.
- The downloaded file does not require installation, place it where all your programs are located (solely to maintain order on your computer) and run it.
- In the program window, select “Disable Service”.
- Click “Apply Now”.
- “Enable Service” button – designed to enable the service.
 If you are unable to cancel your update, we suggest watching a video on how to block a Windows 10 update:
Instruction No. 3. Limited network connection.
And there are life hacks for dozens. Savvy users have long discovered a way to disable auto-updates by assigning their unlimited internet“limited” status. When you have to pay for every megabyte, you don’t want to spend money on a new version of a program that you’ve never even used. Microsoft developers are clearly aware of this fact and have provided the ability to remove auto-updates for metered connections.
This trick is easy to use.
- Go to “Settings” -> “Network and Internet”
- By selecting “ Wireless network” -> “Additional parameters”, set the switch to the “On” position, under the line “Set as a metered connection”.
- If the switch is turned off, the restriction on searching for and installing the latest updates is removed.

This option is only available on Windows 10, and thanks to it it is possible to restrict the installation of updates.
Instruction No. 4. For advanced users.
How to disable updating in Windows 10 permanently - to implement this method, we will need to make changes to the registry. Follow these instructions:
How to remove an update for the Windows 10 Home version?
Not in all versions of Windows 10, it is possible to disable automatic updates without experience in configuring system settings. Users of the “Home” version have minimal rights to change basic settings, and in order to remove auto-update, it is recommended to watch this video:
How to disable automatic driver installation?
Driver problems most often occur on laptops and tablets. The driver may not be optimized for portable devices, which can lead to unpleasant consequences. To prevent Windows 10 from constantly searching for the latest drivers, which are almost no different from previous versions, you can download a utility developed by Microsoft itself for these purposes. It's called “Show or Hide Updates”. You can download it from the Microsoft website.

In the program window, select “Show hide updated”. Next, you should independently select the drivers that you do not need to update. Before you disable the installation of all drivers, consider which ones can actually improve the performance of your PC.
For example, you should not rule out an updated video driver, since a new version better optimized for modern games. Updating drivers that are not used can be completely disabled in the “Show hide updated” program.
By default, in Windows 10, system updates and new driver versions are downloaded and installed automatically. However, auto-update can be deactivated using standard methods or using third-party programs.
Should I disable automatic updates?
Updates correct errors made in previous versions of the system. If you do not install them, some problems found by the developers will not be solved.
However, automatic updating has its disadvantages:
- updates can start downloading at any time, which will lead to increased load on the Internet;
- downloading large updates eats up part of the traffic and money balance if you use metered Internet;
- updates are installed in the background, as well as during the next shutdown and subsequent startup of the device. If you urgently need a computer at this moment, you will have to wait for the update installation to complete.
Therefore, it is recommended to switch to manually selecting updates or abandon them completely. When choosing the first option, you will be able to independently select which updates to download and which of those already downloaded to install.
Deactivating system auto-update
There are several ways to disable auto-update of the system. The simplest is by disabling the service. If it does not work correctly, updates will still continue to be downloaded and installed independently, then additional methods are presented below.
Through termination of service
Video: disabling auto-update through service shutdown
Through the "Local Group Policy Editor"
This method can only be used by users of Windows 10 Professional and higher, because only these packages contain the Local Group Policy Editor.
- Open the Run window by pressing the Win + R key combination and enter the command “gpedit.msc”.
 Run the command "gpedit.msc"
 - Follow the path: “Computer Configuration” - “Administrative Templates” - “Windows Components” - “Windows Update”.
 Go to the Windows Update folder
 - In the Windows Update folder, find the line “Set up automatic updates” and double-click on it.
 Double-click on the line “Setting automatic updates”
 - Set the option to Disabled, accept the changes, and close all windows.
 Set the Automatic Update Settings item to Disabled
 - Perform a manual search for updates via Update Center. This action is necessary to prevent automatic verification and installation from being performed by the system in the future.
 Perform a manual check for Windows 10 updates
Video: deactivating auto-updates through the “Local Group Policy Editor”
Through editing the registry
This method is suitable for all versions of Windows, except for the “Home” build:

By enabling metered internet mode
This method works in all versions of Windows 10, but deactivating automatic updates using it will result in some important and minor updates still being downloaded automatically.

Through a third party program
If the standard methods described above did not help solve your problem, then you can use one of the third-party programs designed to turn off auto-update. For example, Win Updates Disabler. On the website of the developer of this program you can find its portable version, which does not require installation. After launching Win Updates Disabler, check the “Disable Windows Updates” option and click on the “Apply Now” button.
 Check the box next to “Disable Windows Updates” and click the “Apply Now” button
 After deactivating auto updates, restart your computer.
Deactivating automatic computer reboot
The device can reboot itself during your absence. This is necessary to install already downloaded updates. You can manually set a time when a reboot is possible, for example, by setting it to night, or completely prohibit the device from restarting without your knowledge.
Setting time frames
- In Computer Settings, open the Update & Security tab.
 Open Update & Security in System Settings
 - In the “Windows Update” subsection, click on “Change activity period”.
 In the “Windows Update” subsection, click on the “Change activity period” button
 - Set two values: the start and end of the period when you are most likely to use the computer. The period should last no more than twelve hours. Until this time has expired, the computer will not be able to reboot, as it will assume that it may be needed at any time.
 Specify or change the time your computer is active
 - Go back a step and click on the “Restart Options” button.
 Click on the “Restart Options” button in the “Windows Update” subsection
 - In this tab, you can specify or change the installation time of already downloaded updates.
 In Restart Options you can specify when to restart
Partial ban
This method is only suitable for users of Windows 10 Professional and higher, since only these versions have the Local Group Policy Editor.
After changing the values in the Local Group Policy Editor, the computer will not be able to restart if there is a user logged on. If there are no authorized users, an automatic reboot will still occur.

Video: Disabling automatic reboot through the Local Group Policy Editor
Partial ban for all versions of the system
This method is suitable for all versions of Windows, including the Home version. After changing the values, the device will not be able to restart on its own if any user is logged in to their account. If no one is logged in, a restart will be made.

Video: disabling automatic reboot through Registry Editor
Complete ban via Task Scheduler
Using this method, you can completely disable computer rebooting: even if no user is logged in, the reboot will not occur.

Turn off automatic updates for Windows Store apps
By default, apps installed from the official Store program, also called the Windows Store, are updated to latest version automatically. This can be inconvenient, since updating creates an extra load on the Internet, and traffic, if the Internet is limited, is eaten up. Therefore, it is better to deactivate automatic updates:

Disabling automatic driver updates
Drivers are installed automatically when you connect each new device. Over time, new driver versions may become available; by default, they will be obtained automatically. To avoid this, you can disable automatic updates for a specific device or for all at once.
For a specific device

For all devices at once
There are several ways to disable driver auto-update for all devices at once. The most universal of them, suitable for all versions of Windows, is through the “Registry Editor”.

You can also use a third-party program from Microsoft - Show or Hide Updates. It scans the system and displays a list of drivers that, when updated, can harm the computer. By selecting the desired list items, you can prevent the installation of updates for certain drivers.
 In the list of drivers, indicate those that do not need to be installed
 Video: three ways to disable automatic driver installation
Disabling distribution of updates
By default, Windows 10 has a feature enabled that allows computers to receive updates not only from Microsoft servers, but also from other computers that have already downloaded them.
Windows 10 has a function for distributing updates, which is necessary to relieve Microsoft servers. Once your device has received any update, it starts distributing it to others. But this system has a minus - your Internet traffic is wasted only if it is not unlimited, and it creates a load on the speed of your network, since part of it, although small, is given for distribution.
There are two ways to disable the distribution of updates. The first is to indicate that your connection is metered. How to do this has already been described in the subsection “By enabling the metered Internet mode.” The second way is to disable the function itself directly:

Disable system update notifications
If you have automatic system updates turned off, then over time you will begin to receive notifications that the check for updates has not been done for such a long time or that certain updates have not been installed. You can simply ignore these messages, nothing will happen. But if you can’t stand them, you can deactivate receiving notifications:

System, application and driver updates can put a strain on the Internet and cause loss of traffic. But it is not recommended to leave your devices and computer without updates, as they fix problems discovered by developers in previous versions of the system. The best option- disable automatic installation of updates and control this process manually.