This series of lessons is intended for those who want to learn how to create their own weapons for video games, be it AAA First Person Shooter(FPS), Survival Game or Third Person Shooter(TPS). Modeling a weapon is a very simple matter, but it takes a lot of time, since first we have to create High-Poly model, after that we must do a retopology, thereby optimizing the model for games, bake Normal Map With High-Poly, apply quality Physically Based Rendering(PBR) textures and rig the 3D model for subsequent animation. The series of lessons will be divided into 3 parts: 1. Modeling a pistol, 2. Creating materials and animations for Glock, 3. Importing the model into Unity3D and creating a shooting script.
To create this model we will use free and very powerful software Blender3D. The latest version of Blender at the time of writing is 2.78. You can download it from the official website. You can use any other software: 3DS Max, Maya and even domestic Compass-3D, the difference will only be in the program interface. To create textures we will use everyone's favorite Photoshop, but also suitable GIMP.

To create Game-Ready Glock, we need to stick to this plan:
1. Find drawings and several references of the pistol
2. Start High-Poly Modeling
3. Optimize the 3D model for games
4. Create PBR textures
5. Import Glock into Unity

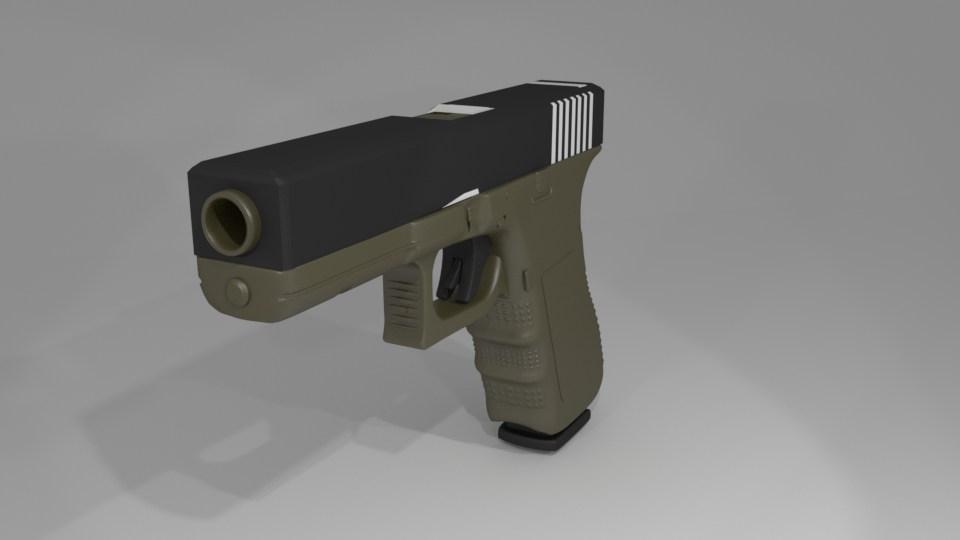
Glock pistol drawings
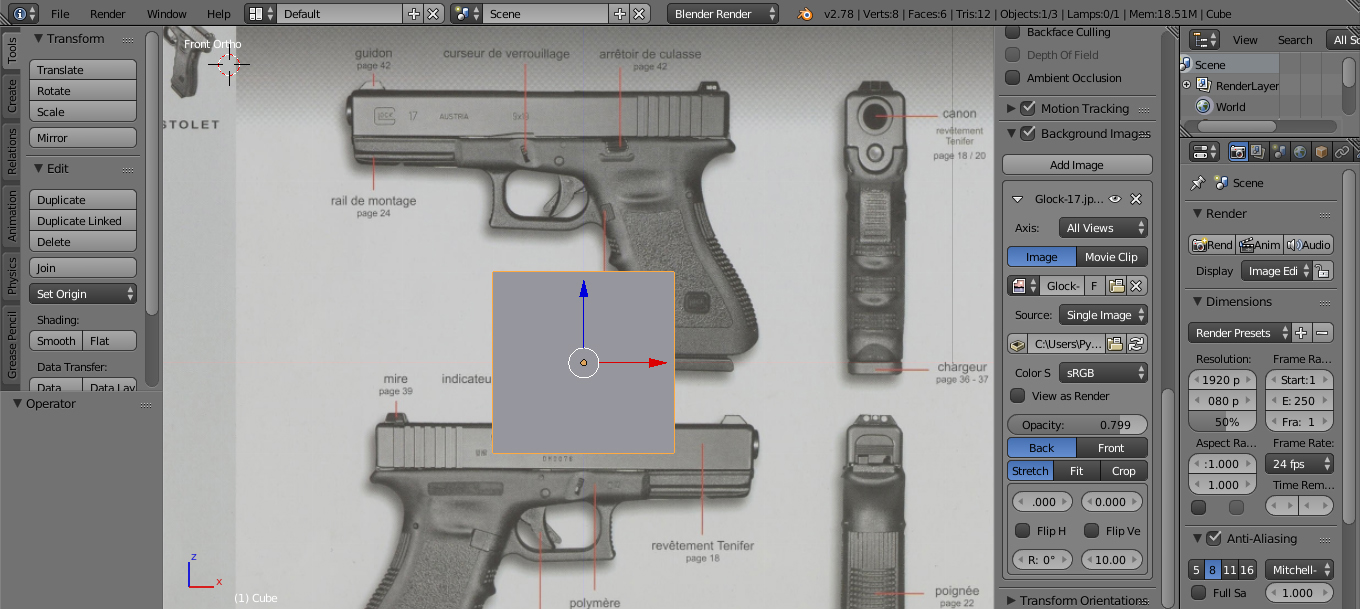
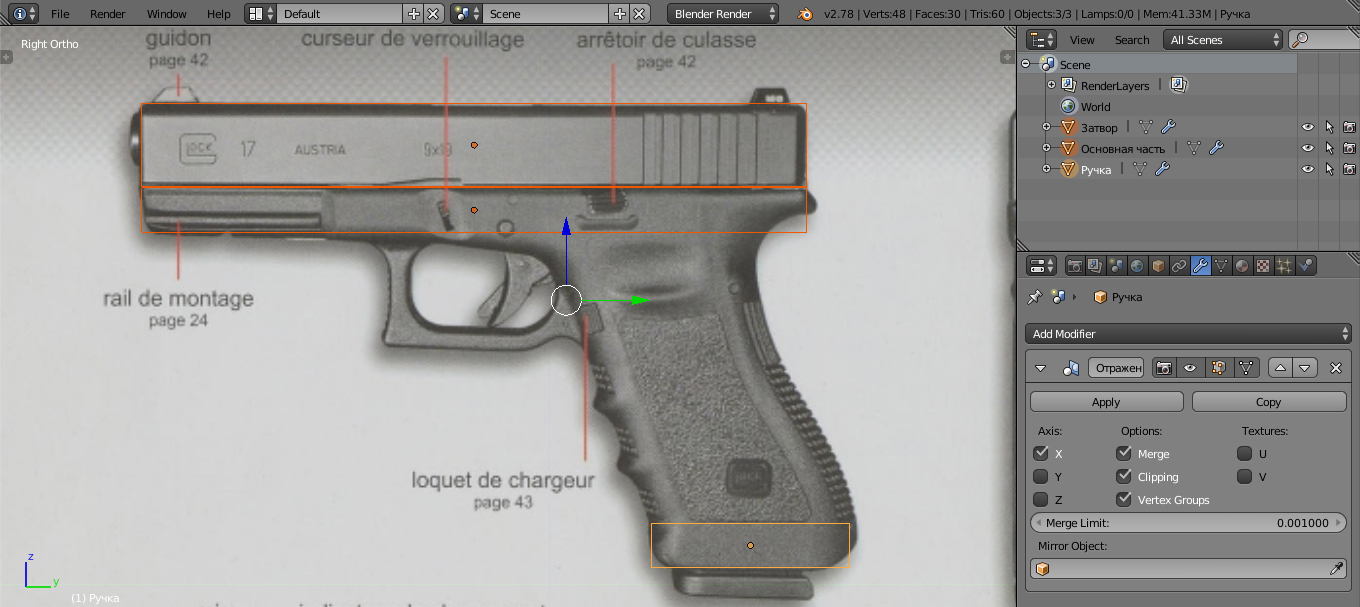
Most models require drawings to create. We found a nice picture of a gun Glock 19 front, back and sides. The photographs do not exactly match, but such errors should not interfere with the process. But it’s still better to use accurate drawings, for example from this or this site. So, to add an image to the background, you need to: press the key N, in the menu that opens, find the tab Background Images > Add Image and select the desired file. To see the image, you need to switch to orthogonal mode by clicking 5 on Numpad. Below there is an important characteristic - Opacity(Transparency). Add a few more references in the same way, but temporarily disable them in this tab. If you don't like this method, you can enable the addon Images As Planes in User Preferences > Add-ons.

Drawings cannot show cuts or small parts on the gun. References from Google. Look for as many pictures of the Glock as you can from different angles.
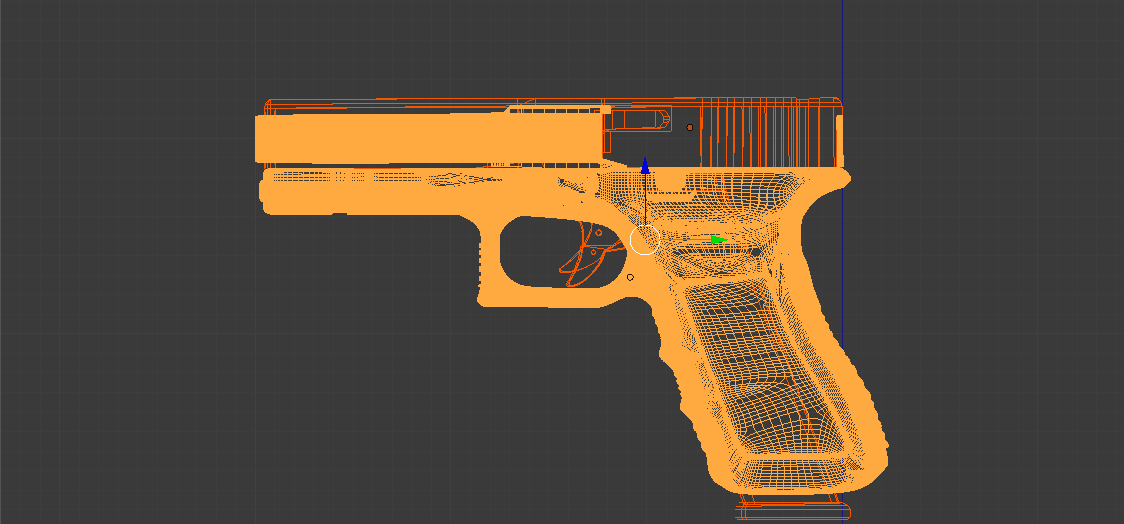
High-Poly weapon simulation
While creating High-Poly The model does not need to save polygons, use as many as you see fit. Do not skimp on polygons for all the various small parts and cuts. For convenience you can use Hotkeys(hotkeys) that will greatly simplify your life and save a lot of time. All useful Blender hotkeys are written in this article:. We only need a few of them: E- extrusion, G- moving, S- scaling, Ctrl+B- chamfer, Z- switch to mode Wireframe,X- removal, A- select all elements when clicked A in edit mode, all points/edges/planes will be selected, H- hide the object.


Retopology High-Poly Glock
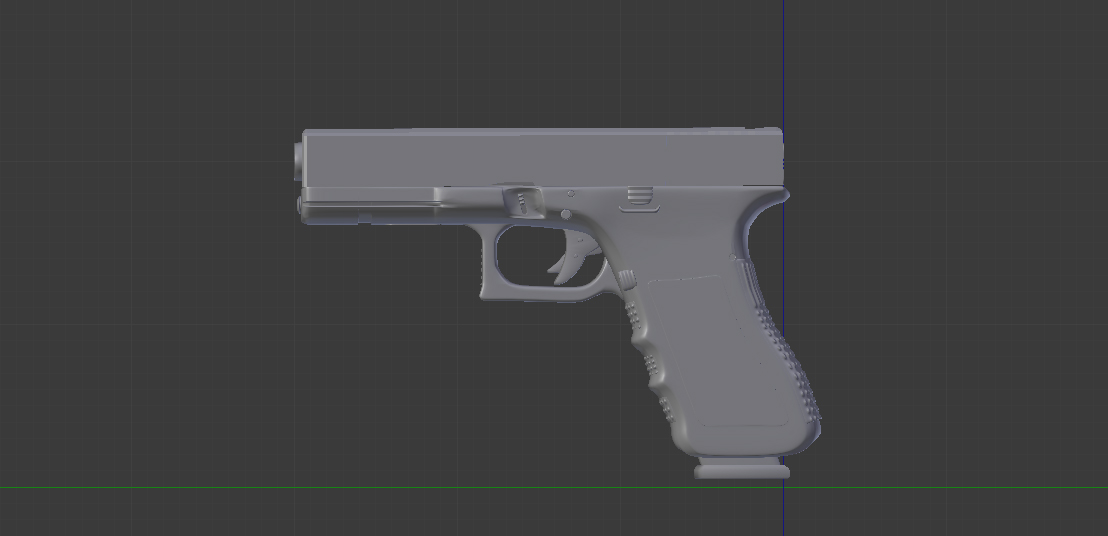
At this stage we need to optimize our 3D model for video games. AAA weapons should now have up to 20.000 Tris, if it's an automatic, up to 10.000 Tris if it's a gun. These are approximate values and are different for each project. BlenderMania released a very good tutorial on how to retopology a high-poly object onto a Low-Poly 3D model.
In this lesson the author talks about how to use Blender3D And MeshLab to create a quick retopology using a minimum of effort and time. In our case there is no need to use MeshLab, we will create Low-Poly model from scratch, as shown in this video tutorial:
Our model should be divided into 4 parts: bolt, trigger, magazine and main part. The magazine, as well as the bolt and trigger, must consist of minimum quantity polygons, because most of the polygons will go to the base of the pistol.
Create UV unwrapping low poly model. To bake Normal Map you need to select our High-Poly model, then choose ours Low-Poly, go to the tab Render. We need to make sure that we have selected Blender Render. Find in this tab Bake> Bake Mode = Normals, Normal Space = Tangent, Selected to Active. Click Bake. After baking, the normal maps need to be saved by clicking F3. Go to the tab Materials, create new material, in the tab Textures select our normal map, in Influence turn off Color, Geometry > Normal. IN Mapping Coordinates must be switched from Generated on UV. Add light to the scene and see the result.
In the next tutorial we will create textures and animations for our pistol.
Good day, dear forum participants!Today I will tell you how to implement your weapon for Counter Strike 1.6 and will help you learn how to work with the FragMotion program.
What will you need today?
- fragMOTION- better not older than 1.1.
- MilkShape 3D- at 1.7.6 itself.
- GUI StudioMDL- the last one.
- Straight arms- from birth.
(Before completing the lesson, take v_deagle.mdl and v_knife.mdl, and put them in separate folders, for convenience).
Part one. Preparing for work.
1. First, open MilkShape 3D, then the Tools tab, and Kratisto's Half-Life MDL Decompiler v.1.x (x=version).
2. Click the review button, the one to the right of the words MDL File...
3. Open the usual v_deagle.mdl, which is located in a specially prepared folder.
4. Click OK and wait until the process is completed.
5. Done! Open the folder and find .smd, .bmp and .qc files in it.
6. Open our fragMOTION, click File --> Open..., select ref_deonly.smd.
7. We will receive the so-called “reference” of the deagle. Now we need to remove all the bones except the mesh (model).
But before you do anything, open Edit --> Customize User Interface. If everything is default, click on the line and select Mouse Configurations.
You have the Default settings in front of you. By the way, they are very difficult to work with.
Right-click on the MouseConfigurations tab --> New... --> MouseConfig.
A new config will appear. We left-click on it and configure everything as I do.
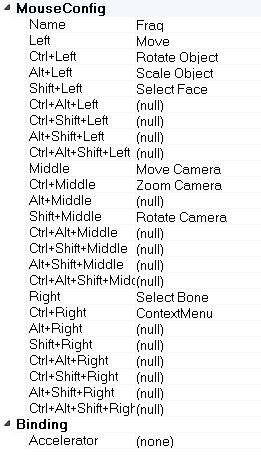
Is everything done? Click File --> Save Changes.
8. How to remove these bones? Easily. Hold down the right button and circle everything around the gun. Press the Delete key. Ready.
9. It remains to prepare the gun for further use.
Click on Transform --> Transform Options...
A window rolls out.
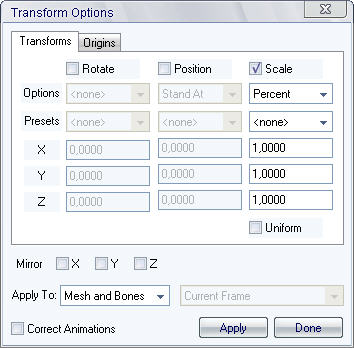
Uncheck the Scale box. Check the Position box, then the Apply button.
Our gun is aligned to the center.
Now you need to turn it so that it lies flat in your hands...
In hand? In hand?! What are we doing?
And this is what we do.
Part two. Baking bones.
10. Now you need to turn it so that it lies flat in your hands...
Click on the Rotate checkbox, enter 90.0000 in the Y field, and click Apply twice.
Erase the nine in the Y field, leaving 0.0000. Now we enter 90.0000 in the Z field.
Click on Apply three times.
11. Uncheck Rotate and check Position. We leave everything as is. Click Apply once.
Note: If suddenly the gun flies away where it shouldn’t, press Apply until the gun lands in the middle.
Well, I didn’t tell you one thing.
Click View --> Layout --> 4 corners. This makes it very convenient to navigate in the future.
To fly in 3D view, hold down the mouse wheel button. To rotate the camera, hold Shift + Mouse3 (mouse wheel). I think you know how to get closer.
After all the operations described above, you should get something like this.

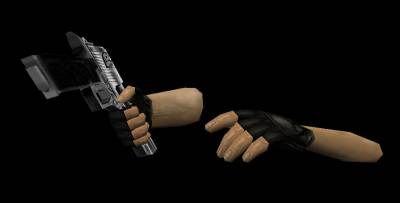
12. Click File --> Merge..., open reference.smd from your decompiled knife. Without selecting anything, just click OK.
Hands and a knife enter the scene.
13. Now we need to destroy the remains of the knife and insert the pistol.
We're not touching the gun, now we'll take care of the knife.
14. Press Shift+LMB (left mouse button) and draw around the unnecessary knife.
Press the Delete key. Wow, there are still pieces left!
15. Now in the Left, Top, Front views, do the same, removing the last remnants of the knife.
16. Hurray! There is no knife, and now you can start roasting the bones.
Click LMB twice on ref_deonly.

Now LMB move the cannon to the blue dot, which is located in the place of the removed knife. Muzzle forward, respectively.
You should end up with something similar.

Note: Don't have textures on your hands? Don't worry! It doesn't matter at all. I still have the textures from old exports.
17. Now select the blue dot, which is located on our muzzle, with RMB.
Note: The gun must be Necessarily highlighted, and be red.
18. Now Bone --> Assign Selected Vertices to Bone.
Voila! The bone is stuck to the cannon! To deselect, right-click on the scene and the key combination Ctrl+Shift+N.
Let's check.

19. Let's see what we got. Click File --> Merge Animations... and select, for example, draw.smd from the knife. Without selecting anything, click OK.
Now in the upper right corner there is a small Anim... button, click. We get this picture.
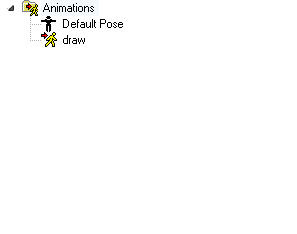
Select the draw animation, and pull the slider below.
If everything worked out, then I am very happy for you!
Part three. Adding weapons to the game.
20. Create a separate folder called Deagle Knife.
21. Click on the draw animation, and click the Delete key. There is no animation, which means we have a so-called reference in our hands.
21. Click File --> Export..., save with the name reference, and below with the Half-Life SMD Files (.smd) format.

Leave a dot on the Mesh.

22. Now, by the way, the easiest thing, but, let’s say, very tedious.
Click File --> Merge Animations..., and select, for example, draw.smd.
Don't touch anything, click OK.
Then File --> Export..., in special. folder Deagle Knife, enter the name of the animation draw, format .smd.
Rolls out the window. Click on the Animation dot and select draw below. OK,

Now you need to do the same with idle, midslash1, midslash2, slash1, slash2, stab, stab_miss.
Note: Don't touch the reference! We already prepared it at the very beginning.
23. Open the folder and check for the presence of such files.
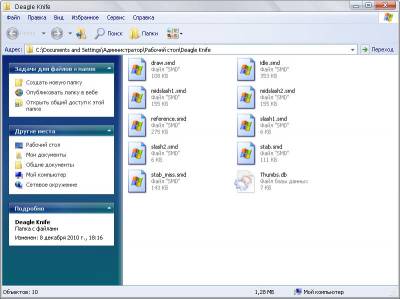
24. If everything is in place, now we will get acquainted with a new program for us - GUI StudioMDL.
25. Transfer v_knife.qc from the folder with the decompiled knife to the Deagle Knife folder. Also, texture knifeskin.bmp.
Note: Why? And in order not to bother with changing the .qc code, we’ll leave the texture. She doesn't interfere.
26. From the folder with the decompiled deagle we take out DE_slide1.bmp, DE_handle.bmp, DE_slide2_eagle.bmp, view_glove.bmp, view_skin.BMP, view_finger.bmp, and throw it into our Deagle Knife folder.
27. Move the Deagle Knife folder to the C:/ directory so that the GUI StudioMDL program does not conflict with the Cyrillic alphabet.
28. Open GUI StudioMDL, click File --> Load QC File.
After that, check the Dump Hitboxes box, and then enthusiastically click on Compile.
If everything went well, v_knife.mdl will appear in the Deagle Knife folder.
Note for the entire lesson: You can not only insert the same deagle into your hand, insert a hacksaw, a screwdriver, a bucket, or anything else into it!
But now the third part has come to an end, and indeed the whole lesson. If anyone has anything that doesn’t work, write, I’ll help as best I can. Thank you for your attention, Valentin was with you.
In the next tutorial I'll show you how to make your own firearms and we'll talk seriously about attaching bones.
I also want to thank Mikhail, for his detailed explanations on this topic, and the entire portal GCC for moral support.
First go to the addons folder - D:\Games\Red Garry's Mod\Game\garrysmod\addons
Create a new folder, rename its name to yours, for example SWEP.
Next, create a text file addon.txt.
We enter into it:
"AddonInfo"
{
"name" "Swep" // Instead of Swep, enter your addon name.
"author_name" "Author" //Instead of Author, enter your nickname.
"author_url" "Url" //Here you can write a page for your website. Example -
"info" "Swep" // Here we enter information about our weapon.
}
In principle, you can leave everything as is.
Next, create the lua folder.
How and what?
Now you can create weapons.
Open our .lua file and enter this code at the very beginning:
SWEP.PrintName = "Chair Thrower" // This is the name of our weapon.
SWEP.Author = "I am athor" // Here you can specify the author's nickname. Enter your nickname in quotes.
SWEP.Instructions = "Left mouse to fire a chair!" // These are instructions for the addon.
SWEP.Spawnable = true // Here you can enter permission for a simple player, if there = true as in our case, then the player is allowed to use this weapon, if = false then the player is prohibited from using it.
SWEP.AdminOnly = true // The same as in the case above, only here permission/denial of weapons is given to the admin.
SWEP.Primary.ClipSize = -1 // This function is responsible for the number of cartridges in the magazine, if the value = -1 as in our case, then the cartridges in the magazine are infinite.
SWEP.Primary.DefaultClip = -1 // The amount of ammo when receiving a weapon.
SWEP.Primary.Automatic = true // Weapon type is automatic or rifle. In our case = true is an automatic, in case = false is a rifle.
SWEP.Primary.Ammo = "none" // Ammo type.
SWEP.Secondary.ClipSize = -1 // Here everything is the same as in the top ones
// functions.
SWEP.Secondary.DefaultClip = -1
SWEP.Secondary.Automatic = false
SWEP.Secondary.Ammo = "none"
SWEP.AutoSwitchTo = false // Auto switch weapons.
SWEP.AutoSwitchFrom = false
SWEP.Slot = 1 // Weapon slot, if = 1, then our weapon will be in the first slot next to the mount.
SWEP.SlotPos = 2 // The position of the weapon in the slot.
SWEP.DrawAmmo = false // Hiding the number of cartridges in the hud, if = false, then the cartridges are hidden, if = true, then the cartridges remain.
SWEP.DrawCrosshair = true // Hiding the crosshair.
SWEP.ViewModel = "models/weapons/v_pistol.mdl" // IMPORTANT: Here we write the path to the weapon. This is the model that the player will hold.
SWEP.WorldModel = "models/weapons/w_pistol.mdl" // IMPORTANT: Here we write the path to the weapon. This is a model that will be in an unselected state.
local ShootSound = Sound("Metal.SawbladeStick") // Sound when fired.
Now let's move on to the main functions.
function SWEP:PrimaryAttack() // IMPORTANT: This function is responsible for the properties of the shot from the left mouse button.
self.Weapon:SetNextPrimaryFire(CurTime() + 0.5) // This specifies when the next shot will fire. 0.5 you can change to your liking.
self:ThrowChair("models/props/cs_office/Chair_office.mdl") // Function of attacking with chairs. If it doesn't work for you, install the Counter-Strike Source content or rename the model to models/props_c17/FurnitureChair001a.mdl
function SWEP:SecondaryAttack() // The function is responsible for firing with the right mouse button.
self:ThrowChair("models/props_c17/FurnitureChair001a.mdl") // Function for attacking with chairs.
function SWEP:ThrowChair(model_file) // Here is the chair function itself.
self:EmitSound(ShootSound) // Play weapon sound.
if (CLIENT) then return end
local ent = ents.Create("prop_physics")
if (!IsValid(ent)) then return end
ent:SetModel(model_file) // Path to the model, in this case we do not specify anything since the models were already specified in the shot functions.
ent:SetPos(self.Owner:EyePos() + (self.Owner:GetAimVector() * 16)) // Specifies where the model will appear.
ent:SetAngles(self.Owner:EyeAngles())
ent:Spawn() // Spawns our weapon
local phys = ent:GetPhysicsObject()
if (!IsValid(phys)) then ent:Remove() return end
local velocity = self.Owner:GetAimVector()
velocity = velocity * 100 // Shot strength, you can set it to 7000 to make the chairs fly at bullet speed.
velocity = velocity + (VectorRand() * 10)
phys:ApplyForceCenter(velocity)
cleanup.Add(self.Owner, "props", ent) // Function for removing a chair, as you can see the code classifies it as a props.
undo.Create("Thrown_Chair") // Main function for removing a chair when the z button is pressed.
undo.AddEntity(ent)
undo.SetPlayer(self.Owner)
undo.Finish()
end
//That's it. Your weapon is ready, you can change the properties to your liking.
//Search in the Other weapons category.
Create a lua file, for example: weapon_scripted_357.lua in the 357 Scripted SWEP/lua/weapons folder.
Now let’s write the code itself accordingly.
Where there are quotes, you need to indicate the names in quotes.
SWEP.Author = "Hds46" // Nickname of the sweep author. Must be specified in quotes.
SWEP.PrintName = "357 Magnum" // The name of the swap that will be displayed.
SWEP.Contact = "Your site or mail" // Contact information where they will write to you about errors and suggestions.
SWEP.Purpose = "357 Scripted Weapon" // brief information about weapons.
SWEP.Instructions = "Shoot" // Instructions on how to use our swap.
SWEP.Category = "My Weapons" // Category where the weapons will be located.
SWEP.Spawnable = true // If false then the weapon cannot be spawned, if true then it can.
SWEP.AdminOnly = false // If false then everyone can use the weapon, if true then only admins.
SWEP.ViewModelFOV = 64 // Here you can specify how to move the weapon model closer/farther from the player’s screen.
SWEP.AutoSwitchTo = true // If true then the player automatically switches to this weapon (if he picks it up), if false then not.
SWEP.AutoSwitchFrom = false // The same thing, but with other swaps.
SWEP.Slot = 1 // Weapon position in Hud.
SWEP.SlotPos = 3 // Weapon position in Hud (at the bottom)
SWEP.Weight = 5 // Weapon weight.
SWEP.DrawCrosshair = true // If true then the crosshair is shown, if false then not.
SWEP.DrawAmmo = true // If true then the player's magazine cartridge indicator is shown, if false then not.
SWEP.ViewModel = "models/weapons/c_357.mdl" // First-person model directory.
SWEP.WorldModel = "models/weapons/w_357.mdl" // Third party model directory.
SWEP.Primary.Sound = "Weapon_357.Single" // Shot sound. You can specify a directory, or you can specify sounds written in the script folder.
SWEP.Primary.Tracer = "Tracer" // Name of the bullet's track.
SWEP.Primary.TakeAmmo = 1 // The amount of ammo that is consumed with each shot
SWEP.Primary.Spread = 0.01 // Weapon accuracy, so that the weapon shoots exactly like an elephant bull from a cs, write 0 or 0.01
SWEP.Primary.Delay = 1 // Weapon rate of fire (you can make a machine gun or machine gun)
SWEP.Primary.Recoil_pitch = -8 // Value required for weapon recoil (Upward recoil)
SWEP.Primary.Recoil_yaw_min = -2 // Minimum value for math.Rand code
SWEP.Primary.Recoil_yaw_max = 2 // Maximum value for math.Rand code, it will pick random decimal number in the range from -2 to 2. The value required for the recoil of the weapon (Recoil to the right and left)
SWEP.Primary.Recoil_roll = 0 // Value required for weapon recoil (Front recoil)
SWEP.Primary.Damage = 65 // Damage dealt by the weapon.
SWEP.Primary.NumberofShots = 1 // Number of bullets fired with each shot (Shotgun)
SWEP.Primary.ClipSize = 6 // Maximum amount bullets in the store.
SWEP.Primary.DefaultClip = 6 // Maximum number of bullets in the magazine when picking up a weapon.
SWEP.Primary.Automatic = true // If true, then you can hold the mouse button and shoot without stopping, if false, then you need to press the attack button again.
SWEP.Primary.Ammo = "357" // Name of the ammunition used.
SWEP.HoldType = "revolver" // Type of animations played by the player.
SWEP.UseHands = true // If true then c_models use custom hands, if false then not.
SWEP.Base = "weapon_base" // Base for weapons. Needed to borrow a couple of necessary features.
// Our weapon does not have alternative shot functions, so we don't need Secodary values.
SWEP.Secondary.Delay = 0.1
SWEP.Secondary.Recoil = 0
SWEP.Secondary.Damage = 0
SWEP.Secondary.NumberofShots = 1
SWEP.Secondary.ClipSize = 0
SWEP.Secondary.DefaultClip = 0
SWEP.Secondary.Automatic = true
SWEP.Secondary.Ammo = "none"
function SWEP:Initialize() // Initialize weapons where you need to cache sounds and specify the type of animations.
util.PrecacheSound(self.Primary.Sound)
self:SetWeaponHoldType(self.HoldType)
end
function SWEP:Reload() // Function when reloading
if (self:GetNextPrimaryFire() > CurTime()) then return end // This is necessary so that it does not reload during the shot.
if (self.Weapon:Clip1()< self.Primary.ClipSize && self.Owner:GetAmmoCount(self.Primary.Ammo) >0) then // Check for ammo. If the weapon has less ammo than usual and the player has ammo, then the following is the code.
self:SetNextPrimaryFire(CurTime() + 3) // Time of the next shot, because the player will not shoot directly while reloading.
self:DefaultReload(ACT_VM_RELOAD) // Reload animation (first person)
self.Owner:SetAnimation(PLAYER_RELOAD) // Player reload animation (third person)
end
end
function SWEP:PrimaryAttack() // Left mouse button shot function.
if (!self:CanPrimaryAttack()) then return end // If there is no cartridge, then the weapon cannot fire.
local tr = self.Owner:GetEyeTrace() // Player's aim direction.
local bullet = () // Bullet structure, values will be used from the values described above, only instead of SWEP - self.
bullet.Num = self.Primary.NumberofShots
bullet.Src = self.Owner:GetShootPos()
bullet.Dir = self.Owner:GetAimVector()
bullet.Spread = Vector(self.Primary.Spread * 0.1 , self.Primary.Spread * 0.1, 0)
bullet.Tracer = self.Primary.Tracer
bullet.Damage = self.Primary.Damage
bullet.AmmoType = self.Primary.Ammo
self:TakePrimaryAmmo(self.Primary.TakeAmmo)
self.Weapon:MuzzleFlash() // Flash of the shot.
self.Owner:FireBullets(bullet) // This code takes all the values from bullet (above) and allows the player to fire bullets.
self:EmitSound(Sound(self.Primary.Sound)) // Plays the sound of a gunshot.
self.Owner:ViewPunch(Angle(self.Primary.Recoil_pitch,math.Rand(self.Primary.Recoil_yaw_min,self.Primary.Rec
oil_yaw_max),self.Primary.Recoil_roll)) // Recoil takes the values that I described above.
self.Weapon:SendWeaponAnim(ACT_VM_PRIMARYATTACK) // Plays shot animation (first person)
self.Owner:SetAnimation(PLAYER_ATTACK1) // Plays the shot animation (third person)
self:SetNextPrimaryFire(CurTime() + self.Primary.Delay) // Next shot time.
end
function SWEP:SecondaryAttack() // Right mouse button shot function. (We won't need it)
end
function SWEP:Deploy() // Function when picking up weapons.
self:SetNextPrimaryFire(CurTime() + self.Primary.Delay) // Time of the next shot, the player will not shoot until he removes the weapon from the holster.
self.Weapon:SendWeaponAnim(ACT_VM_DRAW) // Animation of picking up weapons (first person)
return true // If true then allows you to raise weapons, if false then no.
end
function SWEP:Holster() // Function when putting a weapon into a holster.
return true // If true then allows you to holster the weapon, if false then no.
end
function SWEP:Think() // A function that will be played when the player is holding a weapon, every 0.01 milliseconds.
end
Heh, I'm alive
FAQ:
Question: If the author is still alive, can you give me a log of melee weapons? I really need it
Answer: Unfortunately I didn’t do x. weapons, and I did all this for the sake of leadership. So excuse me, I can give advice, write in the search engine “How to make simple weapon GMOD” there are many options, maybe x. there will be weapons.
Question: Listen, I created a weapon, can I now safely upload it to the workshop?
Answer: Yes, for this you need special program:
Question: Question: is it possible to specify a custom sound "local ShootSound = Sound"?
Answer: Quite, point the way to the sound.
Question: Of course, normal guidance, but is there no other option? (Through some program, for example)
Answer: Unfortunately, there are no programs, there is an addon in the workshop, but there you can make too simple weapons.
Question: how to make a lua file?
Answer: Create a file, for example firstaddon.txt - right-click on the file - rename - and instead of .txt put .lua - save the changes and that’s it :)
P.S. I apologize for the delay, I just didn’t have time :)
Mods- these are add-ons developed by ordinary players that add new content to Minecraft: items, equipment, biomes and much more. Add-ons for new weapons are among the most popular among players around the world, as firearms significantly dilute the gameplay of the game.
There are a lot of modifications that add firearms and armor to Minecraft on your computer, so you can easily find something you like. Hundreds of different models of popular guns from real life, well-known trunks from CS and CS:GO. Do you like tough shootouts? Take a machine gun and fire a couple of clips at the enemy. Do you prefer quiet hidden killers? We quickly grab a sniper rifle with optical sight and take out the enemy with one hit.
What types of weapons do mods add?
As mentioned above, there are a huge number of models. Below I will try to divide them all into some categories and give several examples.
- Assault rifles (CS weapons): Kalash 47, M4A1, Famas F1, Galil;
- Pistols and revolvers: Colt, Deagle, TT;
- Shotguns: Mossberg, Remington, double-barreled shotguns;
- Sniper rifles : AWP, Mosin rifle, Remington 700 LTR;
- Exploding weapons: Grenades, mines, bazookas.
This is just a small part of the weapons from mods for Minecraft that you will get to know.
Firearms on site
On our website you can download the coolest and newest weapon mods for free. In every fashion there will be detailed description, screenshots and direct download links.
Military mod for Minecraft which adds a huge amount to the game military equipment such as tanks, planes, armored personnel carriers, guns, cars, as well as many different weapons for infantry such as automatic rifles, machine guns, rocket launchers, RPGs and other rifle. What militarizes the game and translates into new level This is all good for getting around quickly, but it takes a lot of resources to make enough food and rail to travel efficiently using them. Horses are also good for speeding, but they require saddles to even ride as armor to keep them from getting finished off by mobs. Flan mod is a pretty cool mod that adds planes to the game in Minecraft. This new air route dynamic gets players where they want to go quickly without fear of backlash.

Flies above the world below much faster than traveling on foot, cart or horse, so it is no wonder that the Flan mod is so popular among minecraft players. Like boats, planes can be destroyed by mishandling; unlike those boats though, the player usually has a long, fatal fall forward out of them if they disturb their plane. Learning to craft and maneuver the added vehicle mode is important, so players should be sure to check out the mod's website before they install it. They could always improvise of course, but this could have disastrous consequences, especially on hardcore mode.


While the movement speed can leave a lot to be desired, there are still no enemies in the sky if the player is flying around in the lowlands or at the end. The biplane has an attack mechanism, so flying in these areas is not recommended. Players looking for safe way transporting yourself and your cargo over long distances will need to check out the Flan mod for minecraft. There may be other vehicles added in the future, so be sure to check back to the mod site regularly to see if there are new updates.