The desire to resize a photo appears when there are unsuccessful shots (when unnecessary and superfluous details are captured), placement of an avatar (on a personal page on a social network, in a forum on a website, in an online store), creating various photo portfolios and under other circumstances. There are special tools for this.
You can resize a photo in three ways: using standard programs in the Windows operating system, using third-party programs, and online via the Internet. Let's look at each method in more detail.
Three easy ways to resize a photo
How to resize a photo in paint
All versions of Windows have a Paint program. Launch it and click the “menu” button in the upper left corner. Select “Open” and find the photo you want to edit. We load it into the work area. Next, if you need to trim it, select the appropriate item in the top panel of the program. Using the cursor, we determine the area of the photo that needs to be left. We crop and save the result.
The second option is to select the “Select” function. Select the desired area of the photo and press the key combination Ctrl+X (cut). Next, open the Paint program again. The work area in it is empty, point the cursor there and press the key combination Ctrl+V. The photo fragment is inserted into a new Paint document. If the white background of the working area is larger than the inserted photo, you can reduce it using the same cursor. We successfully save the result.
There is a third option - when you need to reduce the photo to certain pixels. Select the “resize” item at the top of the program.

Windows 7 has a Picture Manager program. It is very similar to Paint. Launch it and select “File” in the upper left corner. Click on “Find drawing”. We find a photo. Next, select the “Drawing” item, there are two processing options - “Crop” and “Resize”. You need to use them in the same way as with the functions of the Paint program. We change the image and save it safely on the computer.
How to resize a photo using programs
There are many quality programs from third party developers. Particularly worth highlighting:
— Image Resizer,
— Movavi photo editor,
- Adobe Photoshop CC,
- PIXresizer
— Fotosizer,
— BImage Studio, etc.
Most of them are free and freely available on the Internet. The download and installation process will take from 5 to 30 minutes. As an example, consider the Image Resizer program.
We find it using a search engine, download it, install it on the computer, and launch it. A program window opens in which you need to click on the Add files menu. Then select the desired photo and go to the Settings section.
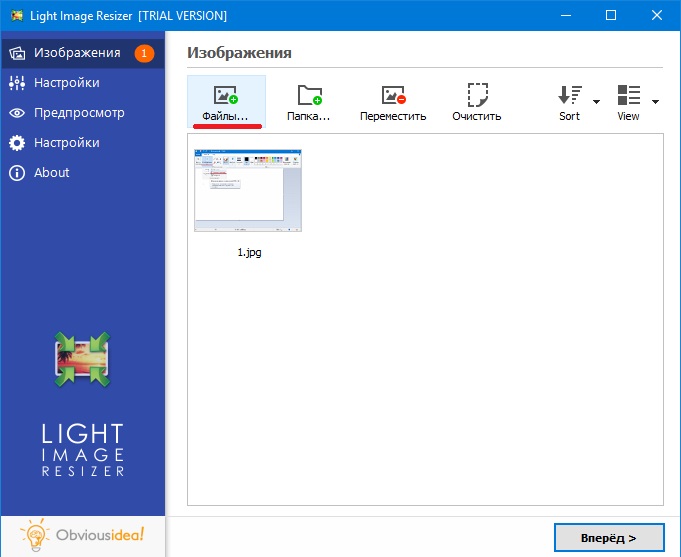
In the settings, enter the desired size and click Execute. The photo with the new dimensions is saved to the desktop in a folder specially created by the program. Ready!

Download Image Resizer— https://light-image-resizer.ru.uptodown.com/windows
How to resize a photo using online services
As well as third-party programs, there are many online services on the Internet that offer to crop a photo or change its size by entering pixels. The most popular and frequently used of them are:
- imgonline.com.ua,
- resizepiconline.com,
— croper.ru,
-resizenow.com
- inettools.net,
- optimizilla.com.ru,
- reduction-image.com,
- pichold.ru.
Let's take a closer look at the imgonline.com.ua service. Go to the website and click on the Resize tab.

Next, click the “Select file” button. Find a photo on your computer and upload it. Next, enter the desired width and height in pixels. Select the type of resizing. If necessary, make additional settings, select the format of the future image and click “OK”.

A new page with information about the photo will open. There are two options - either open the photo for viewing (if you don’t like something, you can “Go Back”), or download it. Ready! The photograph has received new dimensions.

In general, the use of the listed methods is very simple. The main thing is to follow the prompts and enter data in the required fields. The output will always be a high-quality image with the required pixel parameters.
Often, the user may need to reduce graphic files, both their resolution and overall size. Such actions are most often required when posting photos on Internet resources or sending by mail...
How to reduce image size?
Let's look at a couple of the most primitive ways to reduce the weight of a photo or picture. The simplest way is to use the capabilities of the standard Windows OS graphic editor – Paint.
- Open the selected image using Paint
- Click the “Menu” item in the top bar and select “Save as...” from the context list.
- In the window that appears, change the file name so that the original image remains unchanged.
- A little lower you can change the format for the file, the best option would be JPEG
- Click save and you can compare the size of the original file and the one obtained by saving in Paint. It turned out that the compression is achieved at about 5 - 10%
Most likely, such a difference in size is due to a certain encoding of the file when saving. As I have seen in practice, such a solution does not always work, and the result is best visible in the original photographs. For example, you will not notice a difference when saving a small image up to 150 Kilobytes in size and with a resolution of no more than 800 x 600.
Compress photo size using Microsoft Picture Manager
The second method of reducing weight is more visual. In order to use it, we need a graphics editor – Microsoft Picture Manager. This program is supplied as part of, and is found in almost all versions of this product.
You can find the program by following the path: Start – Programs – Microsoft Office – Microsoft office tools; or by right-clicking on the source image - select “Open with” and click the desired program.
- Open a photo in Microsoft Picture Manager
- At the top of the main program window, find the “Change” button - click it.
- You will then see a sidebar for settings tools.
- Then find the last two items in the panel that appears, which are responsible for the image size.
- Depending on the photo change, select the item. If you need to reduce the resolution of a photo - “Resize”, if you want to reduce the weight of the file, then “compress pictures”.
- Let's use the first point and reduce the resolution of the photo. Find the Percentage of original width and height, highlight and set a value from 1 to 99 percent, values above 100 will increase the resolution.
- I decided to reduce my photo exactly in half, which would be equal to 50% of the original resolution. Below you can see preliminary resolution calculations.
- In order to save the desired result, you need to click the “OK” button at the end of the sidebar.
- After changes, you should save the resulting photo as a separate file so as not to affect the original image. Click “File” at the top and select “Save As...” from the context.
- Change the file name or storage location!
- “Compressing pictures” is not anything complicated, let’s also open a photo or picture for editing, and go to the last item “Compressing pictures”.
- and select the required one from the proposed list of compression templates.
- I chose compression for "web pages"
- Just as with resizing, you can observe how the size of the image changes; in my case, it decreased by almost 11 times.


- In order to save the result, do not forget to click the “OK” button at the bottom of the sidebar.
- In order not to affect the original photo, follow steps 9 - 10 of these instructions.
Instead of an afterword
Simple steps for editing graphic files helped us make our image several times smaller. And the main thing is that we don’t need any special knowledge or programs to do it. Remember that most often after such changes the image loses its original quality.
Hello friends!
This is another material on working with images.
In it you will learn how to reduce the size of an image without losing quality using Paint, Photoshop and an online service.
Moreover, you will learn how to do this in two aspects. After all, image size has 2 meanings:
- Size in pixels, that is, the height and width of the image;
- Size in kilobytes, that is, the weight of the image on a computer or other media.
This material is suitable for anyone who is interested in reducing the size of their images, photographs, and so on. And it will be very useful for website owners, since it is strictly not recommended to place large pictures and weights in your materials.
Let's start with a little consideration of the need for all the actions discussed below.
Regarding changing the height and width of the image, there are many options: you need the required size for printing, for posting on the site, to reduce the same weight of the image, since it decreases when the size is reduced.
Weight reduction may be required to save weight on storage media (hard drive, flash drive, etc.), to quickly load images on a website, and so on.
There are actually a huge number of options. In order not to languish, we begin to practice.
By tradition, I give a detailed video lesson in which I showed everything clearly.
Now for lovers of text instructions.
Resizing in Paint
To change the height and width dimensions, I do not recommend using any online services, since this can be done using a standard set of programs and even the standard editor of the Windows operating system - Paint.
Open the image in Paint and on the "Home" tab there is a "Resize" item.
By clicking on it, we can change the size without losing quality (if we reduce it) and without losing proportions. To do this, be sure to activate the setting to maintain proportions.

By changing the horizontal and vertical size parameters, you adjust the width and height of the image accordingly. Select the necessary parameters, click on the “Ok” button, and then save the final file to your computer.

We're done resizing the image in Paint.
By the way, changing the width and height parameters also affects the weight of the image. Therefore, take note of this.
Now let's look at the option using Photoshop.
Resizing in Photoshop
Open our image in the program and move to the “Image - Image Size” item.

In the next window, the change occurs in the same way as in Paint. Make sure the checkbox is checked to maintain proportions and set the required height or width parameters.

After clicking the "Ok" button, the size parameters will be applied and you can save the file.

These methods are quite sufficient to resize the height and width of images.
Now we will look at 2 ways to reduce the weight of images.
But before that, I want to note that you already know one way. If you do not need images of extremely large sizes, then you can reduce their height and width, thereby reducing the weight by several, or even tens of times.
Reducing Weight in Photoshop
This method will be very useful for website owners, since the smaller the page weighs, the faster it loads. And this is very important. The method is also suitable for any needs.
After opening an image in Photoshop, you need to immediately save it, but not usually, but for the web and devices.

In the next window you need to set image quality parameters:
- Quality - high (60-70). Adjust the value to suit your needs;
- Format - jpeg. If you need to save transparent areas in the image, then you need the png format;
- We also set the "Progressive" setting.

You can also change the sizes directly in this window, and not separately through the “Image - image size” item, as I showed in the paragraph earlier. It is very comfortable.
After setting the parameters, save the settings (see screenshot above).
This is the only way I was able to reduce the weight of the image from 116 kb to 75 kb without changing the dimensions (height and width remained the same).
In this method, you can play with the quality value. It all depends on why you need to reduce the weight of the image. It is quite possible that you can set the parameter lower, making the weight even less.
Now let's look at how to reduce weight using an online service.
Online service for optimization
This method is very useful for reduced images. For example, if I have already reduced the image earlier in Photoshop, then using the service we can finalize the size.
The service has a name krakin.io. Let's move on to it. I provided a link directly to the image selection page.
On this page, you first need to decide on the degree of image compression. There are 2 parameters responsible for this:
- Lossy - strong compression (set by default);
- Lossless - less compression.

You can determine this parameter only by testing them. Therefore, try to compress the image this way and that, and then select the desired option.

The image is immediately optimized and we will see a report on the work done under the area for selecting a file.
It can be seen that the original file size was 77 kb, and after optimization it became 59 kb. It also shows how much was compressed in kilobytes (18 kb) and as a percentage (23.8%).
To save the compressed image, you must click on the "Download this file" button in the last "Status" column. We will be transferred to a new tab where the final image will open so that we can evaluate it. To save, you need to right-click on the image and select "Save image as".

If you watched the video at the beginning of the article, where I clearly showed the process and all the nuances of this article, then you know that only these methods can reduce an image from 360 kb to 40 kb. And this is not the limit.
This material has come to an end. As an ordinary Internet user, you will be able to use all the methods described in the article.
In the comments below, I would be interested to know some of your ways to reduce the weight of pictures. Maybe there is something simpler but more effective. Therefore, I’m waiting for you below near the comment form.
Best regards, Konstantin Khmelev!
When uploading images to a website, social network, presentation or other text document, you often need to resize them. This can be done in several ways, using special online applications or programs from the Microsoft Office package. No special skills are required to reduce photos, so even a novice PC user can cope with this task.
How to reduce the size of a photo using Paint
The simplest and most affordable way to reduce the weight of an image is to use the standard Windows editor - Paint. With it, you can change the format and number of pixels, which will reduce the size of the image.
How to do it:
- Open the program by clicking “Start” - “Paint”.
- Upload an image for editing by clicking "Open".


- Open the “Resize” section and check the box next to “pixels”.


- Now, for example, let's reduce the size of the image. Instead of the indicated 1050 pixels horizontally, we will indicate 604 pixels. Since the program automatically maintains the proportions of the picture, it will also be reduced vertically.

- Then select “Save as...” and the desired format to save. The best option for the file is the JPEG type.


As a result, the image size decreased from 62.3 KB to 44.0 KB.
How to Reduce Photo Size Using Picture Manager
You can reduce the weight of a picture using the Picture Manager program, which is included in Microsoft Office and is available on almost any computer.
How to do it:
- Open the program by clicking Start - Microsoft Office - Microsoft Office Tools - Microsoft Office Picture Manager. Or hover your mouse over the image and select “Open with” - “Microsoft Office Picture Manager” from the context menu.


- Upload the photo you want and click “Edit Picture”. After this, a block with keys for editing the image will appear. At the very bottom there will be two necessary tools: “Resize” and “Compress Picture”.


- If you need to adjust the resolution of the picture, select “Resize”. Here you can specify the desired photo size. To do this, check the box next to “Custom height and width” and enter the parameters in the empty cells.


- Or you can select the “Percentage of original width and height” item and set the percentage of the image to be reduced, for example, 50%.


- After this, you need to confirm the changes by clicking “Save”. Then select “Save As” and be sure to rename the file to save the original.
- If you need to compress a picture without changing its graphic resolution, select “Compress Pictures”.
- Then select the desired action: compress for a document, website or e-mail.
- Click "Ok" and enter a new file name.


Reduce photo size using online services
If you can’t use standard Windows applications, you can resort to a simple online photo editor, for example, Resizepiconline.
- Follow this link.
- Upload a photo.

- Set the required image size, quality level and file type using the slider.


- Click "Resize" and "Download". After this, the new photo will be downloaded to your computer.


You can reduce the size of a picture by simply adjusting the image parameters. To do this, you do not need to install additional software or gain professional skills. But remember that photos often lose their original quality after such editing.
Let’s imagine that the question of how to resize picture without photoshop? At the same time, you are on the Internet, and you need to crop a photo or picture for the questionnaire. You will do the right thing if you sit at your computer, or with a tablet, or with a smartphone in your hands, and go to the site.
After all, on this resource you can use an application for cropping photos online. Please note that the application supports gif, bmp, jpg, png formats. It is located in the “Working with Images” block called “Cropping Images”.
And, performing simple operations here, we resizing the image. After all, like everything else within the service, this application is very easy to use. It provides the opportunity to get high-quality results very quickly.
With his help we resize photo. We trim it. And to do this, you just need to upload the desired image, select the fragment you need to trim and press the “Cut” button, having previously received information about the size of the future image. That is, the process involves a percentage increase or decrease in the image. There is always the opportunity to see how you cropped the photo and then save it.
What other features does the application provide?
When we resize a photo online, this does not mean that the whole process, which takes a matter of seconds, boils down to simply cropping the image online.
Anyone working with the image can still spend additional (but literally just a matter of) seconds to rotate the photo or flip it if necessary. But this is not all there is to it. You can also add beautiful effects or a frame. And all it takes is a few clicks.
It is not surprising that the site’s users are people of various professions, ages and even hobbies. This is because some people prefer not to search for the application they need on various Internet resources. And this online service is good for many because it concentrates a wide variety of but frequently used applications.
And many of those who spend a lot of time on the World Wide Web (including in order to change photo), end up on the site quite naturally. Whether he is a designer or a webmaster, a journalist or a motorist. After all, many links on the Internet lead here, and the service is available to everyone without registration.
The service is also free. It can be used when preparing photos and music for blogs and websites. In addition, there is no need to download files, install and subsequently update programs.
This is appreciated both by those who are engaged in professional photography and by those for whom spending time with a camera is simply a great hobby. After all, the site has a suitable application for them. For example, for someone who is tormented by the question, how to resize an image?
Why is such a function needed?
The reason why one or another Internet user is forced to look for an online photo editor to use may be different. But, as experience shows, this is usually caused precisely by the need to quickly resize photo.
And this is usually the case. Let's say someone needs to upload an editable image to a website. For example, as a VKontakte avatar. As a rule, on most resources on the global network, images that are uploaded to the service have a size limit. And this in this particular case means that you need to resize the photo online.
There is no way to do without this. However, the limitation is not only for dimensions. The limitation also applies to the weight of the image. That is, the problem requires such a solution when you need to reduce the photo. And this is very easy to do using an online photo editor.
But the “enlarge photo” function is used when it is necessary to increase the size of the image. Just like photo reduction, this function is used when someone processes an image very often.
For a more detailed description of the popular service, we should also mention such a “trick” as Instagram-style photos. That is, in this case, the service provides the opportunity not only resize, but also to give the desired look to the photographs. Moreover, we are talking about those cases when you do not have a mobile device and an Instagram account with you.
We assure you that processing photos on a personal computer is much more convenient and enjoyable. The “Instagram style photo” feature works exactly the same as online photo cropping. This means the following: you need to upload a photo, apply effects and then save it to your computer. So, in particular, you can create the effect of an old photograph from an ordinary photograph.