Creating, deleting and formatting computer disk partitions is only part of the possibilities hard drive management applications. Today, they make it possible to securely perform operations that previously required data deletion or other mind-boggling combinations.
Many of the tasks performed through the Partition Manager can, in theory, be accomplished using Windows' built-in Disk Management tool. However, it is not as intuitive as the programs discussed here.
A good disk management application consists of several modules. They are used to create, delete and format partitions. Apart from these functions, they also have functions for copying and moving partitions, creating images and backups.
Additional modules support system migration, merging and splitting partitions. Supports various partition schemes, dynamic disks, RAID configurations, various systems files and boot records.
Attention! Anytime you work with sections hard drive, you need to plan everything carefully, back up your data, make sure you choose the right one HDD or partition, before pressing Enter.
Attention! All operations carried out on partitions are fraught with risks. The editors recommend extreme caution and are not responsible for possible loss of data or other damage incurred by readers.
EaseUS Partition Master Disk Management
One of the most popular programs for managing hard drive partitions in Windows. Ensures the allocation of new partitions without data loss.
Benefits of EaseUS Partition Master
- Easy conversion of partition type, primary to logical and vice versa
- Recovers deleted or non-existent partitions
- Supported hard drive capacity up to 8 TB
Flaws
- Inability to transfer data from HDD to SSD in the free version
License: freeware
Price: free
AOMEI Partition Assistant Disk Management
Also popular. Creates, divides, connects, copies hard drive partitions, changing their size, while saving files. System transfer is possible.
Benefits of AOMEI Partition Assistant
- Convenient wizards for every operation
- Supports all the most popular file systems
- Displays accurate information about supported media
- Allows you to create boot disk CD with application
License: freeware
Price: free
Disk Management in GParted
A tool for managing computer hard drive partitions. Distributed as an ISO file. Install it on a flash drive or burn it to a CD and start your computer from it.

Benefits of GParted
- Does not require installation and does not take up disk space
- Attractive free offer for companies
- Wide range of partition management capabilities for almost any file system
Flaws
- Mastery takes time
- Only available via Live CD
License: freeware
Price: free
MiniTool Partition Wizard
Performs all operations with hard disk partitions and also hides it. Copying the contents of the disk and changing the file system.
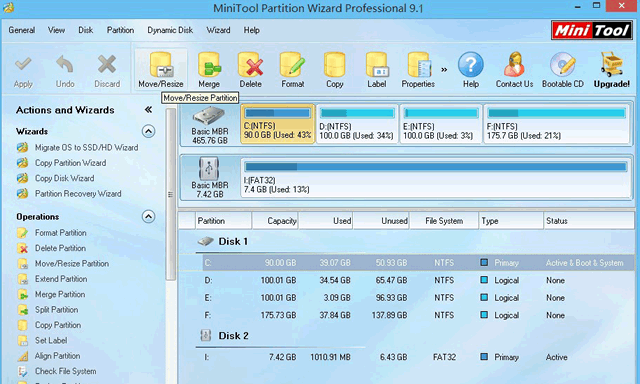
Advantages of MiniTool Partition Wizard
- Lots of tools, including disk cleaning and checking
- Convenient visual wizard for each operation
- Allows you to convert NTFS to FAT32 without formatting, change the disk type from MBR to GPT
License: freeware
Price: free
Active@ Partition Manager
Performs operations on disk partitions. Formats the flash drive in FAT32 and NTFS. Fixes MBR disks. Converts MBR to GPT and vice versa.
Benefits of Active@ Partition Manager
- Disk Imaging Tool
- Convenient wizard for creating and changing partitions
- Built-in boot sector editor, allows you to manually make changes
- Shows S.M.A.R.T data. for hard drives
Flaws
- English only
License: freeware
Price: free
How to connect two drives into one without loss of information? I have a C: drive and the operating system is installed on it. There are two more drives E: and F:, these are the ones I want to combine into one drive, but both drives have information. This means that I cannot do this using the built-in tools of Windows 7. Or I can, but I need to transfer information from the F: drive and delete it, then attach the resulting unallocated space to the E: drive, as a result I will get one large E: drive.
In short, there is a lot of information on both disks and it is quite difficult to transfer it anywhere; I don’t have a portable hard drive. I found articles on your website about the free section manager "", these articles have almost everything: how to create a section, increase, decrease and most importantly, all this happens without losing information, that is, before working with the program, information does not need to be transferred anywhere. You just don’t have an article on the topic of how to connect two disks into one, I think the large audience of your resource will be grateful to you for such an article. Gleb.
How to connect two drives into one
Hello, friends! As our reader correctly noted, for these purposes you can use free program"EaseUS Partition Master Free Edition". Using this program, you can combine two disks into one without losing information on these disks.Our article is suitable for operating systems: Windows XP, Vista, Windows 7 and Windows 8.1.
Let's return to today's article. The content of the article:
1) Connect two disks into one using the "EaseUS Partition Master Free Edition" program quickly and easily, naturally without loss of information.
2) We connect two disks into one without resorting to any programs, that is, using the tools built into Windows 7. I think this part of the article will also be useful to someone. But we will have to transfer data from the disk that we want to delete, otherwise there is no other way.
3) Friends, we also have an article on how to connect two disks into one using the program. This program is the leader among hard drive managers, but unfortunately it is paid.
How to connect two disks into one using EaseUS Partition Master Free EditionLet's go to the official website http://www.easeus.com/download.htm. Select " EaseUS Partition Master Free Edition" and click Download

Freeware Download

Download Now

The program installer is downloaded. Let's launch it. Installing the program is simple, but there are a few points you need to pay attention to.
If you don’t need the TuneUp Utilities 2013 optimizer, uncheck the box and click Next.

It is not necessary to indicate your email

Before starting the program, go to Disk Management. We will not touch drive C:, but we will connect drive E: (59 GB) and drive F: (59 GB), so we will end up with one drive E: (119 GB).

Let's launch the program.

In the main program window, left-click once on the E: drive and click on the Merge tool,

In the window that appears, indicate the drive with which we want to merge the E: drive, this is the F: drive, check the F: box and OK.


Our program works in deferred operation mode, click the Apply button and OK,


The disk merging process has begun.

Go to Disk Management and look at the result. Instead of two drives E: and F:, we now have one drive E: (119 GB).

All the data that was on the F: drive moved to the E: drive, into the folder Local Disk F. 
How to connect two disks into one using the most operating system Windows 7, Windows 8 without resorting to any programs
Let's say that some users do not want to install additional software on their computer and will try to make do with the tools built into the operating system.

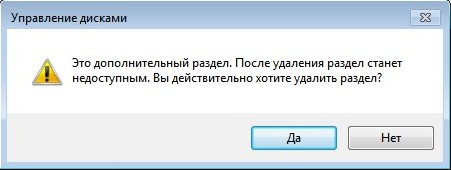
Let's go to Disk Management. To connect drives E: and F:, you must first transfer all the data from drive F: to a portable hard drive or flash drive, or to drive E:, then delete drive F:, right-click on it and select Delete volume, agree Yes.


Once again, right-click on the “Free” space and select Delete Partition.

Are you sure you want to delete the partition? We agree Yes.
Unallocated space of 59 GB appears. We attach this unallocated space to the E: drive. Right-click on drive E: and select Expand Volume.


Ready.

All. I would be very glad if I helped someone.
For several volumes on a PC with Windows 10. This time we suggest you familiarize yourself with ways to combine partitions and make one big volume. These instructions will come in handy when, as the local disk fills up, there is not enough space to install programs and run Windows 10 itself. Adding free space to drive C will solve this problem and return the system to its former functionality. At the same time, we will consider a method for deleting data from the second hard drive and saving the information.
Merging volumes through Disk Management
In order to combine two volumes, or rather, bite off one and attach to the other free place, you need to perform the following steps.
- Right-click on the Start icon and select Disk Management.
- A new window will open. We determine the free space of which disk we will attach to drive C or another drive. Click “Delete Volume”.
IMPORTANT! In order to attach free space, the volume will need to be deleted. Therefore, back up your data. DO NOT USE this method to attach space from drive C to another drive. Windows will be uninstalled and the PC will not start.

- A warning will appear indicating that all data will be deleted. Click “Yes”.

- The data will be deleted and a free partition will appear. It also needs to be removed. To do this, we use the right mouse button options.

- Now that there is an unallocated disk partition in Windows 10, we will attach the free space to local disk D (you select any other drive you need).

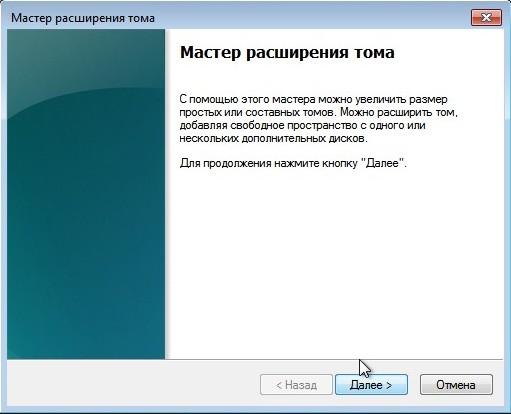
- Right-click on drive D and select “Extend Volume”.

- The “Volume Expansion Wizard” will launch. Click on the “Next” button. A new window will appear. Here we indicate what space we are allocating for drive D. Click “Next”.

- Place added. However, you need to create a new volume from the remaining space (if you have it and you did not give up all the space on the previous disk for the disk). To do this, right-click on the unallocated partition and select “Create simple volume.”

- The Create Simple Volume Wizard will start again. We follow the instructions.
In this way, you can add free space to any disk, but at the same time sacrificing data from another disk.
Merge disks without deleting data
Unfortunately, the previous method of merging disks in Windows 10 does not allow you to save the user’s personal files, that is, to carry out the operation without losing data. To do this, you will have to resort to a software method for merging volumes. To do this we need the MiniTool Partition Wizard Free program. It is with her example that we will consider a way to combine two disks into one.
- Select drive D or the one that needs to be connected to the selected volume. Click on the “Move/Resize Partition” button.

- A small window will open. Here you need to indicate how much space you want to combine with 2 disks (drag the slider on the left).

- Next, we indicate the change in the size of drive C in the same way (pull the slider to the right).

Clicking "OK" will reboot your computer. Data will be automatically moved, space will be added, and information will not be lost.
To learn how to combine two disks into one using this program, watch the video:
Let's take a closer look at how to combine hard drive partitions.
Content:If you have too many unused partitions on your PC and you want to remove them, use the following instructions from the article.
Preparing to delete a disk volume
Before you merge multiple volumes, there are steps you can take to help preserve your files.
Any editing of a partition in Windows results in permanent deletion of files and folders in this volume.
In most of them you can use up to 20 GB of space for free (, DropBox, and others).
Merging partitions in Windows 7
In Windows 7, users can merge disk partitions without downloading additional programs on their computer. All necessary settings can be changed as follows:
- Go to the Start menu and open the Run window. In Home Edition this key may not be available. In this case, just press Win + R to open the desired window or edit appearance Start menu in home screen settings;
- In the window that appears, type diskmgmt.msc – a command to open the computer’s disk management window. Confirm the action by clicking on "OK".

Fig.2 - command entry
- The following window will open. At the bottom of the window, all hard drives connected to the system and their conditional division are displayed. Each division section is a separate volume. It is designated by a letter and has its own file system type and space;

Rice. 3 – display sections in settings
- You need to select the section that you want to delete (merge with the main volume of drive C). Then right-click on it and click on “Delete Volume”. Next, a window will appear with a system message stating that all data on the volume will be deleted and you will not be able to restore it. Confirm uninstallation. Essentially, you're not deleting anything, just erasing the section. All space goes to drive C;

Rice. 4 – volume deletion
After deleting one volume, you can do the same with the rest, thus creating free partitions. “Empty Volume” will appear in place of the previous object.
Don't forget to attach it to the correct section. Click on the section into which all objects will be combined and in the context menu click on “Extend volume”.
In the window that opens, select an available empty partition and add it to the main one. Continue this action until there is no unreserved part of the hard drive left on the computer.

Rice. 5 – volume extension in Windows 7
After completing the procedure, you must restart Windows, otherwise further work may lead to errors and data deletion.
Instructions for Windows 10
The instructions described in this section of the article are suitable for both Windows versions 8. You can merge partitions using built-in OS tools.
As in the previous description of the settings, we will need the utility "Disk Management". Follow the instructions:
- Go to the search box and enter the word "Management". The desired option will appear in the results. And also, you can press the key combination Win and X to bring up the quick access menu. It contains a link to access "Disk Management";

Fig. 6 – hard drive settings window in Windows 10
- Decide which sections you no longer use. For better orientation, they are indicated by letters that correspond to the names of the drives in the window "This computer";
- If you only want to keep one volume, choose which volume you will attach the rest of the items to;
- Then right-click on the object that you want to delete. And uninstall it;

Fig. 7 - deleting a partition in Windows 10
- Confirm the action, agreeing to data loss;
- Remove partition space;

Fig. 8 - freeing up space
- Now you will see that the section has become empty, but its division remains. Since it is no longer used in the system, its name and other attributes are removed. The object can be combined with the main disk;
- As a result of correctly performing all the actions, you will see that the following message appears in place of the disk section: "Not distributed". Now you can start merging the sections.
Click on the main section - in most cases this is drive C. In the menu, select volume expansion.

Rice. 9 – element connection
The Settings Wizard window will open. With its help, you can easily divide free space or combine it into one system storage medium.

Fig. 10 - merging sections
Let's take a closer look at how to combine hard drive partitions. If your hard drive is divided into several partitions, you can easily merge them using standard Windows tools or third-party programs.
In earlier versions of Windows, dividing the hard drive into partitions made it possible to structure the amount of information that users stored on their computers. And also, some system administrators create separation so that system files and other data are stored in different places.
This reduces the risk of damage from virus software or careless user actions.
In modern OS models, as a rule, only two divisions are used - the main disk and space for backup. Thus, if a serious failure occurs in Windows and everything stops working, your data will not be damaged, because you will always be able to make a recovery using the second disk partition.
If you have too many unused partitions on your PC and you want to remove them, use the following instructions from the article.
Preparing to delete a disk volume
Before you merge multiple volumes, there are steps you can take to help preserve your files. Any editing of a partition in Windows results in permanent deletion of files and folders in this volume.
We recommend that you create a backup copy of all files and move it to a removable USB drive. If the amount of information is too large, create a separate profile for it in cloud storage. In most of them you can use up to 20 GB of space for free (Yandex.Disk, DropBox, OneDrive and others).
Fig. 1 - schematic example of dividing a hard drive
Merging partitions in Windows 7
In Windows 7, users can merge disk partitions without downloading additional programs on their computer. All necessary settings can be changed as follows:
- Go to the Start menu and open the Run window. In Windows 7 Home Edition, this key may not be available. In this case, just press Win + R to open the desired window or edit the appearance of the Start menu in the home screen settings;
- In the window that appears, type diskmgmt.msc – a command to open the computer’s disk management window. Confirm the action by clicking on “OK”.
Fig.2 - command entry
- The following window will open. At the bottom of the window, all hard drives connected to the system and their conditional division are displayed. Each division section is a separate volume. It is designated by a letter and has its own file system type and space;
Rice. 3 – display sections in settings
- You need to select the section that you want to delete (merge with the main volume of drive C). Then right-click on it and click on “Delete Volume”. Next, a window will appear with a system message stating that all data on the volume will be deleted and you will not be able to restore it. Confirm uninstallation. Essentially, you're not deleting anything, just erasing the section. All space goes to drive C;
Rice. 4 – volume deletion
After deleting one volume, you can do the same with the rest, thus creating free partitions. An “Empty Volume” will appear in place of the previous object. Don't forget to attach it to the correct section. Click on the section into which all objects will be combined and click on “Extend volume” in the context menu.
In the window that opens, select an available empty partition and add it to the main one. Continue this action until there is no unreserved part of the hard drive left on the computer.
Rice. 5 – volume extension in Windows 7
After completing the procedure, you must restart Windows, otherwise further work may lead to errors and data deletion.
Instructions for Windows 10
The instructions described in this section of the article are suitable for both Windows 10 and all versions of Windows 8. You can merge partitions using the built-in OS tools. As in the previous description of settings, we will need the Disk Management utility. Follow the instructions:
- Go to the search box and enter the word "Management". The desired option will appear in the results. You can also press the Win + X key combination to bring up the quick access menu. It contains a link to access Disk Management;
Fig. 6 – hard drive settings window in Windows 10
- Decide which sections you no longer use. For better orientation, they are designated by letters that correspond to the names of the drives in the “This PC” window;
- If you only want to keep one volume, choose which volume you will attach the rest of the items to;
- Then right-click on the object that you want to delete. And uninstall it;
Fig. 7 - deleting a partition in Windows 10
- Confirm the action, agreeing to data loss;
- Remove partition space;
Fig. 8 - freeing up space
- Now you will see that the section has become empty, but its division remains. Since it is no longer used in the system, its name and other attributes are removed. The object can be combined with the main disk;
- As a result of correctly performing all the actions, you will see that the following message appears in place of the disk section: “Not allocated.” Now you can start merging the sections.
Click on the main section - in most cases this is drive C. In the menu, select volume expansion.
Rice. 9 – element connection
The Settings Wizard window will open. With its help, you can easily divide free space or combine it into one system storage medium.
Fig. 10 - merging sections
Working with Acronis program Director
Often in the standard Disk Management window, users are faced with the fact that the “Delete Volume” button is unavailable or other functions cannot be performed. This occurs due to group policy restrictions. Perhaps the system administrator has prohibited such actions, or your OS version does not allow you to configure disk partitions and other system parameters.
Using third-party utilities will help solve the problem. Acronis Director is one of the best programs, which allows you to customize the disk configuration and bypasses all prohibitions on changing the settings of your computer.
We recommend working only with the bootable version of the program, because it will help to avoid errors that may appear while configuring system parameters. The main window of the utility contains all the necessary data about the hard drive. Partitioning information is also provided in this window.
Rice. 11 – main window in Acronis Director
To create one disk instead of several sections, simply select all the partitions that you no longer want to use and click on “Merge” on the left side of the window. Detailed settings of elements will appear in a new window. You must select a volume that will be the primary one and attach other objects to it one by one.
After completing all the steps, you must apply the settings. To do this, click on the “Apply” button, which is located at the top of the utility (on the toolbar).
Thematic videos:
How to merge hard drive partitions in Windows.
Simple Solution to Complex Errors
Merge hard drive partitions FAST!
I'll tell you how to merge hard drive partitions using a simple program Acronis Disk Director. If you still don’t know how to do this, then watch my short video tutorial, where I outlined everything in detail. You will need a few minutes of your time to merge the disks and the Acronis Disk Director application.