There are many so-called “one-click” programs for obtaining ROOT rights to Android. These exploits are easy to use: just install the utility on your PC or the application on your smartphone, if necessary, make a couple of clicks and you're done! But their the main problem is that they cannot root 100% of devices. In this instruction we will talk about a method that is suitable for all smartphones and tablets on which you can install custom recovery: CWM, TWRP.
What are root rights and what are they for?
Although Android is the most customizable mobile OS, any device out of the box does not have access to the root directory and editing system files– they are mounted in read-only mode. Having root (Superuser account), writing to the system partition becomes available. The user can customize the system as much as possible: bypass restrictions Google Play, and much more.
During the rooting process, the SuperSU root rights administrator application is installed on a smartphone or tablet, a binary file SU, which is written along the path /system/xbin/ and a set of console utilities BusyBox.
How to root Android via CWM
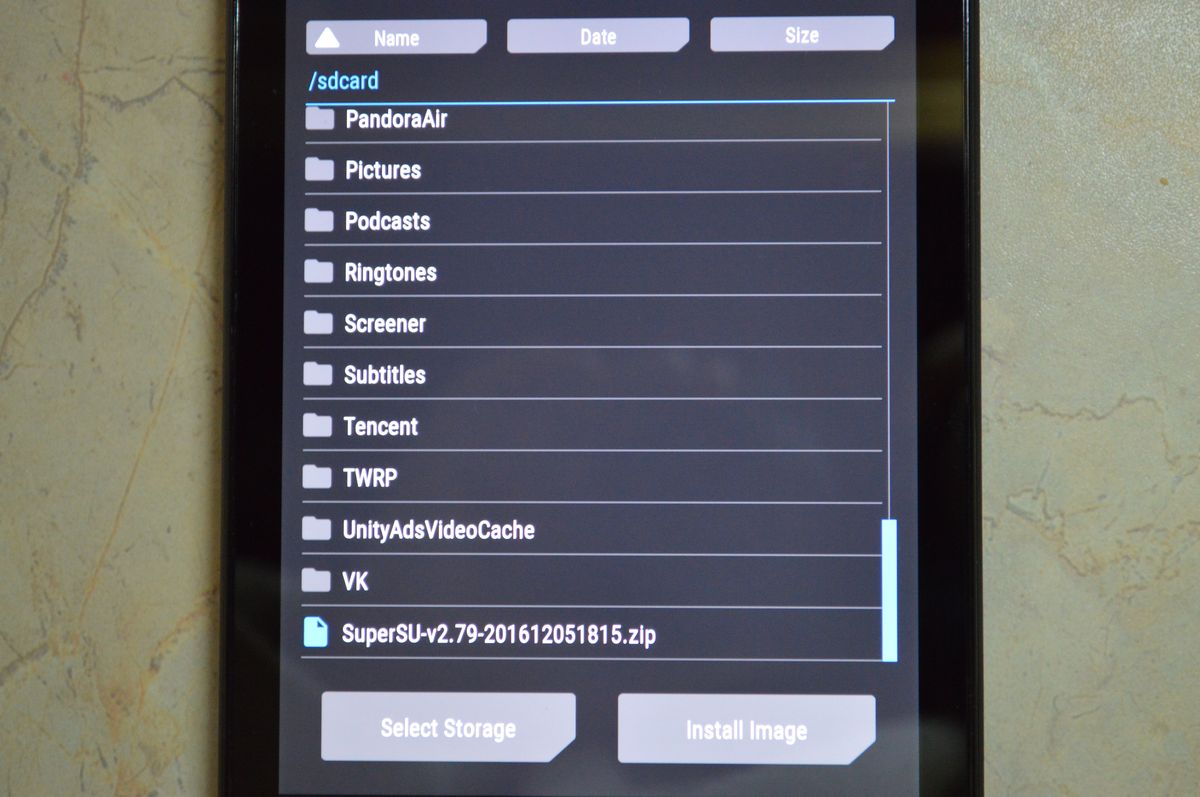
1. After downloading the SuperSU archive from the official website and saving it in a convenient place on your memory card.

2. – how this is done can be found in the instructions at the link.
3. In CWM, select “install zip” (selected using the power button) or “install zip from sdcard” (for older CWM versions below 6.X.X).

4. Then “choose zip from /sdcard” if the archive to be flashed is on the SD card.

5. Go to the folder where you saved “SuperSU- version.zip" and confirm with the power key.

6. Agree to the installation, select “Yes – Install SuperSU- version.zip".

7. The process of rooting the mobile device will begin.

8. At the end you will see the message “Install from sd card complete”, which in our case means obtaining root rights.

9. Return to the main CWM menu.

10. Click "reboot system now" to reboot into Android.

How to install SuperSU via TWRP Recovery
Now similar instructions for . First of all, follow the first two points from the above FAQ on flashing the SuperSU archive firmware from CWM.
1. Then select “Install” from the TWRP main menu.

2. Find the ZIP archive downloaded to SD from SuperSU.
3. Swipe, thereby agreeing to the firmware.
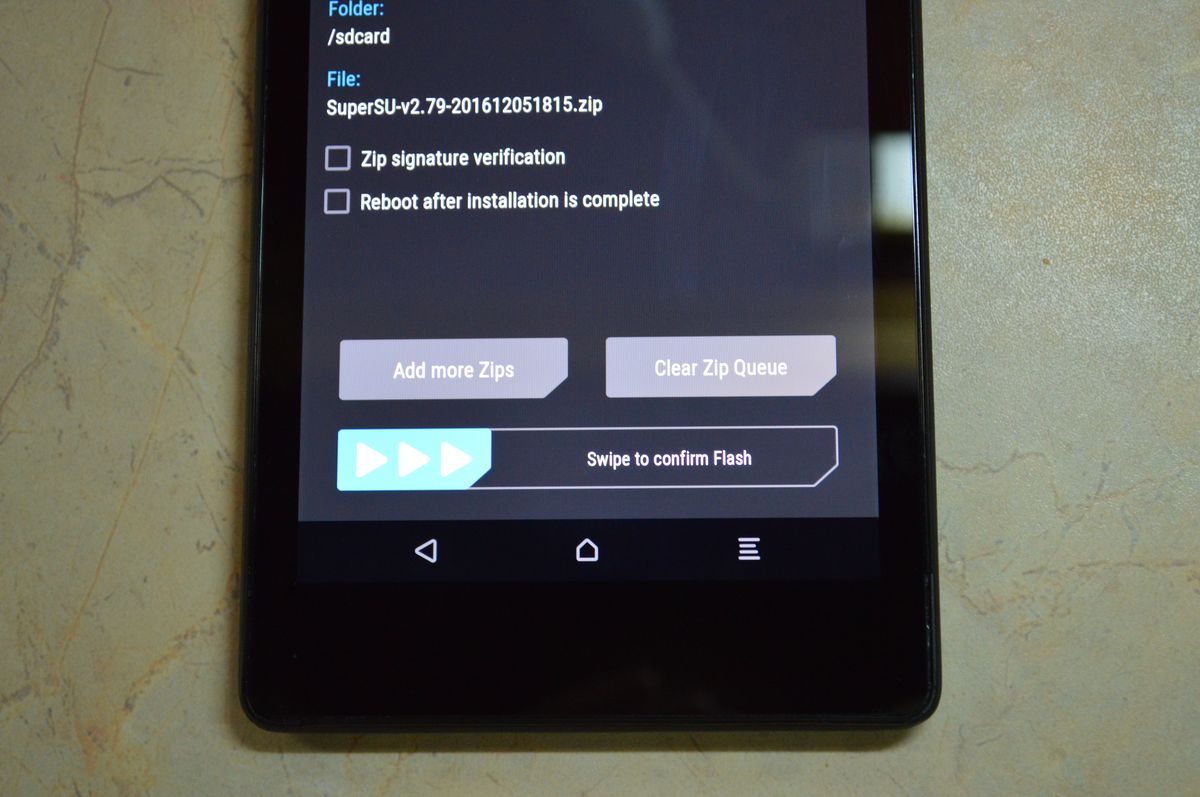
4. Successful! Root rights have been obtained, select “Reboot System” to boot the system.

How to check for SuperUser in Android
Now the Superuser rights manager - the SuperSU application - should appear in the menu. You can check whether you have root rights using a simple Root Checker program.
Sooner or later, any Android device user is faced with the need to install ROOT rights to their device. Sometimes this need arises because of an application that refuses to work without ROOT rights; sometimes access to system files is required in order to change or configure something.
But, in most cases, users refuse to install ROOT rights because they believe that it is too difficult and they will not be able to cope. It's actually quite simple though. Long gone are the days when, to install root rights, you had to study long instructions and sit for hours on your smartphone. Now there are solutions that allow you to install ROOT rights in just a couple of minutes, even if you don’t understand it at all.
In this article we will look at one of these methods. Now you will learn how to install root rights on Android using just one application and even without using a computer.
Step #1: Install the Framaroot app on your Android smartphone.
Download the APK file, copy it to your smartphone and install. Before installation, be sure to ensure that your device allows installation of applications from unknown sources. You can find out more about this in our article about.
Step #2: Launch the Framaroot app on your smartphone.
After installing the Framaroot application, you need to launch it. This can be done using a shortcut on the desktop and in the list of applications.
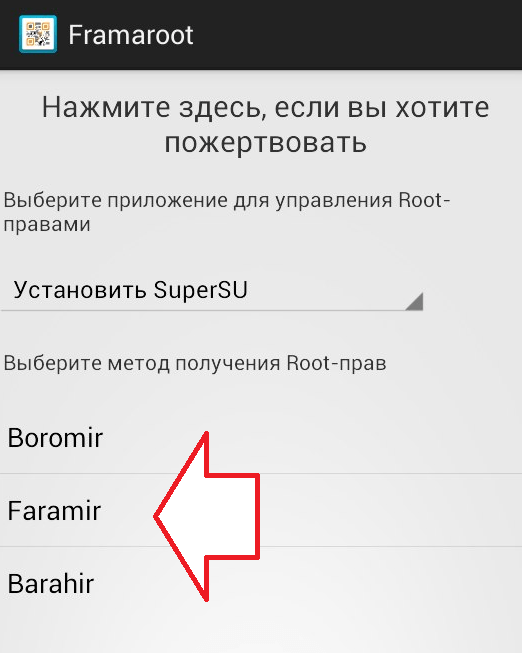
Step #3: Select “Install SuperSU”
Step No. 4. Choose a method for obtaining ROOT rights.
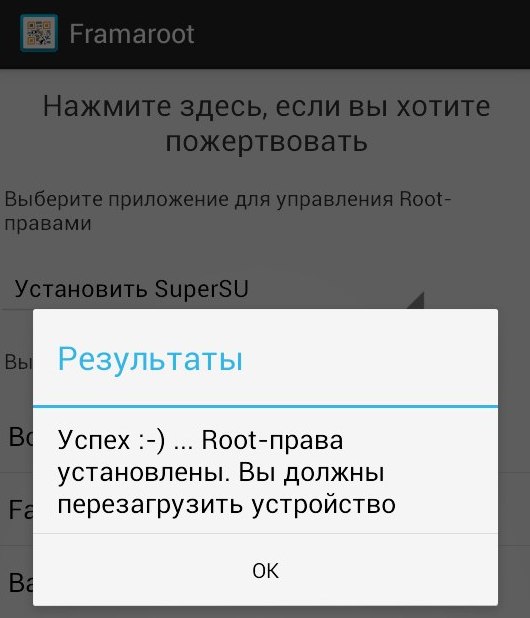
Step No. 5. Installing Root rights on Android.
After this, the Framaroot application will install root rights on your Android smartphone and notify you about it using a pop-up window.
At the end of this article, we will consider the most likely problems that may arise when using Framaroot.
Problem #1: My device is supported by the Framaroot app, but I couldn't install ROOT rights.
Most likely, the firmware on your Android device has been updated, in which the developers have closed the vulnerability used by the Framaroot application. Try another way.
Problem #2: I get error number 1 to 10.
Framaroot cannot exploit the vulnerability. It is possible that your smartphone does not have this vulnerability or you are using an outdated version of the Framaroot application.
Problem No. 3. How to remove ROOT rights obtained using Framaroot.
Launch Framaroot and select “Remove Root Rights”. You can also remove Root rights using other methods.
You can get root rights on Android using three unique methods. To successfully connect root, you will need a computer and a smartphone with Android 5.0.
Root rights are a main administrator mode that can be installed using computer software. In other words, this Account administrator, created on the basis of Android.
Root rights are called superuser mode.
Types of Superuser rights
- Full rights (Full Root). Obtaining unlimited access to all functions of your mobile phone.
- Permanent (Shell Root). Administrator rights cannot be changed system folder system.
- Temporary Root. Superuser mode that works until the device is rebooted. After restarting Android, superuser mode will disappear.
Why do you need root rights?
Main features of advanced administrator mode:
- changing, deleting system files;
- deactivation of advertising in applications;
- reassigning buttons;
- creating an Android backup (backup);
- installing a firewall to restrict Internet access to individual applications;
- flashing or rolling back the OS;
- and other.
Advantages
Pros of advanced mode:
- the ability to optimize and clean your phone;
- “overclocking” of the device (overlocking);
- creating patches or cheat codes for applications;
- ability to record screen (relevant for older smartphones);
- Create a custom system backup.
Flaws
Disadvantages of getting root rights:
- The phone's warranty is completely void;
- fresh updates will no longer be received;
- technical breakdown of the smartphone;
- Difficulty logging in and setting up;
- Only English or Chinese interface language.
Checking for extended rights on the device
Instructions for checking for root rights:
- Download the SuperSU application from Play Market
- Download Root Checker for verification
- Open Root Checker and accept the terms of liability by selecting “Accept”.
- Click on “Verify Root Status”.
- In the window that appears, grant access to the SuperSU program using the “Grant” button. After this, you will be able to install the root.
If the check icon lights up green, then superuser rights can be set. If the message “Sorry! Root access is not properly installed on this device", root rights will not be available.
Ways to get root access on Android
There are two ways to get superuser functions on Android:
- download the application for root access via the Play Market;
- using computer software.
On modern smartphones, access to root rights is blocked, so not all users can count on enabling superuser mode. However, it is possible to obtain temporary rights.
Gaining full access using PC programs
To unlock Full Root using a PC you need to follow a few simple steps:
- Download the software to your computer from the Internet and install.
- Connect your smartphone to your personal computer via a USB cable.
- Set up superuser rights.
Root access using the Kingo Android Root program
The KingoRoot application can interact with many smartphones:
- Google Nexus;
- Lenovo;
- Sony;
- Motorola;
- Huawei;
- and others.
Kingo Android Root installation process:
- Connect your smartphone or tablet to your computer via USB. To do this, USB Debugging must be enabled. To do this, you need to go to “Settings” - “About phone” - “Software version” - “Build number” and click on the build number several times until a message appears about enabling developer status. Then select “For Developers” and enable USB debugging mode.
- After recognizing the smartphone model, you must wait until the main program driver is installed.
- Press “ROOT” to begin the process of enabling advanced mode. Messages about liability and possible problems may appear from time to time - they must be accepted by clicking “OK”.
- After the rights installation process is completed, a message with the text “ROOT Status: YES” will be displayed. Restart your smartphone for the changes to take effect.
Kingo Android Root can also remove advanced mode from the phone. To do this, you need to connect your smartphone to the PC again and select “Remove Root”.
Download the Kingo Android Root program from the official website
Root access using the VROOT program
VROOT software works with all smartphone models and has the same simple interface as the previous application. The software is only supported on Windows OS. Downloading is available for free.
Step-by-step instructions for installing the program
VROOT installation process:
- Run the downloaded installer and follow the instructions.
- Similarly, connect your smartphone to your PC via USB debugging.
- Launch the application and wait for the connected model to be identified.
- Next, click on the “Root” button. A scrolling window will appear.
- Once the rooting process is successfully completed, a box with a check mark will appear.
Download desktop version 1.8.6. VROOT
Learn more about the VROOT program in the video from TELE Mobile.
Obtaining root access without using a computer
Instructions for gaining access to root without using a PC:
- First you need to download the application from Google Play.
- Install apk file.
- Launch the root application and follow the instructions.
Root access using the KINGROOT application
KINGROOT is a new-style application that supports the process of obtaining root rights in one click.
List of supported devices:
- Philips;
- Samsung;
- Alcatel;
- and others.
In order to unlock superuser mode, you need to do a few simple operations:
- Launch the application.
- In the window that opens, click the blue “Start Root/Try to Root” button.
- Wait for the rooting process to complete.
- After successful completion of rooting, a new window with a green check mark will open. The smartphone may reboot automatically.
If getting root was unsuccessful, then most likely the problem is that Bootloader Android is blocked.
This technical protection is used on modern flagships:
- Huawei;
- Sony;
- Xiaomi.
KINGROOT installation process:
- Charge your smartphone to at least 50%.
- Connect to wireless network or 3G.
- Enable the ability to download unverified programs. Go to “Settings” - “Security” and check the “Unknown sources” box.
- Download the application via a mobile browser or Google Play.
- Enable USB Debugging. Move the apk from your computer to your phone and install following the instructions.
- disable security settings for Google Play;
- during installation of KINGROOT, turn off the Internet and then turn it back on;
- install any file manager (ES Explorer, Total Commander) and launch KINGROOT from there.
Download KINGROOT
Root access using the OneClickRoot application
OneClickRoot will help you get free superuser rights in a couple of clicks. Supported up to Android versions 5.1.
Instructions for root access:
- Open the application. In the window that appears, click “Root Deivce”.
- Select “Scan Now”. Wait 2-3 minutes.
- Once the rooting process is complete, a “Congratulation” message will appear.
Step-by-step instructions for installing the application
Installation instructions for OneClickRoot:
- Go to the developer's website and click "Root Now", then "Install Now" to download the application.
- Launch the apk file through Explorer or from the download menu of your smartphone.
- If the program installer is not downloaded directly through the phone, then you need to use USB debugging to transfer the apk from the PC to the smartphone.
- Follow the instructions and wait for the installation to complete (2-3 minutes).
Download the OneClickRoot application from the official website
Top 10 programs to get root access on Android
Top best apps for rooting on Android:
| Program name/Evaluation criterion | Number of supported smartphone models | Supported Firmware | Ease of use | Application installation method |
|---|---|---|---|---|
| FRAMAROOT | 100+ | Android 2.0 and later | In one click | APK file via PC |
| KINGROOT | More than a thousand | Up to 5.1 | 3-4 steps | From Play Market |
| 360ROOT | About 9000 devices | Up to 6.0.1 | In one click | Via PC or APK |
| TOWELROOT | About 30 thousand | All firmware up to 2014 | Automatic rooting | APK |
| ROOT GENIUS | 15,000 devices | Android 2.3+ | In one click | Via Android, PC |
| ROOT MASTER | More than 10,000 devices | Android 1.5+ | A couple of steps | For PC, Android |
| BAIDU SUPER ROOT | More than 10 thousand | Android 2.3+ | Automatic rooting | Via phone |
| OneClickRoot | About 40 thousand devices | Up to 6.0.1 | In two steps | Via PC |
| VROOT | More than 3000 | Android 4.4+ | In one click | PC |
| Kingo Android Root | 15 000 | Up to 5.0 | Three steps | Plat Market, APK, via PC |
Possible problems after obtaining root rights
The most commonly observed problems after unlocking advanced mode:
- penetration of virus programs that reduce the performance of the smartphone;
- stopping system updates;
- automatic phone reboots;
- CPU overheating;
- errors when launching games and applications from official sources;
- the combination of taking a screenshot “Home+Volume Rocker” does not work;
- decrease in device performance.
Smartphones with the biggest problems when receiving root:
- Samsung;
- Nexus;
- Xiaomi;
How to remove root rights on Android?
Removing root via a file manager (ES File Explorer or similar):
- Go to the system/bin or xbin folder and delete the “su” file.
- Open system/app to uninstall Superuser. apk.
- Reboot the device. Check the result using the Root Checker application.
Uninstallation via SuperSU:
- Launch the program and go to settings.
- Select “Complete Root Removal” and follow the instructions.
- After the program automatically closes, reboot the device.
Removal for Samsung Galaxy:
- Download the official firmware from the manufacturer's website.
- Download and install the Odin3 utility.
- Install Samsung and Samsung USB drivers on your computer.
- Turn off and connect the smartphone to the PC. The phone must be turned on in a special mode by holding down the home button and volume rocker.
- Launch the Odin3 utility and select “PDA”. Select the official firmware file downloaded earlier.
- Check the boxes for “PDA” and “Auto Reboot”. The remaining marks must be removed.
- Click start and wait about 5-7 minutes. After successful completion, a window with the message “Done!” will appear.
- The device will reboot automatically.
Video “How to get ROOT rights to ANDROID 6+”
Instructions for getting root for modern Android firmware. Channel "VGEvery".
To unlock hidden properties of your smartphone or tablet, you will need to obtain superuser rights. This procedure is quite simple and will not take much of your time. Let's look at how to get root rights on Android through a computer, as well as without using it.
Methods for opening root access
To activate the Superuser profile on a device running Android OS, many effective applications have been developed that allow you to achieve the desired result with a few clicks. In this case, such software can be divided into two groups:
- Installed on a mobile device;
- Working via PC.
The first method is considered easier to implement, but it is not suitable for all models of gadgets. Therefore, it is recommended to start unlocking root access from there, and if all else fails, you should use the second option.
Obtaining Superuser rights directly from a mobile device
You can activate the superuser profile on Android without a computer using the following programs:
This list can be supplemented with other utilities, but these are the applications listed that are supported the largest number tablets and phones.
Unlocking root rights via KingRoot
This program is one of the most universal of its kind, as it works perfectly with almost all versions of Android firmware. To gain root access using it, you will need:
After rebooting the operating system, Superuser rights will appear on the smartphone.
Using OneClickRoot
Unlike KingRoot, this application can be downloaded from Google Play, so you do not need to additionally provide permission to work with third-party software. Otherwise, the procedure for unlocking root access is almost the same:

Opening a Superuser profile using Framaroot
Another utility that allows you to get root rights on Android without a computer is Framaroot. It works like this:

If the chosen method for unlocking superuser rights does not work, try running a similar procedure using Faramir or Barahir.
Obtaining root rights through a computer
If using mobile applications It was not possible to open the chief administrator’s profile on Android; the only thing left is to use a computer and special activator programs running Windows OS. Such software includes:
- Kingo Root;
- VRoot;
- UnlockRoot.
Before using any of the suggested utilities, you need to do the following:

If the “Developer Options” section is hidden on your phone, open the “Device Information” menu and click on the build number several times. After this, the required tab will become visible. 
The specified software works on the same principle, so once you understand one program, you can easily master the rest. As an example, let's look at how to get root rights on Android via a personal computer or laptop using Kingo Root:

You should be very careful when working with main administrator rights, because they give the user access to Android system data. When you change or erase the wrong file operating system may begin to malfunction or fail altogether. Therefore, after using root access for its intended purpose, it is better to completely remove it. This can be done using the same program through which it was received.
The main advantage of the Android platform is open source. Thanks to this, the end user of Android devices can find custom firmware, programs and tweaks online for almost any model of gadget.
In order for these features to become available for the device, you need to obtain ROOT rights.
Gadget manufacturers have excluded "administrator rights" from their Android shells for reasons of "reliability and security." This limitation negates possible damage to the device when deleting or changing system files. If you confident user Android, then it’s time to get acquainted with the information: how to get root rights on Android.
What are ROOT rights?
ROOT rights(super user or administrator rights) - provide the owner of the Android gadget with full control over the system. Thanks to this, you can change, delete, edit system files and folders.
ROOT access is easy to obtain today. Some programs allow you to do this directly on Android device, without the participation of a computer. At the same time, there is a risk of damage software almost minimal.
Yes it is. When installing root rights on Android, there is a risk of harming the system or turning the device into a “brick” (it will not be able to start).
If this is your first time trying to root Android, don't worry, many popular rooting programs do a great job. Therefore, we can say with confidence: “ROOT rights are safe.”
Advantages and disadvantages
By rooting an Android device, it gains many privileges while sacrificing some features. To understand in detail, let’s look at the advantages of rooting point by point:
- Changing and removing standard and system applications.
- Installing custom firmware and mods.
- Installing personal images when loading the device.
- Working with applications that require ROOT rights.
- Setting up and using additional Android features.
- Using programs and tweaks to improve the performance and autonomy of the gadget.
- Removing viruses and advertising banners in applications.
- Backing up firmware and data.
- Adding Linux executables and more.
In exchange for such rich functionality, you will lose some features, namely:
- Loss of warranty from the manufacturer (although root rights can be canceled at any time).
- Loss of the ability to update Android OS over the air from the manufacturer.
- Unstable operation of the device if system files are damaged (but most often the gadget can be revived).
Advice! If you want to root your Android device, read the instructions completely so as not to miss any nuances.
How to get superuser rights?
Before installing ROOT rights in mandatory. When rooting a tablet or smartphone, information from the phone's memory may be deleted. Therefore, protect yourself in advance.
Transfer photos, music, videos, documents and other files to an SD card or save them on your computer.
Attention! Perform all further actions at your own peril and risk! You are the only one responsible for your gadget. If you are not sure about anything, consult a specialist!
Programs for root rights
The fastest, most reliable and optimal way to obtain superuser rights is to use specialized applications.
|
Android Applications |
PC programs |
|
Kingoapp |
Kingo Root |
|
Framaroot |
Vroot |
|
Universal Androot |
Root Genius |
|
WeakSauce |
King Root |
|
King Root |
|
|
Towelroot |
Advice! King Root allows you to root your devices Samsung, LG, Meizu, Lenovo, HTC, Nexus and many others. In practice, it can be called universal, so we use it as an example.
Installation from Android
The installation process is like this:
- Download the installation .apk file into the device memory and enable the " " function.
- Install the application, launch it, select parameters and perform rooting.
- Wait for the process to complete.
- Install the Root Checker application to check whether your device has ROOT rights.
Application usage example King Root v4.9.6:

Obtaining SuperSU rights
Unfortunately, when this program obtains ROOT rights, it installs the superuser KingRoot instead of SuperSU. If KingRoot is present in the system, not all applications and tweaks will work properly; some programs may not even recognize the presence of ROOT rights. Therefore it is necessary to replace KingRoot to stable and familiar SuperSU:
- Download and install the Super-Sume app.
- Launch, click on the big blue button (first stage).
- Launch the second stage - the progress bar freezes on the initial process and the application freezes (for a long time).
- Click the cancel button and reboot your device.
- Reinstall ROOT rights using King Root.
- Launch Super-Sume. It already contains an invitation to the second stage. After launch, nothing freezes, KingRoot is removed, and SuperSU is successfully installed.
- Once the operation is complete, remove Super-Sume.
Installation with Windows 10
The installation process is like this:
- On Windows computer disable mandatory driver signing.
- Install rooting software on your PC.
- On an Android device.
- Launch the program and connect the device to the computer via USB.
- Perform rooting.
There are several ways to disable mandatory signature verification Windows drivers 10:

An example of working with Kingo Root software:

How to delete?
If you want to remove ROOT rights, use the same program you used to obtain them. For example, when Android connection gadget to your PC and turning on the Kingo Root program, you can remove ( RemoveRoot) and reinstall ( Root Again) superuser rights.