The winter holidays have flown by New Year, Christmas, Old New Year, the middle of winter is already approaching, and ahead of us awaits the most romantic, tender and beautiful winter holiday, Valentine's Day. We already love this holiday in itself, as it gives a lot of love and affection. opposite sex. And no matter how old you are, don’t be shy and congratulate each other on this romantic day. It is not forbidden to love now even at 50 years old, and at 70 years old, and at 5 years old and 10 years old. It is not for nothing that there is a proverb: “All ages are submissive to love!” So, love and give gifts to your soul mate from the heart and with love.
Men are romantic in nature, although at first glance they are strict, but no matter what, they give their halves chic bouquets of flowers, various sweets, perfumes, and jewelry. For women, in turn, it is a little more difficult, since they must respond with something in return, and in such a way that it is also pleasant and unexpected. For example, a woman can make a beautiful bright valentine with her own hands and write congratulations and a declaration of love to her beloved. It will be very pleasant for him, as it will be made by his loved one’s own hands. So here is one of such interesting master classes on creating interesting valentines self made, we'll look at it now.
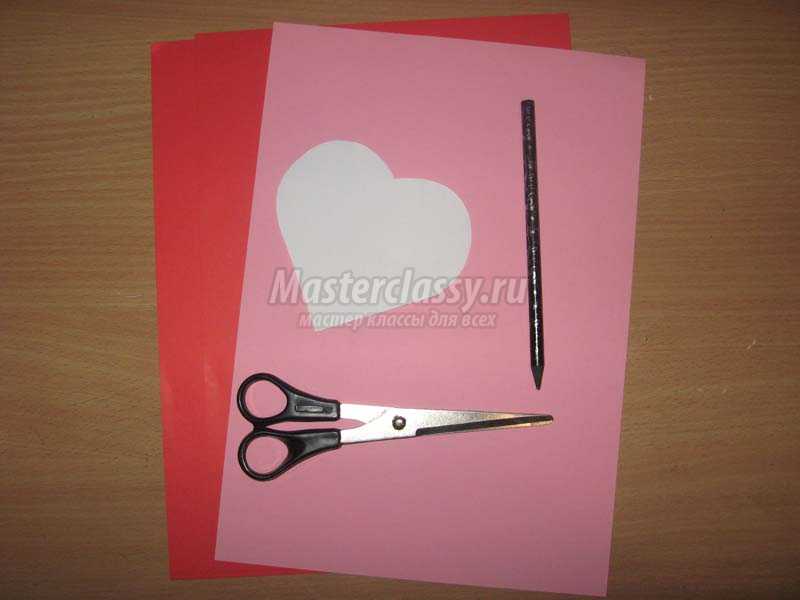
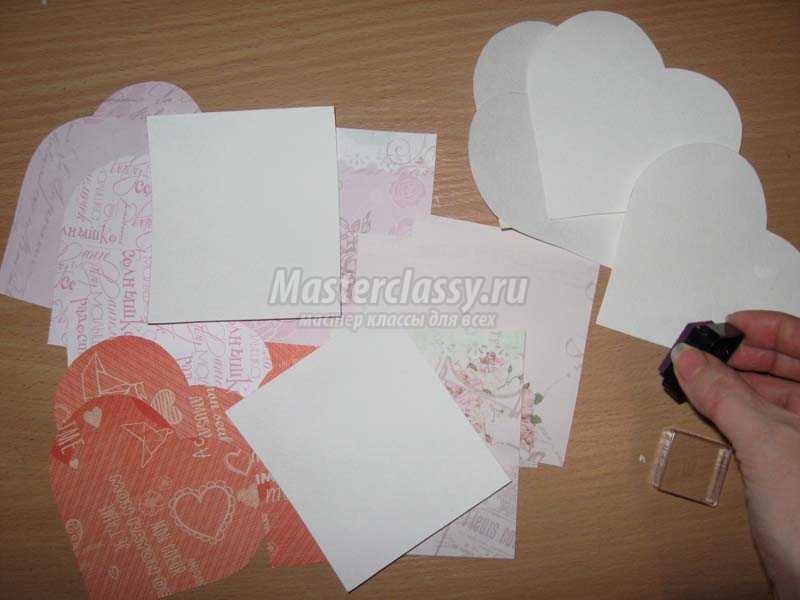
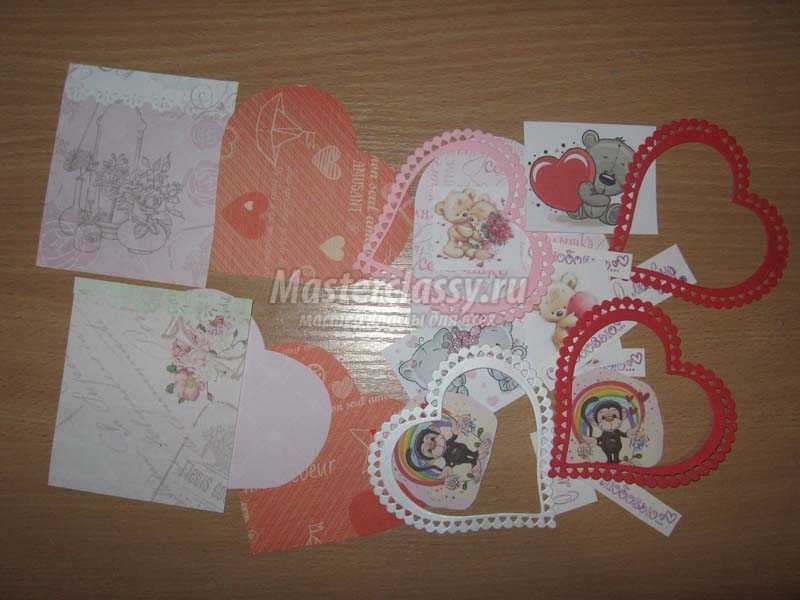
To make interesting valentines we will need:
- red and pink cardboard, A54 sheets one at a time;
- paper for scrapbooking with flowers and hearts in red and pink flowers;
- heart template for a postcard;
- color pictures with bears, monkeys, bunnies on a romantic theme;
- die-cut hollow hearts in white, red and pink;
- figured hole punch with large butterfly;
- figured hole punch with a small flower;
- resin decorations small roses different colors;
- semi-pearls 3 mm in diameter, peach color;
- watercolor paper, A4 sheets;
- acrylic stamps “With love” and “With love to you”;
- dark pink ink;
- scissors;
- glue stick;
- PVA glue;
- ruler and simple pencil.
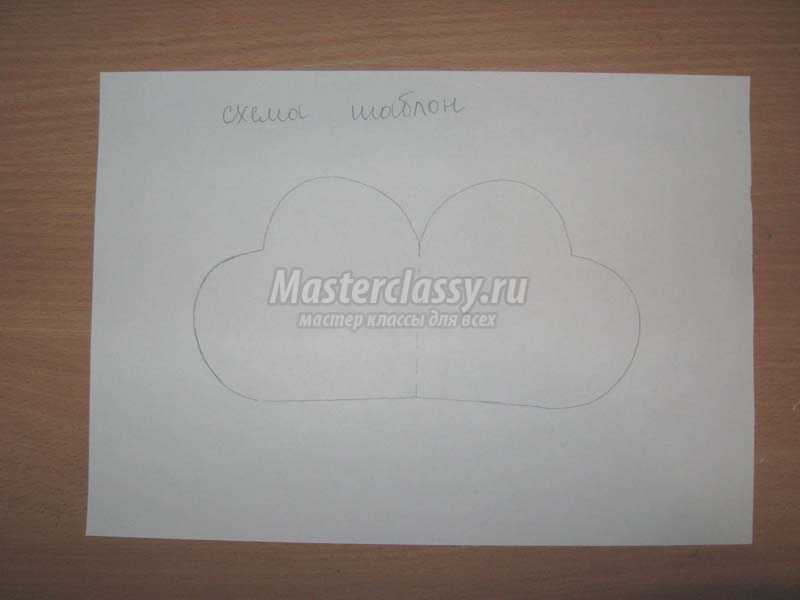
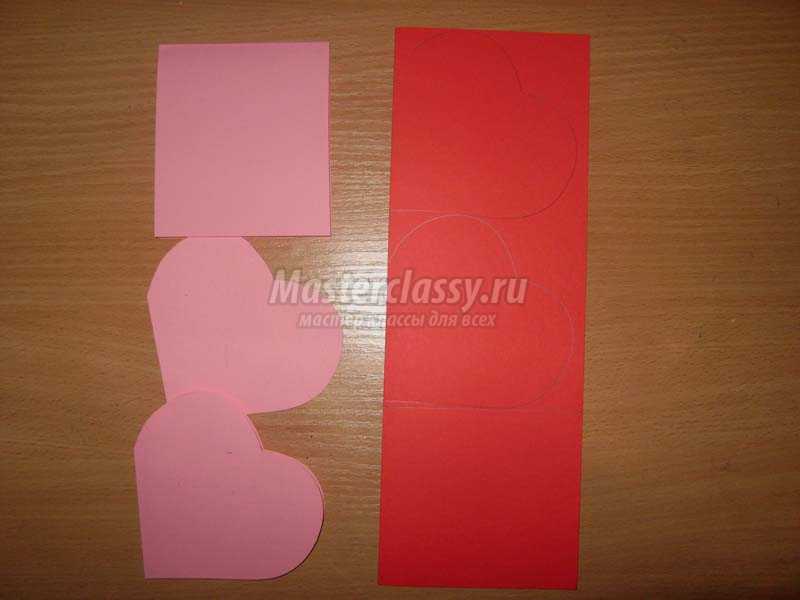
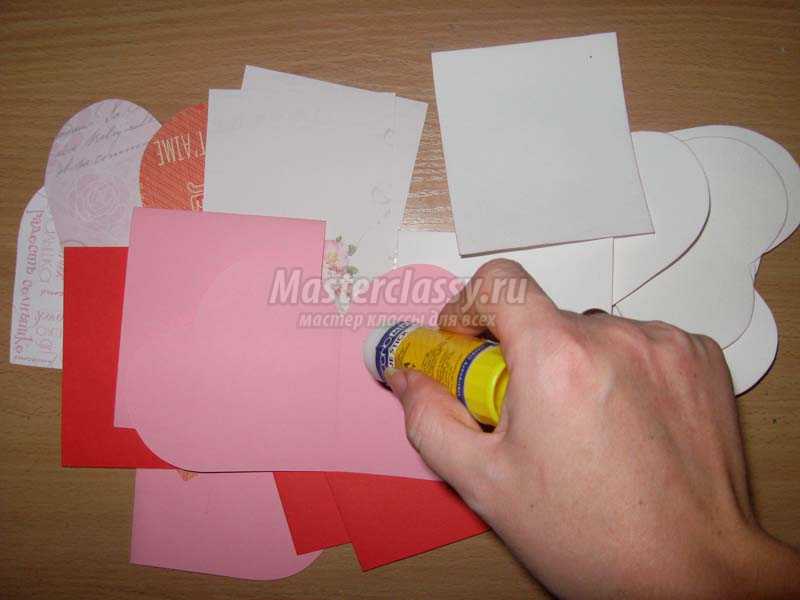
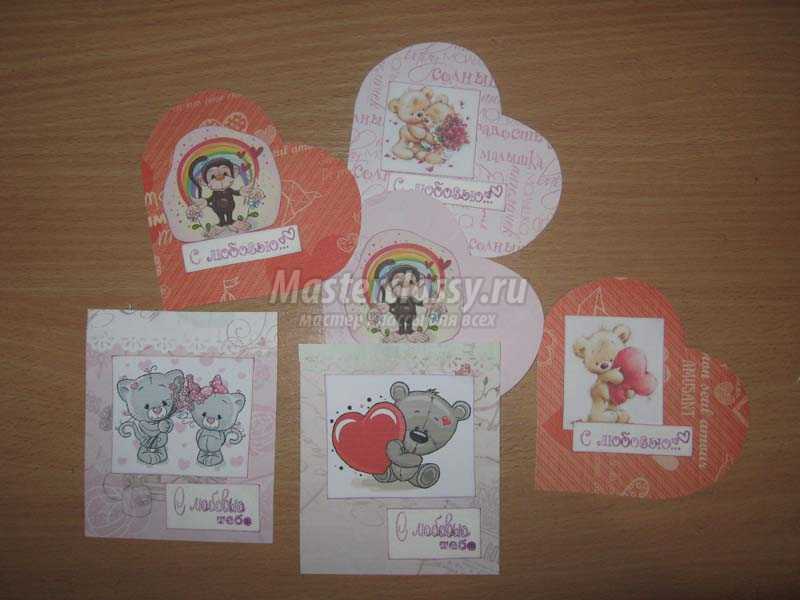
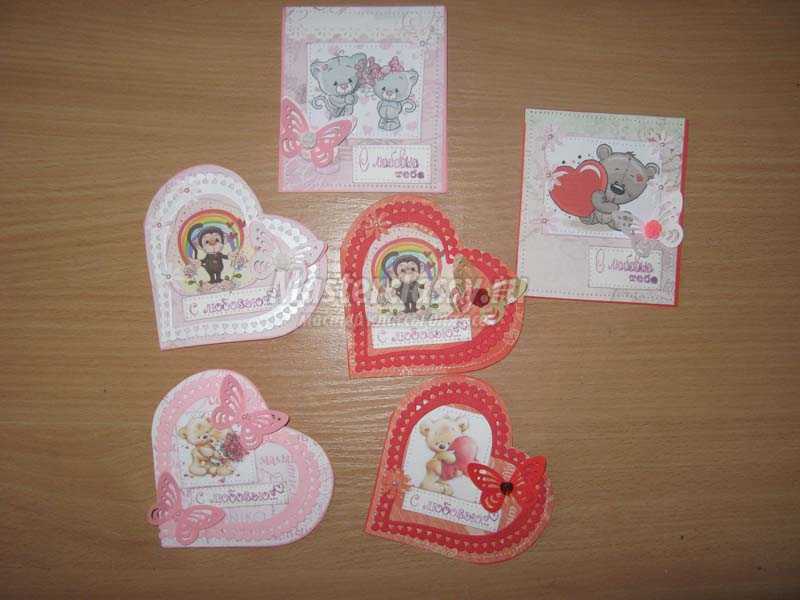
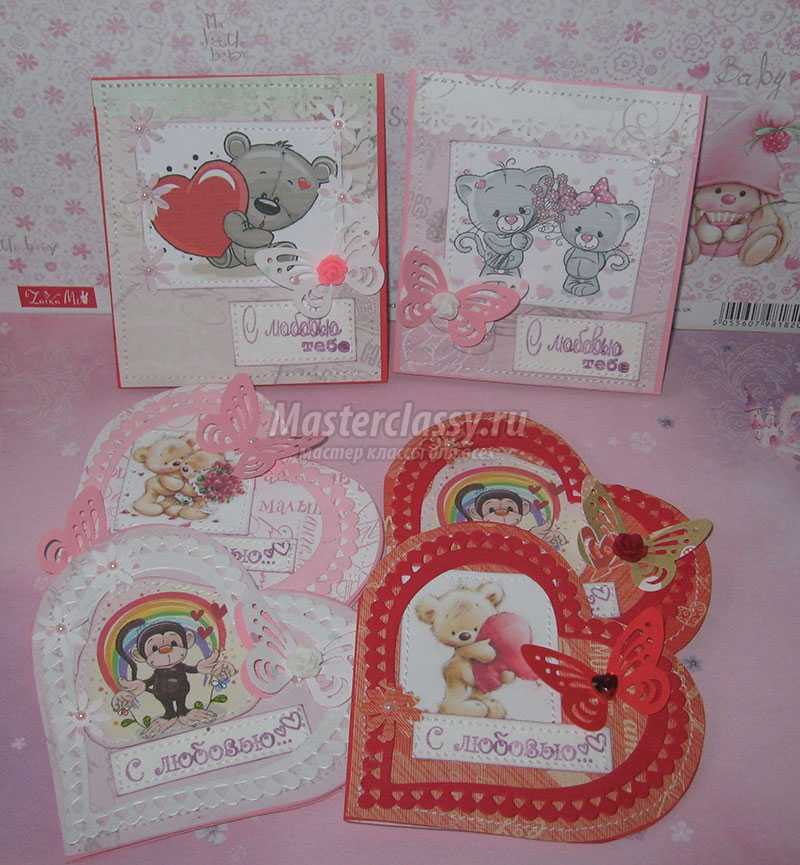
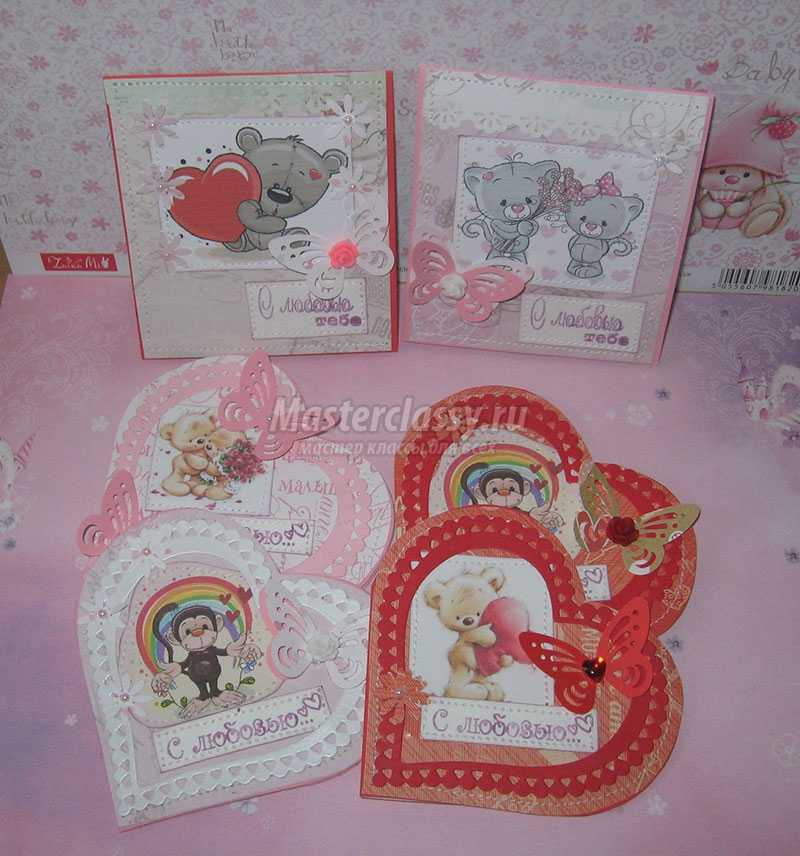
We will make valentines in the shape of a heart and in the shape of a rectangular postcard. For the heart we need to take this template diagram. Cut out the heart itself and fold it in half. Now we will apply this template to the cardboard.
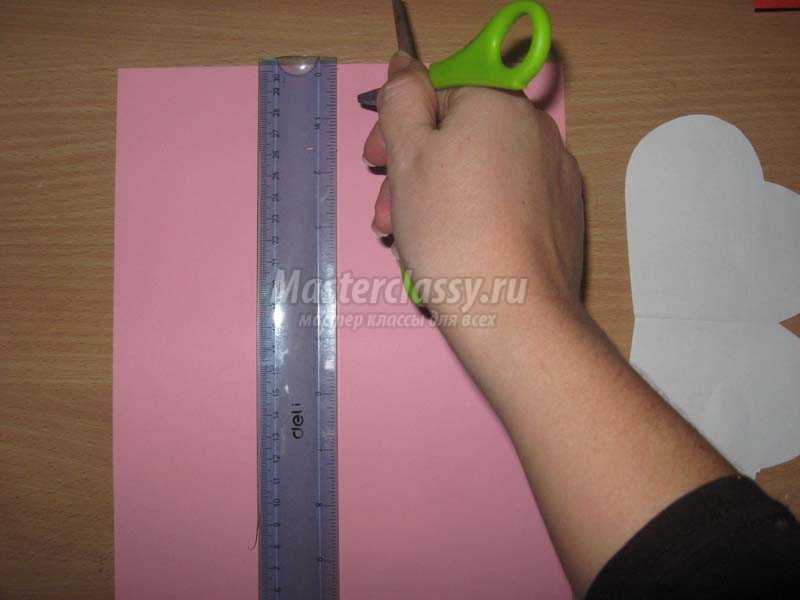
We lay a sheet of cardboard vertically, divide it in half, draw a bend line and fold it. Now we apply the template folded in half and trace it.
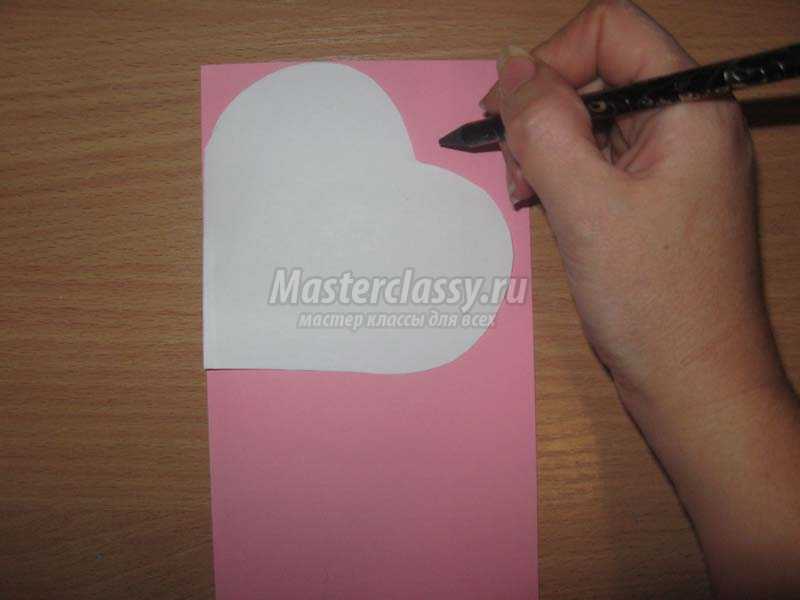
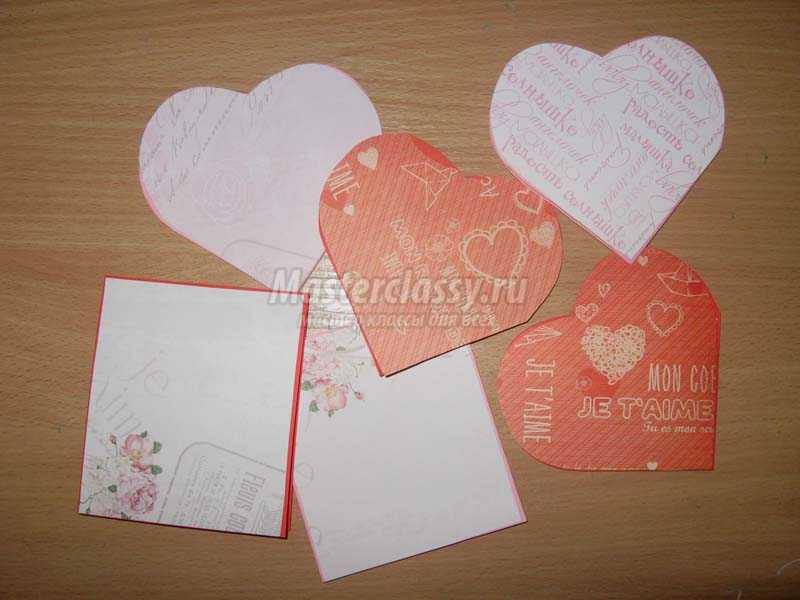
Cut out two pink hearts and two red hearts. And one rectangular blank 9.5*10.5 cm.
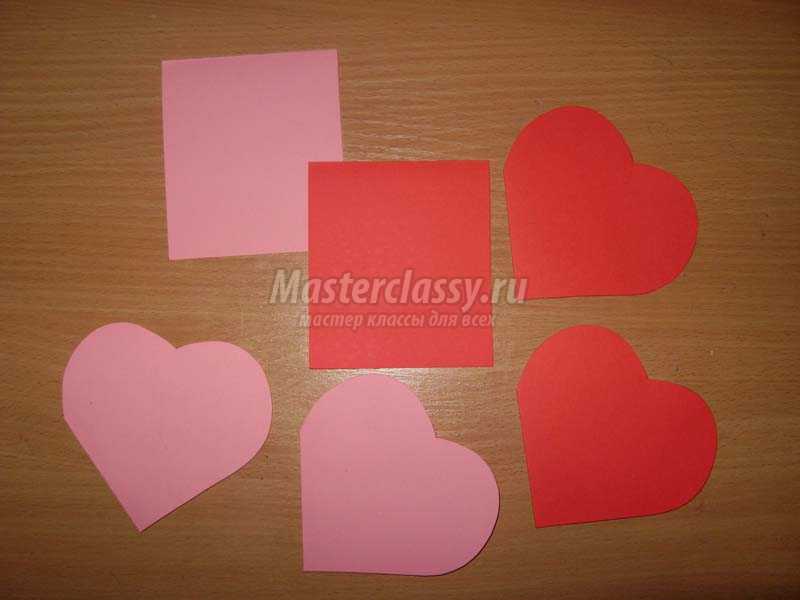
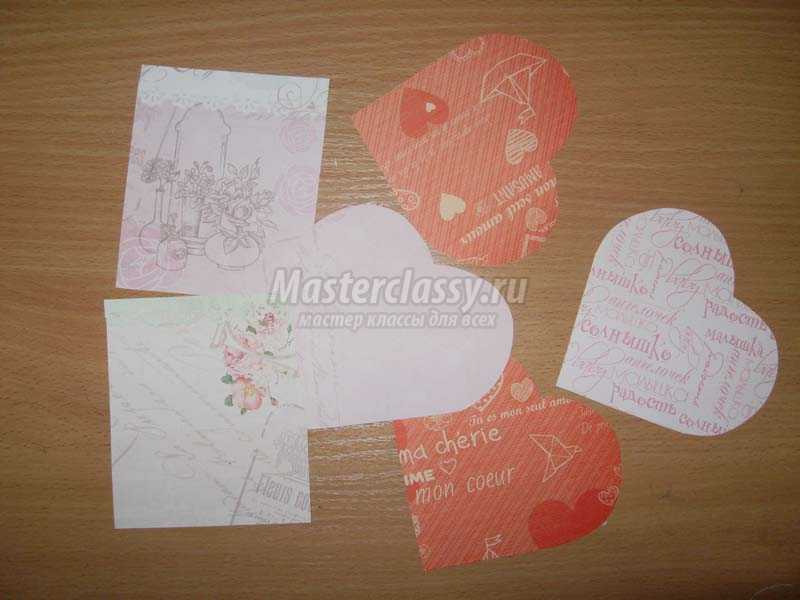
Now for each card we cut out two blanks from scrap paper. Accordingly, eight hearts and four rectangles.
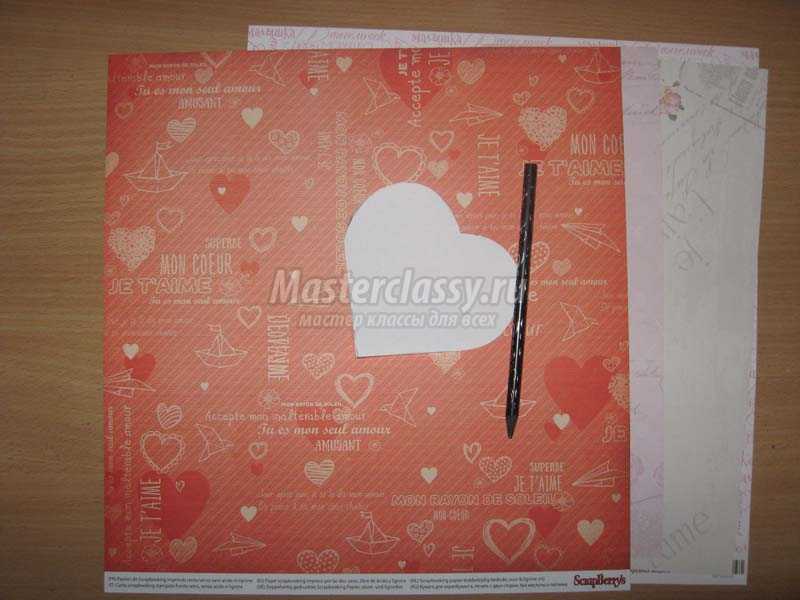
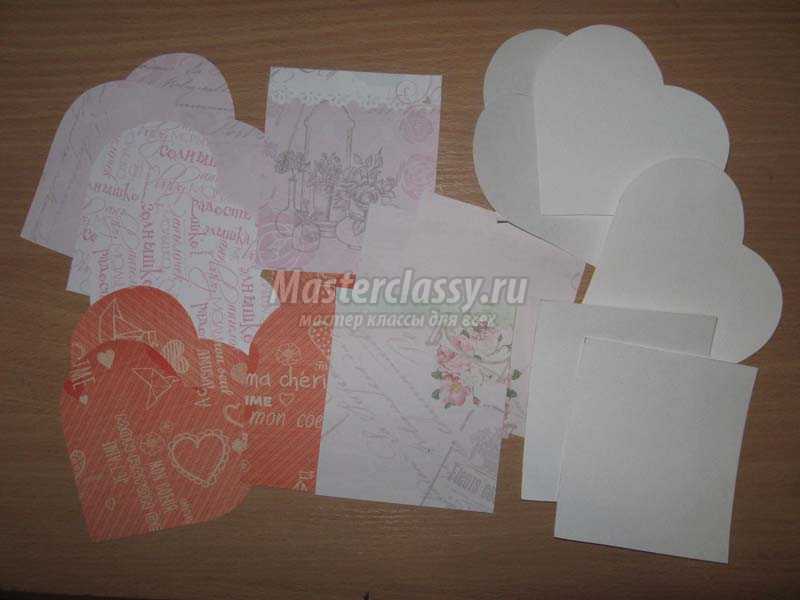
For internal inscriptions, cut out four hearts and two rectangles from watercolor paper. We tint the inner watercolor blanks along the edges. We glue the watercolor blanks with a glue stick and immediately glue the back blanks to the base.
 We sew each part of the card at the back.
 Now from the front we prepare the decorations for scrap blanks. We stamp the inscriptions on watercolor paper, tint and glue, and also cut out and glue the pictures.
 Sew on by machine. Now we glue all the blanks to the bases.
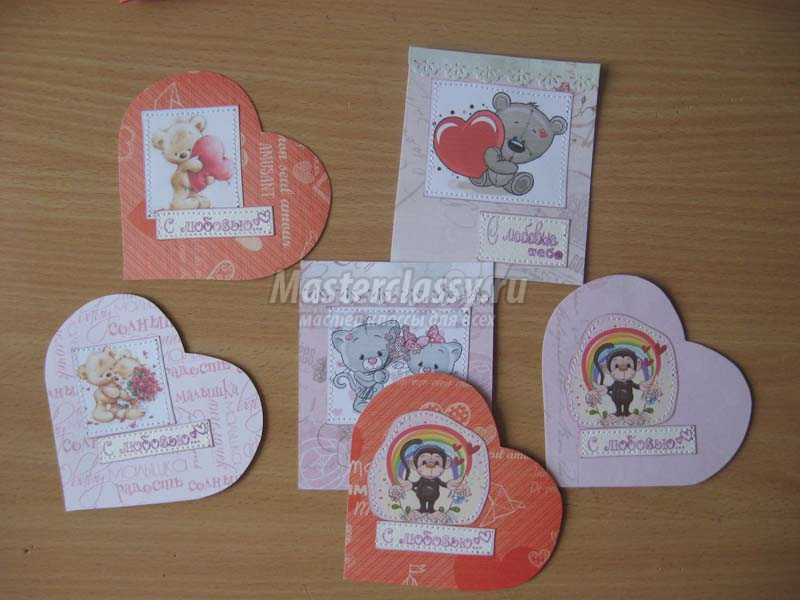
 We also sew the front parts. Now we punch holes in the butterflies and flowers made of cardboard and scrap paper that we are working with.
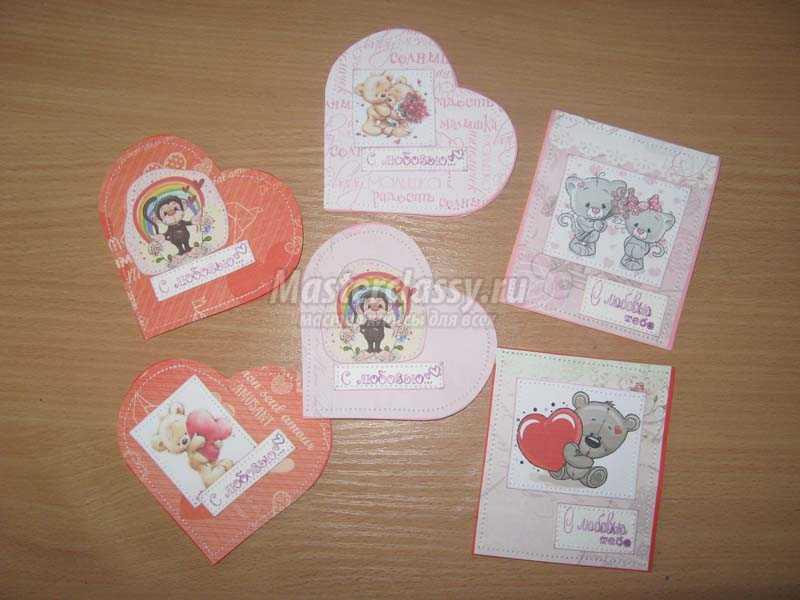

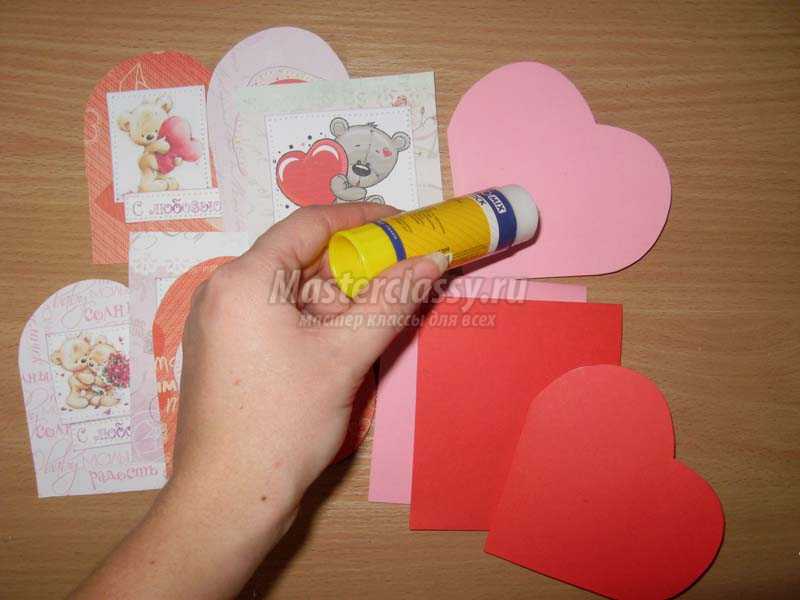
Glue the hearts first, and then the rest of the decor. All is ready! We get these cute and at the same time very bright valentines for a loved one. Thank you for your attention and good luck to everyone!
There is very little time left until Valentine's Day and romantics around the world are busy choosing small souvenirs for their other half. I didn’t stand aside either and allowed myself to plunge headlong into preparing for Valentine’s Day. It all started with making small valentine pendants, a master class of which I would like to present to your attention. I will make one Valentine’s card in the red and white colors that are more familiar to many, and the second will be closer to the vintage old style.
First, let's prepare all the necessary materials that we will use in our work:
- several sheets of A5 cardboard with a density of 300 g (red and beige);
- scrap paper with the most suitable pattern and to match the cardboard;
- tools used: scissors (regular or figured), stamp pads of red and brown colors, a simple pencil, double-sided tape 2 cm wide, transparent Dragon glue.
- for decorating valentines: cotton lace and satin ribbons 0.5 cm wide, various small flowers, buds and leaves, metal pendants, natural raffia, pressed sisal.

I prepared in advance several options for hearts that differ in shape and size from each other. I will need several blanks of the same shape, but some should be smaller in size by 0.5-1 cm than others.

I outline the larger heart on cardboard - this will be the basis of the valentine, and the smaller one on scrap paper - this will be the background. Cut out both hearts with scissors (you can also use curly scissors to make the edges more ornate). I tint the edges of each heart using stamp pads, choosing the appropriate colors. In vintage style this is called distressing.

Now I use my favorite cotton lace, with which I decorate the edges of hearts cut out of scrap paper. Thanks to lace, my valentines will look much more voluminous and interesting.

Now, using double-sided tape, I connect the hearts into one whole, after gluing small strips of ribbon in the form of a loop, which allows you to make an original pendant from an ordinary valentine.
The main work is done and the most interesting thing remains - decorating the products to your liking.


For decoration in scrapbooking, paper flowers and leaves, various ribbons, ropes, pendants, buttons and beads are most often used. First, I create a single harmonious composition by adding or removing one or another component; I select the color of the decor in accordance with the selected colors of cardboard and scrap paper. And only after I am satisfied with the overall picture, I glue each element using Dragon glue, which works great even with metal pendants.

Here is the result of my work. I hope that the presented master class will help you make a small souvenir for your loved one with your own hands.


Did you like the master class? Save it for yourself:
 Another master class for Valentine's Day!
.
Another master class for Valentine's Day!
.
 .
.
What gift should I give for Valentine's Day? Give your loved one a handmade Valentine's card. Master class with step by step photos will help you create it. Our card will be in the style of shabby chic (which translates as “shabby glitter” or “shabby chic”), and the technique used to make the valentine is called scrapbooking.
Handmade Valentine card - required materials:
- thick colored paper with 4 different shades and designs
- double sided tape or super glue
- cotton lace
- waxed lace
- printed beautiful hearts (they can be cut out from anywhere, for example, from cards or napkins)
You also need special tools for scrapbooking: hole punch, silicone stamps, stamp pads. You can purchase all this in sewing stores, stationery stores, or specialized stores with goods for scrapbooking, if there are any in your city.
If you are just starting out in scrapbooking, then for the first time 2 special hole punches, a couple of stamp pads and silicone stamps will be enough for you.
Master class with photos - step-by-step instructions
- Let's start by choosing color scheme for our handmade valentine card. We chose soft pastel shades: soft blue, pink and beige. These colors go well together and will look beautiful when “aged.” (Artificial aging is the main feature of the shabby chic style).

- The postcard will consist of 4 layers of paper. We arrange them by placing them on top of each other, but NOT gluing them.


- Now we need to decorate the edges of the paper. We leave the edges of the bottom layer of the valentine even. We make the edge of the second layer in relief using a special hole punch for scrapbooking. The edges of the third sheet of paper will be wavy. You can cut out such a relief with special scissors or regular manicure scissors.

- Now we can glue the three layers together. We do this using double-sided tape. You can also use super glue.

- Now let's start decorating the top layer, the central part of our handmade valentine. Using a stamp pad with brown ink, we rub over the edges of the sheet, thus aging it.

- We decorate with lace central part with previously rubbed edges. (The lace can be glued with double-sided tape or glue).


- We cut out the prepared hearts and glue them onto dark paper to give them visual volume. Then we make one hole on each heart for the cord. If you don’t have ready-made, printed hearts, that’s okay, you can create them yourself: set the color with paint, and decorate with nail polish with glitter.

- We glue wings cut from cotton lace to our hearts. (You can glue it with either super glue or double-sided tape).

- At the bottom of the card we will have the wish “Sweets and joys.” We make it using a rubber stamp and a red ink pad. After printing, we tear the paper along the ruler so that the edges are slightly uneven. We rub the paper for aging and use a hole punch to make holes in it for the waxed cord.

- Place the hearts in the center of the sheet. To complete the composition, we make patterns in the corners with a stamp. If you don't have a stamp, you can freehand the designs with glitter nail polish.
- The final touch - we link our two forever loving hearts waxed cord and use it to make knots on paper with the wish “Sweets and joys.” Our handmade Valentine is ready!

I wish you love and harmony
Galina Voinskaya
Choosing a valentine for Valentine's Day is quite a difficult task. Of course, a lot of printed products appear in stores on the eve of the holiday, but such valentines are unlikely to surprise anyone and show how much you really love a person. Therefore it is best make your own valentines- This The best way make a unique gift that will help you express all your true feelings.
Paper Valentines: step-by-step master classes
Easiest to make DIY Valentine's card made from paper. Paper and cardboard are inexpensive materials, but the number of design options is unlimited. For work you will only need scissors, glue, a ruler, a stationery knife and a pencil. Even with the help of such a simple kit, which every home has, you can make beautiful postcard.

Valentine's card
We all liked pop-up books that, when opened, revealed interesting figures as children. This is how you can make a Valentine's card. For this you will need:
- A piece of thick cardboard;
- Colored or white paper for decoration;
- Glue, scissors, stationery knife and pencil.
 DIY Valentine card made from paper
 The process of making the inner clamshell itself is very simple. First you need to draw an inscription; it may differ from the one in the picture. The most important thing to consider is that the upper sides of the inscription must have an additional plane in order for the letters to unfold. Next, using a stationery knife, cut out the longitudinal lines of the letters, leaving the transverse ones. After this, you just need to stick the resulting blank inside the book, bending the letters so that they unfold when the book is opened.
Important! Before gluing the inner piece of paper, make the outer design of the valentine first.
This paper valentine looks very original, and you can make the external design to your taste. It doesn't have to be in the shape of a book, it can be a heart, a flower, or any other shape that you think is romantic.

And 3 more step-by-step master class for making a valentine folding card with your own hands:
Valentine's appliques
Some may say that appliqués made from colored paper are a child's activity and are not suitable for an adult. But thanks to their use, you will get a beautiful DIY paper valentine.

Applications can be used for both internal and external external design valentines. Standard option: make a big heart with your own hands and decorate it with appliqués.
Important! Do not copy the children and do not make multi-colored and variegated appliqué, it is best to do everything modestly and beautifully, such valentines look much better!
We won't list everything possible options similar valentines, as it will be a very long time. If you want to make valentines with your own hands, the master class that we can show you will still be incomplete. After all, your postcard should be an expression of your feelings, and not a copy of a beautiful craft. To make your work easier, if you decide to make your own valentines out of paper, photo diagrams and other materials can be found online and simply printed on a printer. But remember that your main task is to make your Valentine’s card original.
Here are the options we found for beautiful DIY valentine appliqués:


![]()


DIY Valentines: scrapbooking
If you have been dating a person for quite a long time and you have photos together, then it will suit you valentine in scrapbooking style. This style is quite extensive and a wide variety of materials can be used. The most important requirement is that the valentine should be in the form of a story.

How to make a Valentine card in scrapbooking style
The first thing you need to do is come up with a story that you want to convey in your valentine card. This could be the story of how you met, your first declaration of love, how you fell in love with a person. It is important that the story fits the theme of the holiday.
The second stage is the preparation of materials for manufacturing. Scrapbooking is a style in which stories are conveyed not only through visual images; you can also use tactile sensations, smells and any other methods to create the appropriate atmosphere when viewing a story. It is, of course, desirable to have photographs, but they can be replaced with inscriptions or pictures that will convey the meaning of the story itself.
The traditional option is an album with photographs, looking through which you can understand the story. It can even be one-page, since you only need to convey the essence. A good option, make a postcard with heart stickers, the inscriptions can be on top of them, or they will need to be opened one by one to view the story.

Important! You make a congratulation or recognition yourself, remember, you are free to choose its design and content, you just need to adhere to the basic canons of your chosen style.
DIY Valentines made from fabric
Fabric is also an excellent material for making valentines, there are also a lot of options for such valentines, and you can really make unique and inimitable crafts. The most important thing when working with fabric is not to rush, as fabric is a little more difficult to work with than paper and cardboard.

Valentine pillows
Making a heart shaped pillow is quite simple. For this you will need: two pieces of fabric for a pattern, cotton wool or other filling for a pillow (you can even use pieces of fabric), needles and threads, scissors, a piece of cardboard for a pattern.

First, a heart-shaped pattern is made (you can change the shape at your discretion). After this, the outline of the future pillow is drawn on the fabric using a pencil or felt-tip pen.
When cutting out patterns, remember that the outline you draw is a seam indication, not a cutting line. Be sure to step back 1-2 centimeters when cutting from the outline so that there are no problems when sewing the pad. When you make valentines with your own hands from pattern fabric, you don’t have to cut them straight. The edges of the fabric will not be visible anyway, since they will be inside.
Next, the two pieces of fabric are folded together so that the right side is on the inside. If you have a sewing machine, then you can sew the fabric together on it, if you don’t, then you can get by with a simple needle, although it will take a little more time. The heart is not completely stitched, but a small hole is left on one side. It is needed to turn the workpiece inside out and fill it.
When everything is ready, just carefully sew up the hole that remains after filling the pillow. Additionally, before sewing the blanks together, you can embroider an inscription on the pillow to make it as original as possible.
Important! It will be easiest to embroider an inscription on a pad using satin stitch.
You can easily make these DIY valentines from felt, velvet, silk or other fabric that you like. The most important thing is that it is not only beautiful, but also durable. Indeed, in this case, your congratulations will be remembered for many years.


Embroidery valentines
If you like to embroider with cross stitch, satin stitch or another method, then you can make an original Valentine card that will be an excellent addition to the interior. To do this you will need:
- Embroidery fabric;
- Needles and threads;
- Embroidery pattern or drawing.
The easiest way to embroider a Valentine's card is with a cross. To do this, just find an embroidery pattern, transfer it to the fabric, and then put it in a frame. For embroidery you will have to spend a little time, but such a gift is rare and you can show the person how dear he is to you.
Satin stitch embroidery opens up a lot of scope for imagination for needlewomen. By embroidering with satin stitch, you can transfer almost any design onto the fabric; all you need to do is simply have the desire. You can make inscriptions in an original font, embroider hearts and much more.


Important! Try to find a beautiful frame for your embroidery, she will too important element design, and gives the gift a beautiful and finished look.
Embroidery patterns for valentines

DIY Valentines for children: templates
As you know, children also love to give each other Valentines, and if your child is still in kindergarten or primary school, then you will have to help him. Of course, in such at a young age valentines cards for February 14 are congratulations, not declarations of love, but it’s still better to try so that your child can assert himself.
The easiest way would be to use templates for making, they are not difficult to find, and they are varied. When you make DIY valentines for children, it is best to choose templates that will be as easy as possible for your child to make. After all, not all children do appliqué or other types of crafts.


Templates make it much easier for parents, as they can simply be printed on paper, cut out and signed. Of course, you can buy similar cards in stores and simply sign them, but for a child, as well as for an adult, it will be much more pleasant to give gifts that are made with your own hands.
There are many ways to make a valentine card. It could be a postcard, a book, a box, a painting, a photograph, a pillow. The most important thing is desire and a little imagination. Gifts made with your own hands are always more valuable than those simply bought in a store. Have a good day Saint Valentine's!
Share your valentines in the comments!
author of the master class: Marina-Admina
There is very little time left until Valentine's Day and romantics around the world are busy choosing small souvenirs for their other half. I didn’t stand aside either and allowed myself to plunge headlong into preparing for Valentine’s Day. It all started with making small valentine pendants, a master class of which I would like to present to your attention. I will make one Valentine’s card in the red and white colors that are more familiar to many, and the second will be closer to the vintage old style.
First, let's prepare all the necessary materials that we will use in our work:
Several sheets of A5 cardboard with a density of 300 g (red and beige);
scrap paper with the most suitable pattern and to match the cardboard;
tools used: scissors (regular or figured), stamp pads of red and brown colors, a simple pencil, double-sided tape 2 cm wide, transparent Dragon glue.
for decorating valentines: cotton lace and satin ribbons 0.5 cm wide, various small flowers, buds and leaves, metal pendants, natural raffia, pressed sisal.

I prepared in advance several options for hearts that differ in shape and size from each other. I will need several blanks of the same shape, but some should be smaller in size by 0.5-1 cm than others. 
I outline the larger heart on cardboard - this will be the basis of the valentine, and the smaller one on scrap paper - this will be the background. Cut out both hearts with scissors (you can also use curly scissors to make the edges more ornate). I tint the edges of each heart using stamp pads, choosing the appropriate colors. In vintage style this is called distressing. 
Now I use my favorite cotton lace, with which I decorate the edges of hearts cut out of scrap paper. Thanks to lace, my valentines will look much more voluminous and interesting. 
Now, using double-sided tape, I connect the hearts into one whole, after gluing small strips of ribbon in the form of a loop, which allows you to make an original pendant from an ordinary valentine.
The main work is done and the most interesting thing remains - decorating the products to your liking. 

For decoration in scrapbooking, paper flowers and leaves, various ribbons, ropes, pendants, buttons and beads are most often used. First, I create a single harmonious composition by adding or removing one or another component; I select the color of the decor in accordance with the selected colors of cardboard and scrap paper. And only after I am satisfied with the overall picture, I glue each element using Dragon glue, which works great even with metal pendants. 
Here is the result of my work. I hope that the presented master class will help you make a small souvenir for your loved one with your own hands. 
