Some users are concerned about how to disable Windows 7 updates on their computer. Why are users worried about system updates?
Regularly, at certain periods of time (usually once a month), update packages are released for the Windows operating system. Sometimes, if problems arise or vulnerabilities are discovered, emergency patches are released that need to be installed on your computer.
In the Windows 7 operating system, with default settings, automatic updating is enabled. The system periodically downloads and then installs updates and patches released for Windows onto the computer. Most of the updates concern system security.
Users, for various reasons, refuse to install updates for the operating system. Here are some reasons for not receiving Windows 7 updates through Windows Update:
- it happens that after installing updates, Windows or applications malfunction;
- Windows updates I often take a lot of time, during which I cannot turn off the computer;
- with a limited Internet connection, major system updates consume a lot of traffic;
- updates take up space on the PC disk;
- users are afraid of losing their operating system activation after installing updates.
How to disable Windows updates 7? This issue can be resolved using the system in two ways: disabling automatic Windows 7 updates, or disabling Windows 7 updating completely.
How to disable automatic updates in Windows 7
After turning off automatic updates for Windows 7, the user will still have the option to download and install updates manually.
This is a preferable option than completely disabling the update, since some updates should be installed on your computer in order to avoid becoming a victim of dangerous viruses, for example, .
Go to the Start menu, click on Control Panel, then Windows Update. In the Windows Update window, in the left menu bar, click on the “Customize settings” link.
In the “Settings” window, in the “Important updates” option, select “Do not check for updates (not recommended)”, and then click on the “OK” button.
Additionally, you can uncheck the two settings below: “Recommended updates” and “Who can install updates.”

In the future, if you need to install updates manually, in the “Important updates” setting, select “Search for updates, but I make the decision to download and install.” Next, after you've finished searching for available updates, select the updates you want to install on your computer.
How to disable Windows 7 update permanently
The second method disables the Windows Update service on your computer, so checking for updates will be disabled.
Go to the Start menu, then go to Control Panel => Administrative Tools. In the “Administration” window, double-click with the left mouse button on the “Services” shortcut.
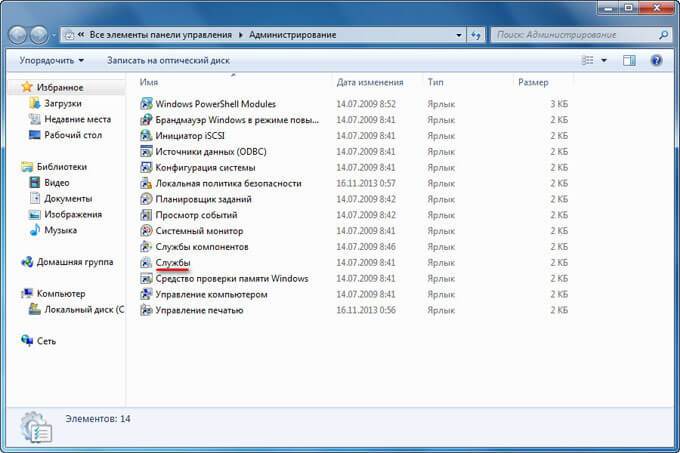
In the “Services” window, in the list of operating system services, find the “Windows Update” service, and then right-click on the service and select “Properties” in the context menu that opens.

In the “Properties: Windows Update (Local Computer)” window, in the “General” tab, select the startup type: “Disabled”, click on the “Stop” button to stop the service in this moment time.

You can re-enable the update in Windows 7 using the same method. In the “Properties: Windows Update (Local Computer)” window, select the startup type: “Automatic (Delayed Start)”, and then click on the “Run” button.
Disable Update Center on the command line
You can disable Update Center on the command line, follow these instructions:
- Run Command Prompt as Administrator.
- Enter the commands sequentially (after entering the command, press the “Enter” key):

After this, the update service and Windows Update will be disabled.
Conclusions of the article
If necessary, the user can independently disable updates in the Windows 7 operating system by disabling updates completely or disabling automatic updating of the operating system.
Downloaded, suspended and installed updates are stored in the computer's memory. Over time they take a large number of memory and cause system malfunctions. Windows removes one part of the updates automatically, and the second half will have to be cleaned manually.
Cleaning the computer: ways and methods
Removing installed updates
Already installed updates can be removed, thereby rolling back the version of the operating system to the moment when these updates were not yet received. To completely remove a specific update, as well as to install it, the computer must be restarted at the end of the process. Removing some updates will cause the system to install the previous version of the update, the one that was used before the installation of the update being removed.
There are several built-in methods to get rid of installed versions. Removal options through additional programs will be discussed in a separate paragraph, so if standard methods do not suit you, you can use a third-party application. So, let's look at internal removal tools.
Using the update center
- Expand your computer settings. Open computer settings
- Select the Update & Security tab.
 Go to the “Update and Security” section
 - Go to the update history, which contains all information about installed updates.
 Open the update log
 - Click on the “Uninstall updates” button.
 Click the “Uninstall updates” button
 - The control panel will open. A list of installed updates will appear on the screen; you can sort it by one of the columns. To erase an update, select it and use the Remove button.
 Select the update and click on the “Delete” button
 - You will be asked to confirm the action, do this by clicking the “Yes” button. After removing all unnecessary updates, restart your computer.
 Click the “Yes” button
Video: Uninstall updates using Update Center
Using the control panel
IN previous paragraph we got to the desired section of the control panel through the computer settings, now let’s look at how to do this directly:

Video: Uninstall updates using Control Panel
Using the command line
- Find and open the line using administrator rights.
 Open command prompt as administrator
 - Please note that in order to remove updates using a command, you must find out the unique number of this update in advance. It always starts with KB, you can find it in the update log, when viewing the list of installed updates, on the official Microsoft website, or using the wmic qfe list brief /format:table command, which calls up a table with dates and update numbers.
 Run the command wmic qfe list brief /format:table
 - Once you know the numbers you need, use the command wusa /uninstall /kb:unique_code to begin uninstalling a specific update.
 Run the command wusa /uninstall /kb:unique_code
 - You may be asked to confirm the deletion, do so by clicking the "Yes" button.
 Select the “Yes” option
 - To complete the procedure, you must restart your computer. This can be done immediately or later.
 Choose whether to restart the computer now or later
Clearing the folder with old updates and copies
Restore points and versions of previous updates are stored in the computer's memory so that in case a new update causes an error or any other problem, the system can be rolled back. Under no circumstances should you delete the WinSxS folder, as this may cause Windows to stop starting, and it will not be possible to roll back or restore it without this folder. It is recommended to empty the folder only when its weight exceeds 8 GB.

Clearing downloaded updates and cache
Updates that have been downloaded but for some reason not yet installed or installed recently are also stored in the computer’s memory. Some downloaded updates freeze and cannot be installed because of this. All such updates are located in the Primary_disk folder:\Windows\SoftwareDistribution\Download. By going to this folder, you will find subfolders with long names; you can delete all of them or only certain ones, focusing on the code in the name and the date of creation. Removal is carried out by simply moving to the trash, that is, right-click on them and use the “Delete” function.
 We delete the contents of the folder in the Main_disk:\Windows\SoftwareDistribution\Download
 It is worth clearing the DeliveryOptimization subfolder, located in the same SoftwareDistribution folder; it stores the update cache. You cannot delete the folder itself, only its contents.
 Clear the folder in the Main_disk:\Windows\SoftwareDistribution\DeliveryOptimization
 Cleaning up from a previous build
After installing the anniversary update, the system build version changes. In order for the user to have the opportunity to cancel the transition to a new global version of the operating system, a Windows.old folder is created containing all the necessary files for 30 days. After this period expires, the folder will self-destruct, but if you don't want to wait, follow these steps:
- Run a disk cleanup program.
 Open the Disk Cleanup program
 - Select drive C and wait for it to be scanned.
 Selecting a disk to clean
 - Go to Cleanse system files, this will require administrator rights. Windows will ask you again to select the drive you want to scan.
 Click the “Clean up system files” button
 - Check the boxes for “Previous Windows installations” and “Temporary installation files”.
 Check the boxes for “Previous Windows installations” and “Temporary installation files”
 - Begin the uninstallation process and agree to all warnings that appear on the screen.
 We indicate that we still want to delete the files
Cancel automatic update
By default, all available updates are downloaded and installed automatically, notifying you only that the system is updated. Negative sides The disadvantage of this action is that a load on the Internet may appear at any time. The traffic spent on downloading updates is not controlled. There are several ways to deactivate automatic system updates, the easiest and fastest is to close the update center:

Third-party software for managing updates
There are several third-party programs that help you manage updates, one of them is Windows Update MiniTool. In it you can select updates to download and install, delete installed and downloaded versions, and block certain updates. The application has the Russian language installed, almost all actions are performed in the main menu using the list and action icons on the left side of the window. It is recommended to download the program, which is distributed free of charge, from the official website of the developer.
 Managing updates via Windows Update MiniTool
 Another program, IObit Uninstaller, is designed to remove various Windows components, including updates. The application has built-in support for the Russian language. The trial version can be downloaded for free from the official website of the developer. In the Windows Updates section, you can uninstall each update individually or uninstall several of them at once. The application allows you to create restore points that will help you configure the system if failures occur after uninstalling the next update.
 Uninstalling updates using IObit Uninstaller
 Error uninstalling updates
Updates may not be removed for the following reasons:
- they are currently being downloaded or installed;
- the update being removed is involved in some process or application;
- The update is stuck.
First of all, disable all unnecessary processes, programs and disconnect from the Internet. If this does not help, then boot into safe mode and try to remove the update through it. Try uninstalling updates different ways described above in the article: through the control panel, command line, third-party applications and cleaning folders.
To enter the safe mode, follow these steps:

If all else fails, then there are two options left: roll back the system to the moment when the update was not yet installed, or reinstall the system using an image of the desired version. When you manage to remove the update, do not forget to deactivate its automatic installation, otherwise the update will install again the first time you connect to the Internet.
If Windows updates or lack of memory lead to uncomfortable work, then it is worth removing harmful updates. There are many system methods for this in Windows 10, such as uninstalling using Update, uninstalling using Control Panel and using the command line. Third-party programs are also suitable, the functions of which are not limited to this. Remember, if auto-updates are not disabled, the data will be transferred to your computer again.
Name Removing required updates does not fully reveal the meaning of what is described in the article, since it is not entirely clear what exactly is meant by the term “mandatory”. The material could be titled as Removing uninstallable updates, but then it is not entirely clear why they suddenly became undeletable: by the will of the developer or due to errors with the component storage. There is also an option to designate as deleting updates that are not intended to be deleted, but this is somehow redundant or something.
Just recently I discovered one curious feature of some updates: they are not removed by standard operating system tools. In practice, a situation arose in which I could not remove the “broken” update from the system. As we delved deeper into the topic of the question, it turned out that in Windows there are different types updates and what special case The impossibility of removing some of them is not at all a consequence of any local error, but rather reflects a feature. Apparently, this is explained by the architectural nuances of the update mechanism. In practice, it is difficult to create a system of update relationships in which each update will be completely autonomous, that is, independent of the others, and, accordingly, can be deleted without any consequences. But even more important is that some updates for the system are truly critical, since they are quite deeply integrated into it. For example, the update mechanism itself (service stack) is provided by a set of modules (installer, libraries, etc.) that are necessary for installing subsequent updates and on which the performance of the mechanism as a whole depends. Accordingly, all servicing stack updates that introduce algorithmic changes cannot be simply removed, since then some features of these algorithms that were already installed in subsequent service packs will no longer be available. Removing such updates is fraught with serious consequences for the system, such as destruction of the component store, and as a result, potential problems with the performance of the operating system itself. In fact, everything is so scary, since there are only about a dozen such mandatory (non-removable) updates, for example in the Windows 7 system :) But it’s still worth knowing about this nuance, as well as having an understanding of how exactly to perform removing required updates.
Problem
From a technician's point of view, installing and uninstalling system updates are considered trivial tasks. In our age of the global Internet, updates to the system are constantly installed, often completely unnoticed by the user. Updates are security fixes for various components, modules containing additional functionality of existing applications, as well as new software. However, along with the tasks of installing updates, there are often tasks of removing system updates. The reasons for this can be completely varied, ranging from the need to simply reinstall any of the updates to achieve correct functionality and ending with the need to correct dependency problems and the integrity of the component repository.
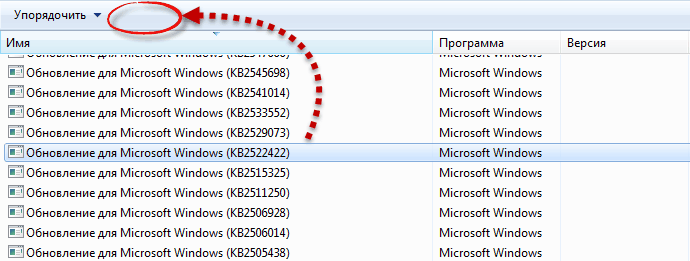
The system provides several ways to remove updates from the system, for example through the component Windows Update, applet Installed updates. In this case, the user simply selects (marks) the update he is interested in by clicking the left mouse button and by right-clicking, opens the Delete menu, or selects the item of the same name from the top panel:
everything is trivial here. But with mandatory updates, everything is somewhat more complicated, since during similar actions we do not see the usual controls:
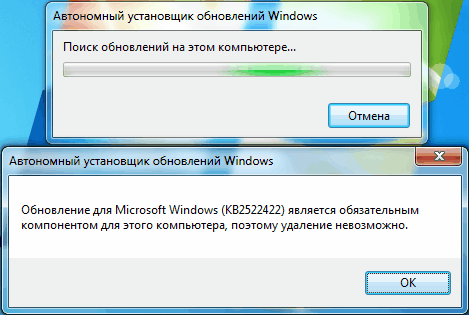
when trying to remove this component from the command line using the wusa utility:
wusa /uninstall /kb:2522422
the error is given: Update for Microsoft Windows is a required component for this computer and cannot be removed.
In this case, the specialist has a reasonable question: why are you doing this to me? :) The fact that the system considers some updates mandatory and does not allow them to be deleted does not at all guarantee that these updates cannot be damaged and cause various kinds of problems. Therefore, in some cases there is a need for removal. Is it possible to remove such uninstallable updates from the system?
Solution
The changes described in this section may result in the component store not working!! You perform the actions given in this section at your own peril and risk!!
Therefore, act extremely carefully, preferably making a full backup of the system or creating a restore point. The main thing is to understand why you are doing all this. If you need to correct the consequences of a crooked update, then uninstall the required update and then install it again. In a successful scenario, after uninstalling/reinstalling a non-removable update, you will be able to correct the consequences of a crooked update, but in the worst case scenario, you will render the system inoperative, since the update may turn out to be key. The result may be damage to the component store with the error STATUS_SXS_COMPONENT_STORE_CORRUPT.
At what level is it ensured that such mandatory updates are not uninstallable? At the parameter level in configuration .mum files.
Mum file (Microsoft Update Manifest) is a Windows update configuration file in XML format containing package parameters: name, identifier, installation language, dependencies, action flags, and others. Used as an identifier (symbolic name) of a service (stack) for the purpose of performing enable/disable/remove operations on a package using various service utilities (for example, the Package Manager (pkgmgr)). The manifest file contains the name of the update being served in its name and is located in the %WinDir%\servicing\Packages directory;
Msu file (Microsoft System Update/Microsoft Service Pack) is an isolated Microsoft Update package containing metadata (describing each service pack contained in the .msu file), one or more .cab files (each .cab- the file contains individual update modules), .xml file (describing the update package, used by the Windows Standalone Update Installer wusa.exe to perform the update installation process), properties file (the file contains property strings that the wusa.exe utility uses.
The .mum file has a parameter called permanence that takes two values: removable and permanent. Service packs that are not desirable to be removed from the system are declared by Microsoft developers as “permanent”, while all other (regular) service packs are marked as “removable”. Therefore, the process of changing the update type from undeletable to deletable comes down to changing this parameter in the corresponding .mum file.
General algorithm of actions
At the request of readers, the algorithm of actions is presented for the widest possible audience of users, so I tried to describe the process at an accessible level.
- After installing a typical system update, the corresponding .mum files are placed inside the %Windir%\servicing\Packages\ directory. Therefore, open it in C:\Windows\servicing\ and place the cursor on the Packages subdirectory.
- Often there is a problem with access to objects in the %Windir%\servicing\Packages\ directory, since full access permissions are set only for the system account TrustedInstaller. Therefore, to make changes to access rights, right-click on the Packages directory, select Properties and then go to the Security tab. In the window that opens, immediately after the “Groups and Users” section, click the Edit button, then click Add, in the window that opens, write All in the input field, click Check names, select from those found, click OK, then set full rights for the newly added group. Close the window, in the main window Security, at the very bottom click the Advanced button, in the window that opens again, in the “Permissions” tab, select the newly created group (All), click the Change permissions button, then at the very bottom of the new window check the “Replace all” checkbox permissions of a child object to permissions inherited from this object", click OK everywhere, closing all windows.
- We go to the Packages directory, look for the .mum file(s) related to the update to be removed. They usually have a name containing the full name of the package being sought:
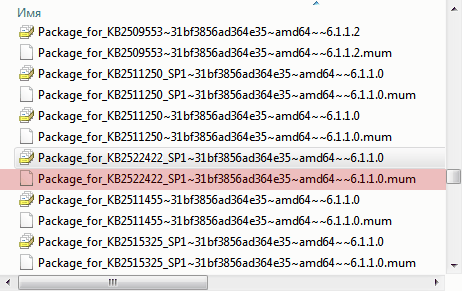
- Open the found file for editing:
- We look for a line containing the word permanence, replacing the parameter value with permanence="removable" . In the example above, this is line number 4. Next, close the file and save the changes made.
- We perform similar actions for all .mum files associated with the required non-removable update package, since some updates may have two or more .mum files associated with them.
- After finishing the editing process, close all windows related to updates. In some cases, changes take effect instantly, that is, the update will become available for removal immediately after opening and re-indexing in the section
System update - necessity or excess? Well-functioning mechanism of a Swiss watch or a chaotic flow of data? Sometimes situations arise when it is necessary to remove updates that, in theory, should stabilize the operation of Windows 10 or other systems. The reasons may be different, be it an incorrectly installed upgrade or a reluctance to make changes to save space on the hard drive.
How to remove the latest installed updates on Windows 10
It often happens that a freshly installed OS update harms the performance of your computer. Problems can occur for a number of reasons:
- the update may have installed with errors;
- the update does not support the drivers that are installed for the correct operation of your PC;
- When installing updates, problems occurred that resulted in critical errors and disruption of the operating system;
- the update is out of date and did not install;
- the update was installed two or more times;
- errors occurred when downloading updates;
- there were errors hard drive, on which the update is installed, etc.
Photo gallery: errors when installing Windows 10 updates
Windows Update database corruption errors Duplicate Windows 10 update in Update History Updates fail due to hard drive failure
Uninstalling updates via Control Panel
- Open the “Control Panel”. To do this, right-click on the Windows icon in the lower left corner of the screen and select “Control Panel”.
Right-click on the Start menu and open Control Panel
- In the window that opens, among the set of elements for managing your OS, we find the “Programs and Features” item.
In the "Control Panel" select the "Programs and Features" item
- At the top left we find the link “View installed updates”.
In the left column, select “View installed updates”
- Click on the update you need. By default, it is sorted by date, which means that the required update will be among the top if several upgrades were installed at once, or at the top when only one was installed. It needs to be removed if it is because of it that problems arose. Left-click on the element, thereby activating the “Delete” button.
Select the required update from the list and remove it by clicking on the corresponding button
- We confirm the deletion and restart the computer. Some updates may not require a reboot.
Uninstalling updates via Windows Update
- Open the Start menu and select the Settings item.
Select the “Settings” item by opening the “Start” menu
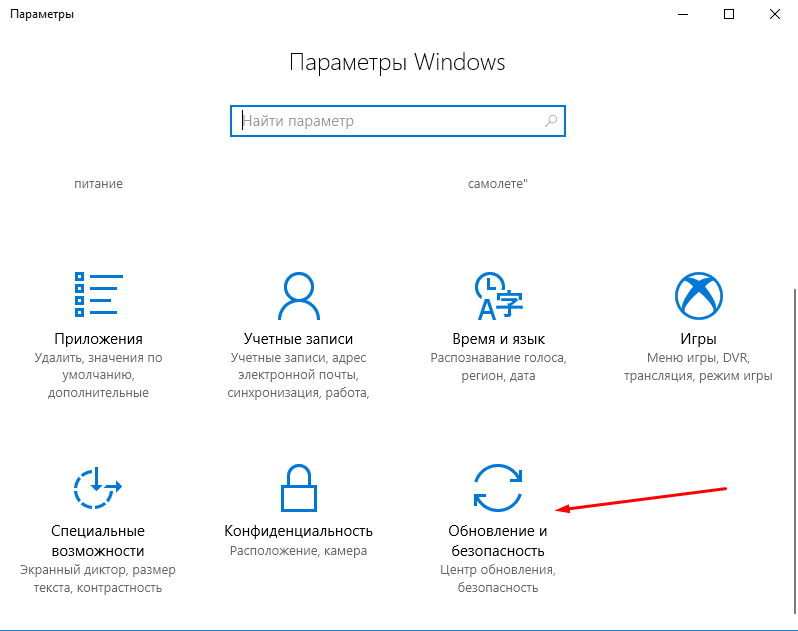
- In the window that opens, select the “Update and Security” environment.
Click on the item “Update and Security”
- In the “Windows Update” tab, click on “Update History”.
In Windows Update, look at the Update History.
- Click the “Uninstall updates” button. Select the upgrade you are interested in and remove it by clicking on the corresponding button.
Click “Remove updates” and remove incorrect upgrades
Uninstalling updates via the command line

Instead of [update number], enter the numbers from the second column of the list displayed command line. The first command will remove the update and reboot the computer, the second will do the same, only it will reboot if necessary.
All updates are removed in similar ways. You only need to choose which upgrade will incorrectly affect the operation of the OS.
How to delete Windows 10 updates folder
The magic folder is named WinSxS; all updates are downloaded to it. After a long service life of the operating system, this directory becomes increasingly overgrown with data that is in no hurry to be deleted. No wonder experienced people say: Windows takes up exactly as much space as it is given.
Do not delude yourself into thinking that the problem can be solved with one click on the Delete key. Simple, brutal deletion of the updates folder in any Windows versions can lead to deterioration of the OS, slowdown, freezing, refusal of other updates and other “joys”. This directory should be cleaned using operating system tools. This safe operation will free up as much memory as possible.
There are several ways to optimize the updates folder:
- Disk Cleanup utility;
- using the command line.
Let's consider both methods in order.

The second method is even faster, but it does not clean the entire system or other disk and deals exclusively with OS updates.

How to cancel a Windows 10 update
Unfortunately or fortunately, canceling Windows 10 OS updates is not so easy. In the simple settings you will not find an option to refuse to receive new upgrades. A similar function is not included in the “Ten”, because the developers promise lifelong support for this system, which means they guarantee its stability. However, threats, new viruses and similar “surprises” appear every day - accordingly, your OS must be updated in parallel with them. Therefore, it is not recommended to disable system updates, although this can be done in a workaround.
- Right-click on the “This PC” icon on the desktop and select “Manage.”
Using the context menu of the “This PC” icon, go to “Management”
- Select the “Services and Applications” tab. In it we enter “Services”.
Open the “Services” of the computer through the “Services and Applications” tab
- Scroll down the list to the required Windows Update service and launch it by double-clicking.
Open Windows Update properties by double-clicking
- In the window that opens, change the filter in the “Startup type” column to “Disabled”, confirm the changes with the OK button and restart the computer.
Change the “Startup type” of the service to “Disabled”, save the changes and restart the computer
Video: How to cancel Windows 10 update
How to delete Windows 10 update cache
Another option for cleaning and optimizing your system is to clear cached information files. A full update cache can affect system performance, cause it to constantly search for new updates, etc.

Video: How to clear Windows 10 update cache
Programs to remove Windows 10 updates
Windows Update MiniTool is a free and easy-to-manage program that helps you customize the Windows 10 update environment to your liking.
Windows Update MiniTool - a program for working with Windows updates
This utility looks for the latest updates, can remove old ones, reinstall upgrades, and much more. This software product also allows you to refuse updates.
Revo Uninstaller is a powerful program similar to the Windows Add or Remove Programs service.
Revo Uninstaller - a program for working with software and OS updates
This is a functional application manager that allows you to track how and when the operating system or any individual application was updated. Among the advantages is the ability to remove updates and applications in a list, rather than one at a time, which significantly reduces the time it takes to clean your device. The disadvantages include a complex interface and common list for programs and updates, which is separated in the Windows service.
Why is the update not uninstalled?
An update cannot be uninstalled only because of an error or a series of errors that occurred during installation or operation of the patch update. Windows system is not ideal: every now and then problems arise due to the load on the OS, inaccuracies in the network, viruses, and hardware failures. Thus, critical errors when installing an update may be located in the registry in which the update data is recorded, or in the hard drive sector where the update files are stored.
How to remove uninstallable updates
There are no standard methods for removing the “unremovable”. Emergence similar situation means that your device has critical errors that prevent the operating system from working correctly. It is necessary to take a whole range of measures to solve this problem:
- check your computer for viruses with several defender programs;
- carry out comprehensive diagnostics of the hard drive using specialized programs;
- run the registry cleaning utility;
- defragment hard drives;
- run the Windows repair service from the installation disc.
If all these measures do not lead to the desired result, contact a specialist or reinstall operating system. The last measure, albeit drastic, will definitely solve the problem.
Updating the system is not scary. However, to maintain your computer's performance, you must ensure that all updates are installed promptly and correctly.