Let's look at what you can give preference to when choosing a PC for gaming. When starting to select components for your computer, you must first study the price list of a computer store. The first priority is to choose a good gaming combination - video card + processor. This is what will make it possible to build the best computer and provide excellent performance for modern games.
Let's start the search. We allocate up to 50% of the calculated cost of the computer for the selection of a video card and processor! To do right choice, don’t stop your attention on processors like Intel Core i7 2600 3.40 or AMD Fx-8120, because we need to build a PC for next-generation games, and not just buy the coolest processor.
Dual-core INTEL Core i3 processors - 2nd generation, with HYPER THREADING technology and 4 threads, are ideal. The following models are perfect for a gaming computer: CORE i3 - 2100 3.1GHz, CORE i3 - 2120 3.30 GHz /5GTs/850MHz(GPU)/ 3072Kb/, CORE i3 - 2130 3.4GHz. If you choose among AMD processors, there is more choice, but preference can be given to the PHENOM II X4 965 AM3 and AMD FX-4100 AM3+. So, the choice is yours - to build a gaming computer using a new generation processor, or with a good CPU of the previous generation. Both of these options are suitable, but it’s up to you to decide which one to choose.
How to assemble a gaming computer according to parameters
Choosing a video card for gamesComputer for latest games can be equipped with a RADEON HD 7850 video card with 1 GB of memory, starting with the most affordable - HIS HD7850 FAN 1 GB H785F1G2M, or with the most advanced cooling system - HIS HD7850 Ice q X 1 GB H785QN1G2M. You can also give preference to more productive models with 2 GB of memory with overclocking - SAPPHIRE RADEON HD 7850 2 GB 11200-14 920 / 5000MHz and GIGABYTE GV-R785OC-2 GD 975 / 4800MHz.
For a gaming personal computer, you can also choose from a GeForce GTX 660 or RADEON HD 7870. I would also like to highlight the GIGABYTE GeForce GTX660 GV-N660OC-2GD, MSI GeForce GTX 660 N 660 TF 2GD5/OC and ASUS GTX 660-DC2O-2GD5 . And, of course, let's not forget about the representative of AMD RADEON HD 7870 - GIGABYTE GV-R787OC-2GD. With it, your gaming computer will be even more powerful.
Motherboard
Here, first of all, you need to understand what kind of computer you need to build - it is clear that in order to play, but still, in addition to games, there are many more useful and exciting activities.
If you have decided to build a computer based on an INTEL processor, then you need to start choosing a motherboard with the P 68 chipset and at least the iZ 68 GIGABYTE GA-Z68M-D2H board. Also, when choosing a PC, we pay attention to the Z 68 chipset - MSI Z68A-G43 (G3) and As Rock Z 68 Pro3 Gen3. Don’t forget about the possibility of purchasing a motherboard and Cross Fire X support or SLI, with two PCI-E x 8+ x 8 connectors. All this will give a chance to make the computer relevant for games for a long time, and, without changing the entire system, change only the processor and video card . Thanks to this, you will again have a good, powerful personal computer that will perfectly run the latest games.

If you still decide to give preference to a computer with an AMD processor, pay attention to boards for SOCKET AM3+, regardless of the selected processor. Desirable motherboards for a computer for gaming are motherboards with the latest AMD970 or AMD990 X chipset. Such as GIGABYTE GA-970A-D3, As Rock 970 Extreme4 or MSI 990 XA-GD55.
For those who prefer Phys X effects and those who have an outdated GeForce video card, starting with the VIII series, it is advisable to buy a motherboard that includes two PCI - EXPRESS x16 video card slots, at least x16+x4. Installing an additional video card will help relieve the main one, and owners of RADEON video cards will be provided with support for Phys X. All this provides an opportunity to build a more powerful PC with an enhanced gaming component.
RAM
When choosing a gaming computer, you need to remember - RAM needed with a total volume of 4 GB. It is best to set a pair of identical 2 x 2 Gb strips to activate dual-channel mode. To use the full amount of memory, you must use a 64-Bit operating system. Frequency specifications depend on motherboard support.
Selecting a hard drive
The slowest component of a gaming computer is the HDD. Therefore, when choosing a hard drive for a computer, in addition to the minimum capacity of 500GB, you need to pay attention to the rotation speed. The most common: 7200 rpm or from 5400 to 5900 rpm. Low-speed models are designed to store various files, so they are not the best option for a gaming PC. For system disks, it is better to use faster HDDs with a speed of 7200 rpm. The difference in performance will be quite noticeable.

HDD drive 500 GB WESTERN DIGITAL WD 5000AAKX with 16Mb cache, Samsung HD 103 SJ 1000 GB, HITACHI HDS 721010 CLA332 1000 GB. But in order to save money, you can build a gaming PC based on an old hard drive.
At the final stage, in order to assemble a good gaming PC, all that remains is to choose the case and power supply. Taking into account the selected video card and processor, for full operation of the computer you will need a good power supply with a power of 500 - 550 W. For example, CHIEFTEC A-135 APS-500S.
Frame system unit
The final point when assembling a computer for gaming is the case. You can simply choose it by appearance. When choosing a case for a gaming PC, you should pay attention to:
- A). The building should be spacious;
- b). The length from the back wall to the HDD cage should be larger size video cards – HIS HD 6870 Ice Q X = 260 mm;
- V). The metal thickness is preferably from 0.7 to 1 mm;
- G). Minimum one installed fan, at least 120 mm.

Happy shopping!
Before you start assembling the computer yourself, let's look at the picture below. It presents all the main components from which the computer will be assembled with your own hands (our own hands) :)
When you click on the picture, it will open in a modal window in improved quality.
Let’s briefly go through the individual components of our “experimental subject” so that assembling a computer with our own hands will present itself to us more holistically. Using the link below, open a new window with the top image, which will contain numbers (from 1 to 10), and on this page below we will give a brief description of each of the components.
- At number “1” we have -
- number “2” - PCI Express standard
- “3” - cooling system (aluminum radiator and cooler for heat dissipation)
- “4” - itself for the socket (connector) LGA 775
- “5” - two DDR2 modules
- “6” - IDE cable (for connecting or CD-DVD of the old standard)
- "7" - DVD-ROM
- "8" - computer
- "9" - hard drive ( HDD) SATA standard
- “10” - cable (for connecting a hard drive or CD-DVD standard SATA)
- “11” - floppy disk (disk drive) and its data cable
Naturally, all this “stuff” needs to be packed somewhere. For this we need a good one.
Assembling a computer with our own hands occurs in the following sequence: first we install (actually screw) the motherboard into our case, install the processor and its cooling system into it, and then we connect and secure the remaining necessary elements to this “foundation”.
Another link, which in a separate window schematically shows in what sequence the computer should be assembled.
So, at the initial stage of self-assembling a computer, we need to install the motherboard into the case. Regarding it, there may be the following recommendations: the case should be spacious enough so that we can easily install all the components we need into it.
The board is attached to it using screws that are screwed into special mounting sleeves (metal hexagons). They come complete with the case.
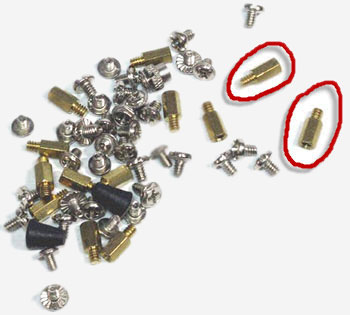
The bushings are screwed into special holes on the back wall of the computer (with inside its right side wall), the motherboard is placed on top of them and secured with screws.
Hexagons are needed in order to create a gap between the board itself and the metal surface of the system unit (to exclude the possibility of electrical contact between the soldering of elements from the rear surface of the board and the case). Such contact may well cause a short circuit () and damage the electronics. The more bushings you manage to use, the more secure the fixation will be (look at the number of mounting holes on the case and the board itself).
Tip 1: remember, mounting sleeves for the motherboard must go complete with computer case . If you buy a case, then only with them. This is important because these fastening elements vary in height and differ in the width of the thread at the base. With others you simply cannot install the fee!
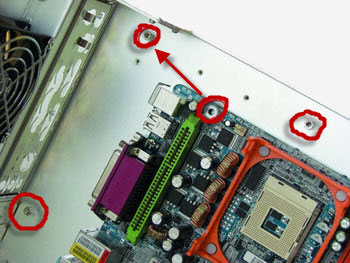
Tip 2: If you plan to change the motherboard (you buy it secondhand or in a store), then be sure to make sure that it comes with a panel with holes for connectors? When assembling the computer with your own hands, you will need to install the socket on the back wall of the system unit. Pay attention to the photo below:
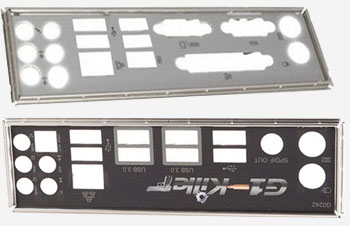
Please note that the location of the holes for the connectors is different for each batch of boards, and if you are not sold the panel corresponding to the motherboard right away, then it will be very difficult to get it separately later.
The panel is installed in a specially designated place. This needs to be done before placing the motherboard in the case.
Orient it correctly in relation to the main connectors and install it by pressing firmly with your fingers. The plug should fit tightly and lock into place with a characteristic click.
Below you can watch a video that clearly demonstrates the entire process:
We continue assembling the computer with our own hands. After we have secured the motherboard in the case, we need to install it in the slot (connector) of the board CPU. Let's look at the picture below and comment on some points.

The installation procedure in the slot is as follows: press down and bend the clamping latch to the side (indicated in the photo above as number 2). To do this: we snap it out from under the special hook (number 1 in the photo), lift the metal frame (number 3), which secures the processor in the socket. After this, all we have to do is install the CPU itself (indicated by the number 4).
Attention! Take a good look at the processor and determine on which side the “key” is located (a corner specially cut off on one side or two small indentations on the sides). The socket has the same corner or protrusions in the appropriate places. When installing the processor into the socket, they must be aligned with each other.
When the installation is completed, we repeat all the steps in the reverse order: place the fixing cover (No. 3) on the processor, lower (with a certain force) the pressing metal rod (No. 2), move it slightly to the side at the lowest point and thread it under a special hook on the side No. 1.
To learn how to install an old PGA processor (believe me, you need to know this), watch the video below:
In the process of assembling a computer ourselves, we need to be able to install a cooling system (radiator with fan). It should be noted that now we are installing a cooling system for a product from Intel; in the case of AMD, it looks a little different.
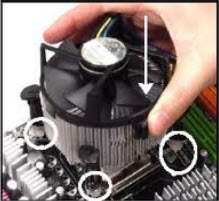
In theory, it looks like this: at the four corners of the processor slot there are special holes in the motherboard, and it is through them that the entire air cooling system is attached.
Accordingly, there are four special plastic clips on the radiator, which, when pressed, press the radiator against the processor and, at the same time, fix the entire structure on the motherboard.
Here's what a close-up of the cooling system looks like for our CPU that we just installed:

And this is one of its latches on the board in close-up and we snap it into place.
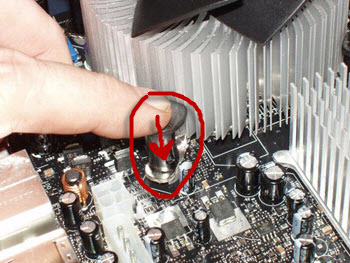
Pay attention to the photo below:

Do you see the slots (grooved indentations) on each of the four plastic clips? The position when the recesses are located perpendicular to the radiator fins corresponds to the closed state of the latch-clamp (in the photo above all the latches are closed). This is exactly the position they should all be in before installing them on the board! Remember this!
The arrows indicate the direction in which you need to turn (you can do this with a screwdriver) the latch in order to move it to the open position.
Advice: After placing the heatsink clamps strictly above the holes around the mounting slot (you need to ensure that the plastic tips of the fasteners “sink” into them a little), you need to simultaneously smoothly but firmly press two clamps located diagonally from each other (until they click and are securely fixed in the board ). Then we carry out the same procedure for the two remaining clamps. All! Cooling system installed!
It’s much easier to show the whole process once in a short video than to describe it in words, so watch the video below:
If the need arises to remove the cooling system, then simply move all four latches to the “open” position and pull the structure towards you (it can be removed quite easily).
Advice: Some people find it more convenient to install a computer cooling system before that How the motherboard will be secured in the case. This makes it possible to clearly see what snaps where and where, and to measure the force applied to securely fix the elements.
The design for mounting the cooling system on processors from AMD is somewhat different from what we can see in products from Intel. It consists of two components: a plastic base frame, securely fixed around the processor socket, and a radiator with a fan, which are attached (snapped) onto this frame. Here, for example, is what it looks like for the AM3 processor socket:
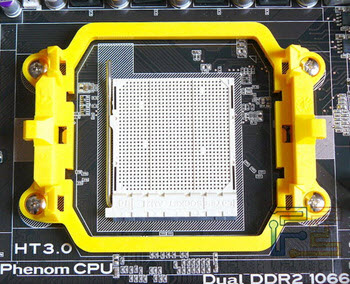
As you can see, with this approach, the pressing pressure force from the radiator is first transferred directly to the plastic base (frame) and only then is evenly distributed over the PCB of the motherboard itself.
By the way, when removing cooling systems from motherboards running Intel processors, quite often you have to observe how the very base of the motherboard (textolite) has a visually noticeable curvature (from the constant pressure on it of the cooling system radiator), which is attached directly to the board itself . This is bad and could potentially lead to micro-cracks in the very core of the motherboard.
Assembling a computer with your own hands, in particular, installing a processor and motherboard, often involves installing third-party cooling systems on the processor, which can weigh half a kilogram, or even more! In this regard, to prevent the motherboard from deflecting at the mounting location, they come with a special metal cross, which is located on the back side of the board (under the processor).
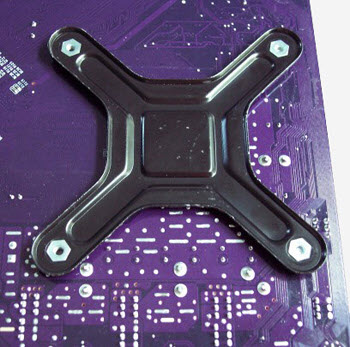
This additional fastening is called the word “Backplate” and it serves, as we have already said, to remove unnecessary physical activity from the motherboard. The only caveat of this design is that it must be installed before fixing the board in the computer case.
Don't forget: a properly installed cooling system can prevent future problems!
When assembling a computer ourselves, we need to remember to do one more thing: from the cooling system fan there is a small (3 or 4) pin wire that supplies power from the motherboard to the fan so that it spins and dissipates heat. We need to find the corresponding connector on the board (usually 3-4 pins next to the processor socket) next to which there is the inscription “CPU_FAN” and connect our power cord to it.
The most important components and cooling system are installed. Now we need to install all the remaining devices. And since assembling a computer with your own hands is quite a responsible and painstaking task, then, for the general readability of the text, let's continue our description on the next page.
In conclusion (to better secure the material), you can watch a video on how to install a processor and cooling system on products from Intel:
Probably every more or less advanced user has wondered how to assemble a computer themselves. It's cheaper and more reliable. And every second person drove this thought away from himself, because he thought that the process of assembling a computer on his own was very difficult. But don’t be afraid of difficulties, especially step-by-step instruction described in the article will help overcome fear. Moreover, modern computer components are equipped with a protection system. Each component can be installed only the right way, it won’t work any other way. As the saying goes: “Fear has big eyes.” So let your eyes be afraid and your hands do the work.
First, let's talk about the benefits of building a computer yourself. The most important thing is that you will know for sure that your computer has completely new, high-quality components, you will know everything about the characteristics of the computer and at any time you will be able to increase the memory or performance of the computer. Not all sellers are honest; there are also those who are ready to pass off a single-core computer as a dual-core one and hide some of the computer’s shortcomings. Moreover, by purchasing a finished computer, you agree that you will not open it yourself (during the warranty period). This means you won’t be able to make any transformations. Otherwise, you will lose your warranty. Also, if your self-assembled computer breaks down, you will be able to identify and replace the weak link yourself. While a store purchase will need to be taken to a service center and first wait for the diagnostic results, then they will repair it.
We hope that all of the above has overcome your fears, and now you can get down to business. To assemble a computer yourself, you need to have:
- CPU;
- Motherboard;
- Case with power supply;
- CPU cooler;
- Video card;
- HDD;
- RAM;
- Drive.
- Phillips screwdriver.
And not just have all of the above in stock, but also try to ensure that all the components fit together.
So, the first question that needs to be resolved right now is: “What do you need a computer for?”
For all users, the computer performs different tasks: some play all day long, some work on the Internet, some work with 3D programs based on the specifics of their specialty, etc. Naturally, they all need computers with different capabilities. Let's try to figure it out.
The following computer components are suitable for solving simple problems: a 512 MB video card, two 2 GB RAM modules DDR type-1333, 512 GB hard drive (7200 rpm, 16 MB cache buffer), Intel Pentium G620 processor or AMD Athlon II x3 440, H61 Express motherboard for Intel or AMD 770 processor for Athlon, 400 W power supply. Price about $400.
Components for a mid-priced computer: two 2GB RAM modules of DDR 1600 type, 512 MB video card (for example, GeForce GTS 450 512Mb), 1TB hard drive (7200 rpm, 16 MB cache buffer), Intel Core processor i3 2100 or AMD Phenom II x4 955, Z68 motherboard for Intel processor or AMD 870 for Phenom, 450 W power supply. Price about $600. The result will be a computer capable of performing many tasks, including supporting a bunch of modern games.
To solve problems that require enormous resources, the following components are required: two 4GB RAM modules of DDR-1866 type, a 1GB video card (for example, GeForce GTX 560Ti), a 60GB SSD hard drive + 2TB 7200 rpm, a 16MB cache buffer , Intel Core i5 2500K processor or AMD Phenom II x4 965, Z68 motherboard for Intel processor or AMD 990FX for Phenom, 550 W power supply. Price about $1200.
Have you decided on the purpose of your computer? It's time to choose a case with a power supply.
The case can be selected according to several parameters: size, material, ease of installation.
It is recommended to purchase aluminum cases, which are distinguished by their lightness and thermal conductivity. In addition, steel cases have appeared, which have advantages over aluminum cases in resistance to deformation.
The range of housings on the market is very wide. There are surprisingly compact Barebone cases, medium-sized MiniTowers, MidiTowers and huge BigTowers.
Surprisingly compact Barebone cases are suitable for lovers of minimalism. Barebone also has the advantage that it comes straight out of the box. motherboard, video card and processor. All you have to do is install RAM and a hard drive. It is important that assembled computer in the Barebone case it operates almost silently.
It is not recommended to buy medium-sized MiniTower cases, since the ventilation system in them leaves much to be desired. And some components are generally difficult to find, since they simply do not fit into the case. But, for example, MiniTower is perfect for office use.
MidiTower cases are the most common. They have a good ventilation system and ease of installation.
The largest BigTower cases for the most powerful computers.
It happens that cases are not equipped with a power supply and you need to select and install it yourself.
Selecting and installing the power supply
There is no need to skimp on the power supply. Since the stability of your finished computer depends on it. It is recommended to buy a power supply at an average price of 1,500 rubles. When purchasing, pay attention to the weight of the device. The power supply must be heavy. If it is light, it most likely has a poor cooling system. Next you need to decide on the power of the power supply.
Computers designed for gaming and working with 3D graphics require a power supply power of 500,550,600 W. A case with a similar power supply will cost you $50 or more.
Computers designed to run office applications and surf the Internet do not require such a lot of power. You can get by with a power supply with a power of 400.450 W. A case with this power supply will cost you $30 or more.
The required power of the power supply can also be calculated. Link to power supply power calculator
To do this, simply follow the link, select your computer components and their quantity from the drop-down lists. Then click the "Calculate" button. The calculator will display the power value with a small margin (30%). All that remains is to choose a power supply with a power close to the calculated one.
The power supply is usually located in the upper rear corner of the case. To install it, you simply need to screw the unit to the rear wall of the case.
Now the case with the power supply has been selected and now it’s time to select and install
The processor, RAM, and input/output controllers are installed on the motherboard. The motherboard coordinates the operation of these components.

The picture shows the motherboard. 1-power supply for the processor, 2-socket for the processor, 3-north bridge, 4-PCI-EXPRESS connector for video card, 5-PCI connector for expansion cards, 6-slots for RAM, 7-connector for power connection, 8- IDE connectors for hard drives and optical drives, 9- south bridge, 10 – SATA connectors for hard drives and optical drives, 11 – USB connectors.
- The south bridge is responsible for supporting the optical drive, hard drive, audio adapter, etc.
- The north bridge is needed to control the video card and RAM.
When choosing a motherboard, you should consider the number of memory slots for the possibility of subsequent upgrades.
Let's start installing the motherboard:
- We unscrew the front cover of the system unit and take a closer look at where to place the motherboard;
- We get rid of the plug on the case. We replace it with the plug that comes with the motherboard;
- We screw the bolts into the system unit, into the places where the motherboard is supposed to be attached (the bolts usually come with the case);

- We insert the motherboard, tighten the screws;

- Connect power to the motherboard. We connect the four-pin power connector from the system unit to the ATX_12V connector of the motherboard. We connect the twenty-four-pin power connector from the system unit to the ATX motherboard connector.

- We connect the case wires PWR-LED, PWR-SW, RESET-SW, SPEAKER, HDD-LED to the F_PANEL connector to turn on, reboot, and diagnose computer malfunctions, respectively.
- HDD-LED– a red diode on the front side of the case (the color scheme for marking wires is mainly used, red-white)
- PWR-LED– green diode, network indicator (green-white)
- PWR-SW– on/off button (orange-white)
- RESET-SW– the PC reset button (black-white) has reverse polarity.
- SPEAKER– system speaker (red-white, often yellow-white)


We connect the white wire to the minus, the colored wire to the plus. Read the instructions for the motherboard. The boards are different - the connection of these wires is also different.
If you still don't understand what we're talking about we're talking about and you think that you simply cannot cope with these tasks, then I would recommend that you call a computer repair specialist at home.
With the motherboard installed, it's time to move on to installing the processor.
Processor Installation
The processor performs all the basic calculations in the computer and processes information.
Decide which processor you will install: Intel, AMD and others.
You should also decide on the number of cores. For a home computer, a dual-core processor of average power is suitable. An engineer or designer's processor requires a quad-core processor.
Whatever processor you choose, make sure it is compatible with your motherboard socket. A socket is a place to install a processor on the motherboard. This information can be found on the motherboard box.
For example, Intel processors Compatible with the following sockets: Socket LGA775, Socket LGA1156, Socket LGA1155, Socket LGA1366.
AMD processors are compatible with the following sockets: Socket939, SocketAM3, SocketFM1, SocketAM3 plus, SocketG34.
Almost all modern processors from this company are based on socket 755 (Socket LGA775). The advantage is already noticeable in the absence of legs on the processor. Consequently, the risk of breakdown and careless installation of the processor on the motherboard is minimal.
Let's get on with the installation. To do this, you need to open and lift the socket lever - a metal rod parallel to the slot. Remove the processor from its packaging without touching the bottom. Remove the black protective plate. Install it into the socket. For convenience, there are arrows on the motherboard and on the processor itself; they indicate which side of the processor should be placed in the socket. Make sure the directions of the arrows match.

Close the fastening plate and lower the socket locking lever.
Installing AMD processors
The installation principle is the same. The only difference is that the processor has legs. The yellow arrow on the processor and on the motherboard again simplifies the installation process.

The processor is installed.
Installing a CPU cooler
A cooler is necessary to cool the processor during operation. It is important that the cooler produces as little noise as possible when operating. The operating noise of a good cooler fan should be in the range (20-40) dB. Moreover, in the specification it is necessary to look at the processor power it can cool.
Before proceeding directly to the installation, make sure that the cooler is compatible with the motherboard socket. Some processors are sold complete with a cooler (cooling system).
At the corners of the socket on the motherboard there are four holes for the cooler legs.

But before installing it, make sure there is thermal paste on the cooler (in the picture - White spot in the center). The cooler consists of a radiator and a fan. The heatsink touches the processor directly and absorbs heat, while the fan removes heat from the heatsink itself. This cooling scheme requires rapid transfer of heat from the processor to the radiator. For this purpose, thermal paste is applied to the radiator. It provides a tight connection between the heatsink and the processor and has good thermal conductivity. If there is no thermal paste, you need to apply it in a very thin layer of 1mm.

Install the four cooler legs into the holes on the motherboard. Press the legs one by one until you hear a characteristic click. Make sure the cooler is securely fastened. This will be indicated by the switch. If the switch is in the closed position, the leg is securely fastened; in the open position, it is not fastened. Connect the wire to the CPU_FAN connector.
That's it, the cooler installation is complete.
Let's move on to installing RAM
RAM is rewritable memory. Program and application data is temporarily stored there.
The connector slot on the motherboard must match the type of RAM module (DDR, DDR2, DDR3). To increase the performance and speed of the computer, it is recommended to install two RAM modules. It is worth remembering that in this case the module manufacturer must be the same. And in terms of characteristics they should be the same. The bandwidth of the motherboard, processor and memory module must match.
The clock frequency of the RAM module must be commensurate with the frequency of the system bus of the motherboard. Even if the module frequency is higher than the bus frequency, the actual memory frequency will still be equal to the bus frequency.
Let's proceed directly to the installation. Push the latches to the sides on the motherboard slot:

Place the memory in the slot. Apply gentle pressure along the edges until the latches click into place.
The slot on the motherboard has a partition that corresponds to a notch on the memory module. It is impossible to make a mistake with the installation.
Installing a video card
A video card is needed to convert the data array into an image displayed on the screen. Moreover, modern video cards are also needed for processing and storing graphic data. The speed and quality of the output image depends on the parameters of the video card. This is very important when gaming or video processing.
The power of the video card should match or be slightly less than the power of the power supply.
The video card is inserted into the PCI Express 16x slot (under the processor). Install and press until it clicks.
The “skeleton” of the computer has been assembled.
Installing a hard drive
The hard drive stores the operating system, user information, and programs.
The hard drive and motherboard connectors must match. For example, Serial SATA 6Gb/s. The throughput of a hard drive with a Serial SATA 6Gb/s connector is 6Gb/s.
- Connect the SerialATA cable to the motherboard's SATA connector.
- We connect the SATA adapter to the hard drive, then connect the Molex power cable from the power supply to the adapter.

The hard drive installation is complete. Let's move on to installing the optical drive.
An optical drive is a device for reading information from disks or writing information to disks. The following types of drives are currently sold on the market: CD-ROM, CD-RW, DVD-ROM, DVD-RW and Blu-Ray.
- The CD-ROM drive is designed for reading CDs only.
- A CD-RW drive allows you to both read and write to a CD.
- The DVD-ROM drive is designed for reading CDs and DVDs.
- The DVD-RW drive allows you to read information from CDs and DVDs and write information to CDs and DVDs.
- Blu-Ray drives are designed for large-capacity discs. Such disks, and the drives themselves, cost a lot of money.
It is preferable to choose a DVD-RW drive so as not to limit yourself in what you can do.
A drive is necessary in a computer, even if you have long switched to flash media. After all WINDOWS installation comes from disk. In addition, you can free up your computer's memory by dumping the necessary files onto disk for the time being. Download distribution kits for games. And you can just watch a movie.
When choosing an optical drive, pay attention to its speed of reading and writing discs. In order for the drive to read and write to all disks, a speed of 48x is required.
We place the drive in the space provided for it in the power supply case. We fix it with screws to reduce the influence of vibration and noise. Connect power to the optical drive. Next, we connect the drive directly to the motherboard with a cable.
Closing the housing cover
All that remains is to connect the monitor, mouse, keyboard, speakers to the system unit, connect the power cords to the monitor and the system unit.
When you connect your computer to the network for the first time, you should hear a squeak, symbolizing that all components are properly connected. Information about the processor clock speed, amount of RAM, operating modes and storage capacity will appear on the screen. Nothing else can appear, because the operating room WINDOWS system not yet installed.
If after reading the article you still have questions about how to assemble a computer yourself, the video will explain everything to you in detail:
Now we are assembling a computer ourselves, having overcome all fears and doubts and having figured out why it is more profitable to assemble a computer ourselves. Having previously figured out why each of us needs a computer. We learned how to select components and calculate the required power of the power supply. We figured out the purpose of the computer components. We selected the optimal components in each price category. And let the computer you assembled with your own hands be a useful assistant at work or at home.
Assembling a new computer is quite a task, because everywhere you look, store shelves are simply bursting with all kinds of PC components. How to choose among this squeaking, buzzing, winking light bulb mass what is worthy of becoming “ internal organs» your future “family member”? And so that these “organs” are compatible with each other?
Some people think that it is better to entrust the choice of filling for the “iron pet” to specialists or to purchase a system unit already assembled, but we are not looking for easy ways. Assembling a gaming computer is not such a difficult task when you have a helper. Today we will learn how to use the free web service “Online PC Configurator” of one computer store and create 3 assemblies for games in 2017: up to 30,000 rubles, up to 50,000 rubles and up to 100,000 rubles. Believe me, even a second grader can do it!
How to Determine What Hardware You Need
The selection of components for a PC is usually followed by choosing the motherboard and other parts, taking into account compatibility. When assembling a gaming machine, I advise you to change this order a little, because...No, I don’t urge you to sweep powerful and expensive video cameras of the latest generation off the shelves. To buy exactly what will meet your needs and not spend too much, it’s better to do this:
- Make a list of toys that you are going to play on your new computer (after all, we are building a machine for games).
- Go through the official websites of the selected games and write down their system requirements. It is also advisable to look at resources where gamers communicate and take a closer look at their recommendations for choosing hardware. Sometimes these tips are more practical than those from the developers.
- Take the highest system requirements as the basis for the future build.
The key link when selecting components for a gaming PC is the combination of processor + video card (sometimes + monitor). We select the rest for them.
How to properly distribute your budget
The budget distribution survey is no less important than correct selection iron, because when putting together an assembly there is always a temptation to add something extra to it, and money tends to run out unexpectedly.The set of components for the system unit of a gaming computer includes 7-15 items. Our task is to divide them into 3 groups according to degree of importance:
- A key link in the future assembly – processor and video card. These are the most important and usually the most expensive devices.
- Equipment of the 2nd stage– what is necessary for the operation of a PC and what you cannot do without. This includes: motherboard, drive for installing the OS and programs (optimally SSD), CPU cooler and power supply. The power supply is one of the last to be included in the assembly, but we reserve funds for it in advance, since “”.
- Equipment of the 3rd stage. This group includes what you can do without if you don’t have enough money (in order to buy more later) and what you can save on: RAM (instead of 32 GB, 4-16 GB is enough for the first time), a second drive, an optical drive, a discrete sound card , peripherals, system unit case. As for cases: if the design with bells and whistles and the famous brand, which mainly determine their cost, are not particularly important to you, buy a regular inexpensive case that is suitable in size.
Devices of the first and second stages are 80-90% of your costs. Cutting the budget for them is extremely undesirable, because this is what will bear the main burden “on its shoulders” for the next 3-5 years. If the optimally fitting part seems too expensive to you, it is better to look for it in other stores.
When choosing equipment of the third stage, do not go for cheapness. Savings should in no case concern the quality side of devices! Only quantitative.
Economy gaming computer for 30,000 rubles (without peripherals)
Well, we've sorted out the theory, it's time to start practicing. The free one I mentioned above belongs to computer store"DNS". This is not an advertisement, just this service seemed to me the best among analogues specifically for untrained users. It does a good job of checking the compatibility of devices based on various parameters, has an automatic calculation of the cost of goods, and sometimes provides useful hints. In addition, it is very easy to use, and the finished assembly can be saved in your account on the store website. There is no need to buy anything after this.Before the build starts, the service page looks like this:

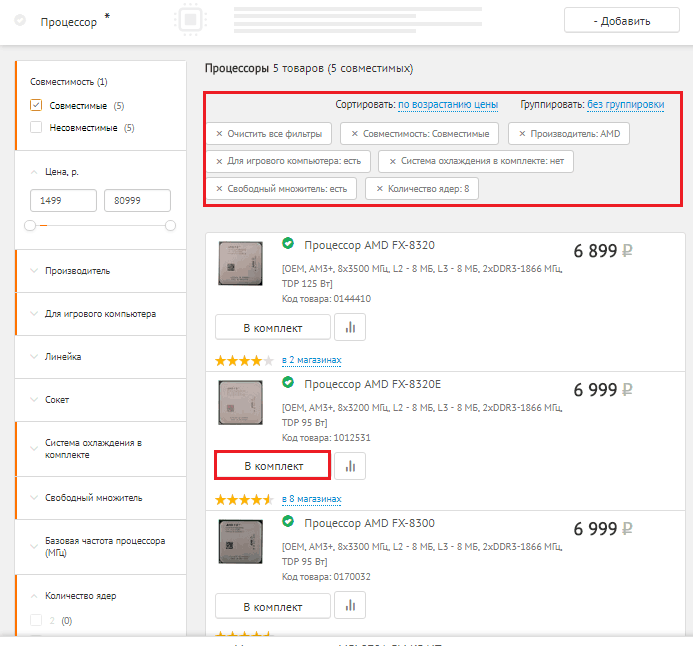
Let's start by including two key devices (how to do this, I think, is clear to everyone). The first is the processor. The main parameters for choosing a product (filters) are collected in the column on the left. Here are the criteria I set to select the models that suit me:
- Manufacturer: AMD. Since we are building a budget gaming computer, I give preference to this family.
- For a gaming computer.
- With a free multiplier and 8 cores.
- No cooling system included.
The configurator selected 5 processors for me at prices ranging from 6,900 rubles to 11,300 rubles. The cost of the first three is almost the same, the performance is the same, so I will choose the less hot and most energy efficient model AMD FX 8320E. To add it to the assembly, press the button " Included».
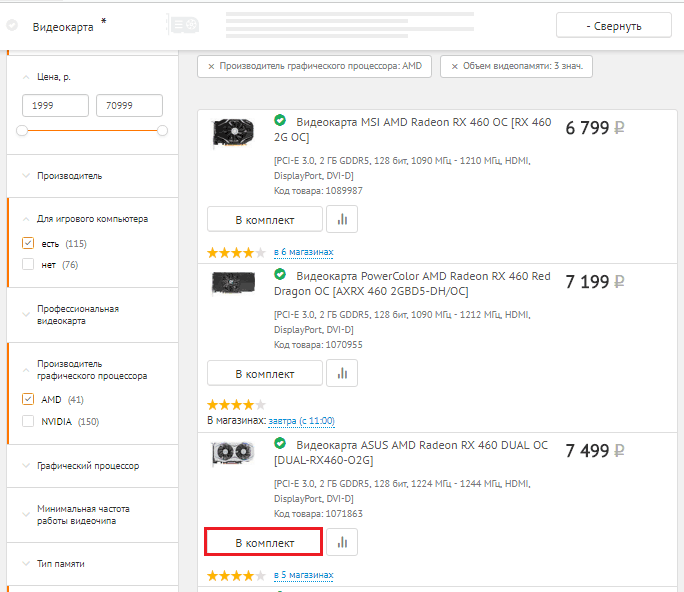
- For gaming PC.
- Manufacturer: AMD.
- Video memory capacity is 2-4 GB.
An automatic filter is also included here " Compatible" It is present in every tab, but sometimes it is worth turning it off. I'll tell you why a little later.
The service selected 14 models. By brief description In the catalog it is difficult for me to understand how they differ. To see all the characteristics of the device I like, I will double-click on its name. This will open a product card for me with a detailed description and pictures.
To return to the configurator I will click " Back to catalog».
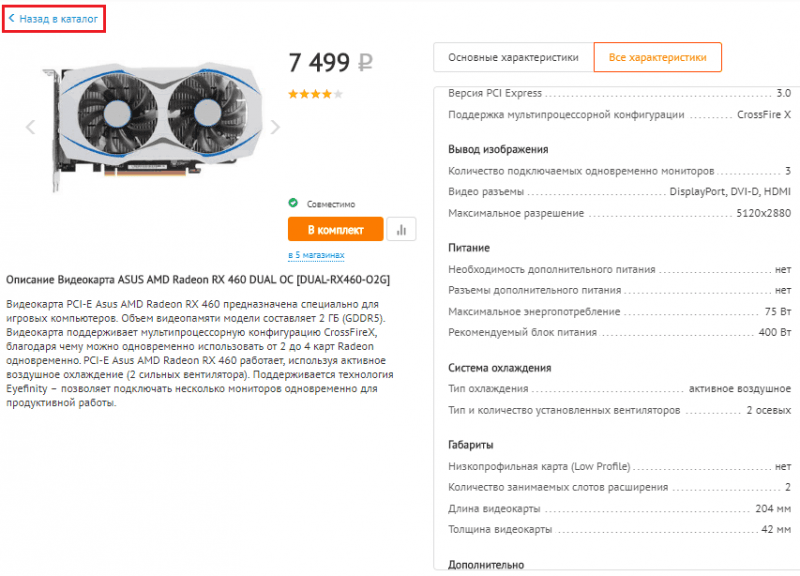
Having looked through all the models that suit me in terms of parameters and price, a not too expensive one is sent to the kit ASUS AMD Radeon RX 460 DUAL OC. By the way, it does not require additional power.
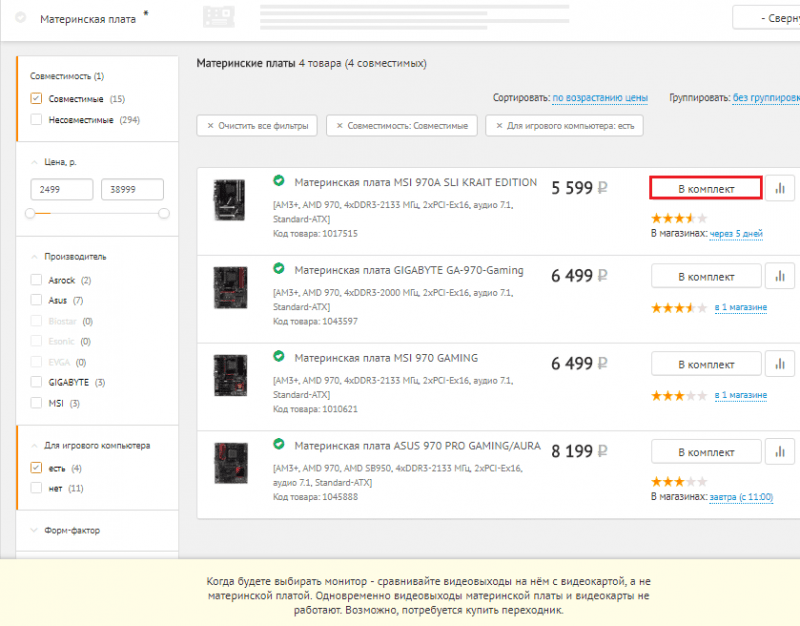
So, the key components have been selected, let's move on to the devices of the second group. Next up is the motherboard.
The configurator found 4 models for me that were compatible with the processor and belonged to the gaming class. After comparing their characteristics, reading reviews and reviews, I send them to the assembly MSI 970A SLI KRAIT EDITION, since, all other things being equal, it is slightly cheaper than the others.
It's time to choose a cooler. My criteria:
- Power dissipation – from 100 W (I focus on the TDP of the processor – 95 W).
- Base material – copper.
- Type - tower.
- Connector – 4 pin.
Socket AM3+ compatibility is automatically set. The choice fell on inexpensive DEEPCOOL GAMMAXX 200T.
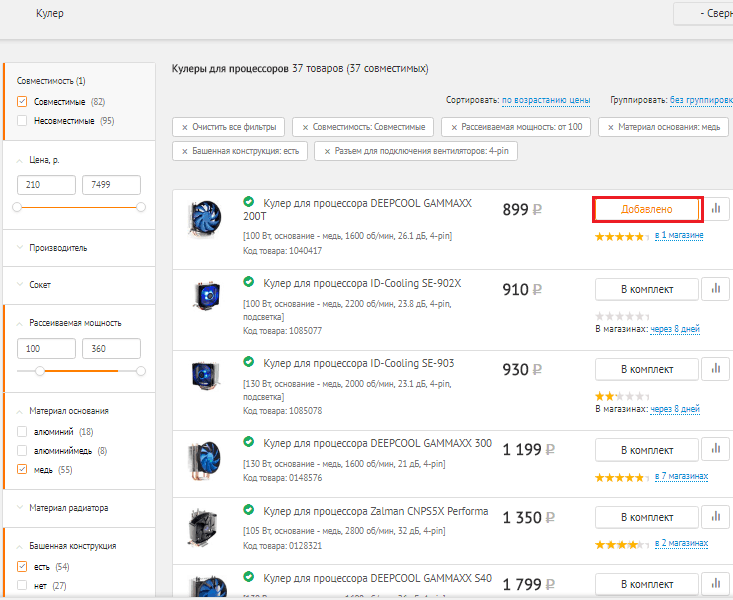
I wonder if I'm on budget? At the top of the configurator the total cost of my potential purchases is displayed. There are about 9,000 rubles in stock, so so far everything is fine.

What is this red-green stripe next to the price and why does it say “Compatibility Issues” and “Non-Optimal Power Consumption”? It turns out that this is also normal, because I have not yet included the power supply and case in the assembly. If the problem notification (red icons) remains after adding all parts of the system unit to the kit, then you have made a mistake somewhere.
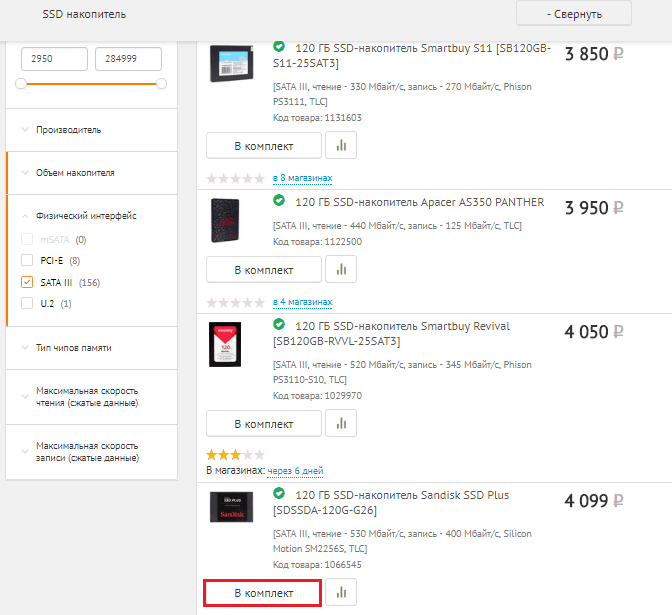
- Capacity 120-128 GB.
- Interface SATA-3.
I'll look at other characteristics in the descriptions of the models.
I’ll take the fastest one available to me at a price - Sandisk SSD Plus. 120 GB is quite enough for the first time. Later I will buy an additional hard drive to store files.
By the way, if you did not add a PC case to the package, the configurator will consider the SATA interface incompatible with your devices. Why this was done, I don’t know. To avoid this distraction, simply uncheck the "Compatible" box.
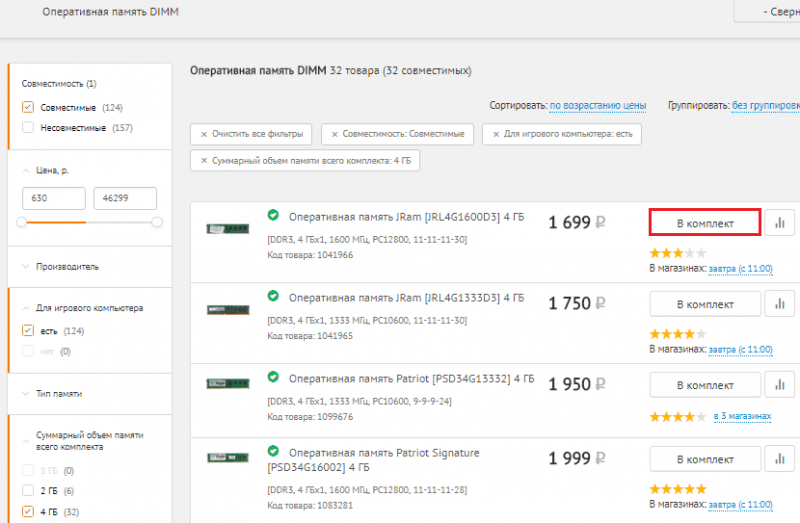
The second group is almost finished. There is still a power supply left, but I will choose it a little later. First the RAM. I plan to equip my computer with 8-16 GB of memory, but since I no longer have the funds for this, I will buy 1 4 GB stick for now. Let it be a memory JRam– DDR3 with a frequency of 1600 MHz.
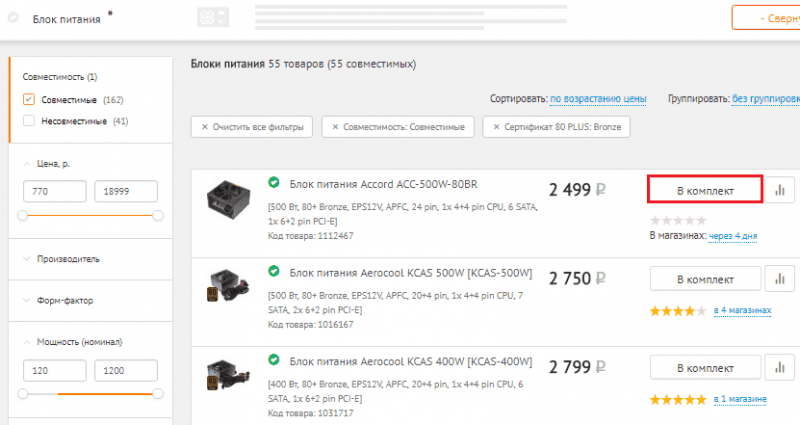
The total power consumption of my current build was 244 watts. The characteristics of the video card indicate the recommended power of the power supply - 400 W. You also need some reserve for possible upgrades and overclocking of the system. Accordingly, the power supply for the PC being assembled must be at least 450-500 W. And of course, it must be of high quality and reliable.
Following these wishes, I am sending a 500-watt Accord ACC-500W-80BR.
In addition to performance, I pay attention to the presence of all the required connectors (the main thing is 4+4 or 8 pin for powering the processor) and an 80+ Bronze energy efficiency certificate.
Well, all that remains is to find a cozy “house” for all this stuff. An expensive fancy “cottage”, alas, did not fit into my budget plans, so I’ll settle on a simple steel case AeroCool V3X Advance. The main thing is that it suits me in size and the presence of the necessary parts: shelves for 2.5-inch drives, a cutout in the area of the CPU cooler, 2 built-in fans and a USB 3.0 connector on the front side.
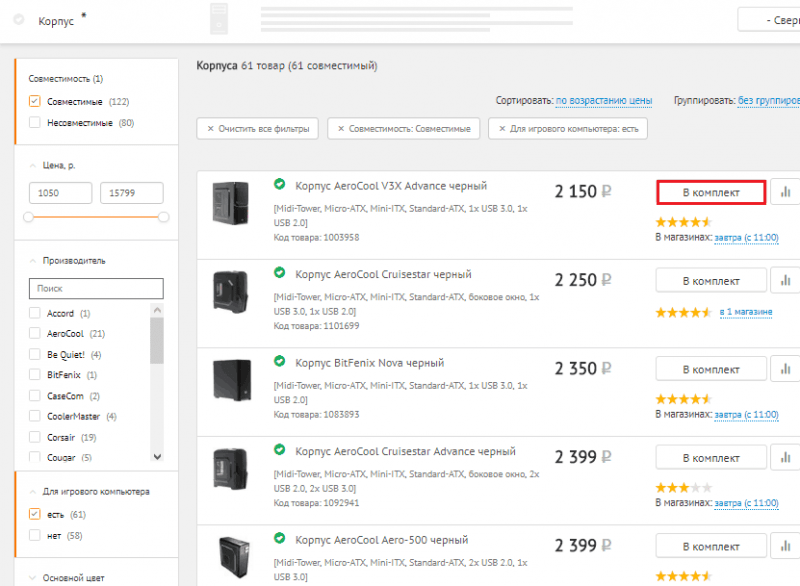
The configurator shows that all selected devices are compatible, and their total cost was 31,843 rubles.

It turned out to be a slight overrun, but this is an approximate price, because it is not necessary to buy all the hardware in one store. It may be sold cheaper in other places.
Now I can save the configuration in my personal account (registration on the DNS website is required) in order to be able to return to it again (track price changes), edit and show it to other people (share a link).
Mid-budget gaming PC for just 50,000 rubles (without peripherals)
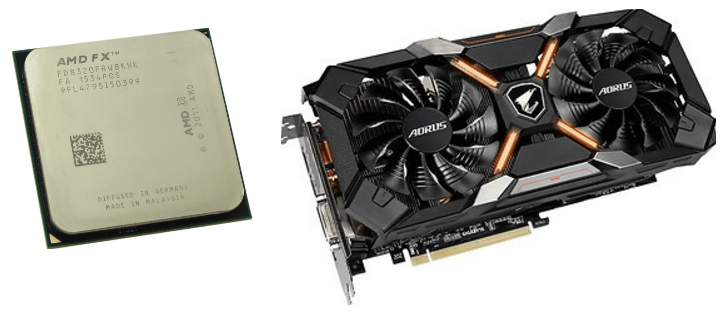
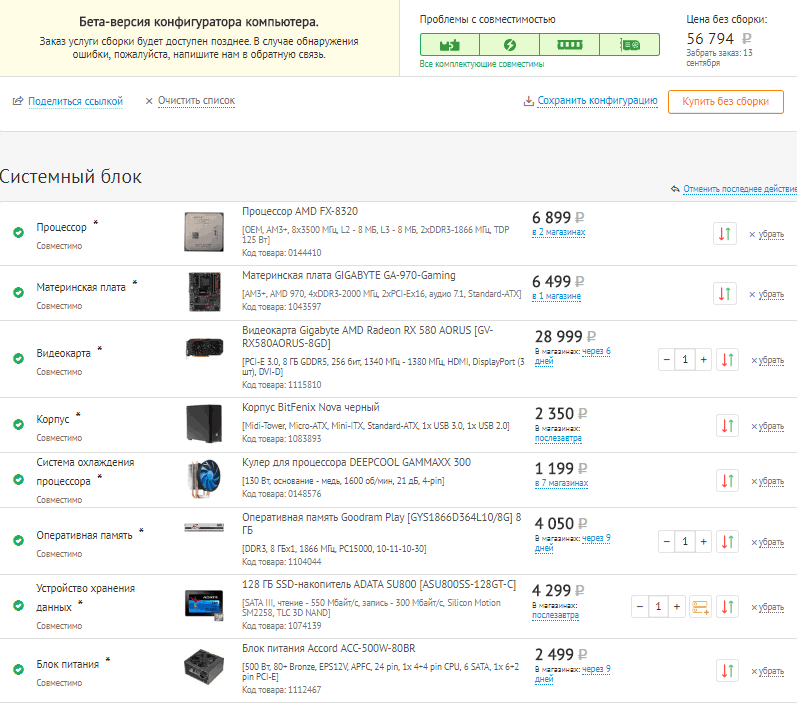
Let's consolidate the skills we've acquired and put together another gaming PC build worth about 50,000 rubles. This time without detailed explanations.Let's start with the processor + video card combination. Since you can’t get away with this amount either, let’s turn again to the AMD line and throw a CPU into the kit AMD FX-8320(compared to the FX-832E, it withstands high heat better and more stable). It will be paired with a video card Gigabyte AMD Radeon RX 580 AORUS – a decent gaming model with 8 GB of memory on board.
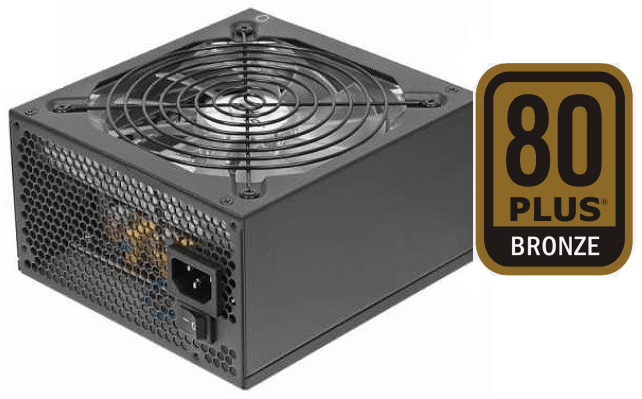
Next we select devices of the second stage. This is a gaming motherboard based on AMD 970 chipset GIGABYTE GA-970-Gaming, cooler DEEPCOOL GAMMAXX 300 at 130 W and SSD ADATA SU800 for 128 GB. Let's take the same power supply as in the previous assembly. Its power is just enough for all equipment, taking into account overclocking, plus the kit includes all the required connectors and a bronze certificate 80+.
The final chord is the RAM and the case. I throw in the set 1 RAM module with the desired parameters at the lowest price. This Goodram Play with a capacity of 8 GB and a frequency of 1866 MHz. In the future, the memory capacity can be increased to 32 GB. And all this will “live” in the “house” BitFenix Nova. This case is also not particularly fancy, but it has everything you need. Its main advantages are the lower placement of the power supply (important, since the processor and video card here are much hotter than in the previous assembly, and the power supply needs cold air) and the presence of a compartment for laying wires behind the rear wall (the fewer wires inside, the better the heat sink + it's comfortable).
As a result, goods amounted to 56,794 rubles. Also an overspend, but gaming video cards are expensive these days.
Let's go for a walk! Gaming system unit for 100,000 rubles
With a hundred thousand rubles at your disposal, you can afford not to save. With this amount we will assemble a full-fledged computer for the most resource-intensive toys and, perhaps, there will still be funds left for additional goodies.So, here's what I got:
- Processor + video card: Intel Core i5-6600K And MSI GeForce GTX 1070 AERO OC.
- Motherboard: MSI H270 GAMING PRO CARBON(Intel H270 chipset).
- Cooler DEEPCOOL GAMMAXX 200T.
- SSD PlextorM8SeY with PCI-E interface and read/write speed of 2400/1000 MB/s.
- power unit Seasonic 550W(80+ Gold).
- Memory Goodram Play– DDR4, 2 modules of 8 GB, frequency 2133 MHz.
- HDD Toshiba P300– capacity 2 TB, speed 7200 rpm. It was not present in previous builds.
- Optical drive BD-RE LG BH16NS40 with the function of reading and writing 2-layer Blu-ray discs. It was not present in previous builds.
- Frame AeroCool Aero-500 with fan control unit and the ability to install liquid cooling.

The cost of the configuration was 100,343 rubles. Completely done! The only thing missing was discrete sound, but even without it it turned out very well.
I will not claim that the above assemblies are “ultimately true”, because they are compiled from the assortment of one store. Most likely, they can be supplemented and improved without going beyond the allotted budget, but to do this you need to browse online stores, read reviews, look at test results, compare and analyze the experiences of other users. However, this is what you need to do before purchasing; fortunately, the service allows you to save your assembly in your personal account, but, unfortunately, only one.If you do not have experience in selecting computer components yourself, do not rush to place an order immediately. First consult with knowledgeable people(not from among the store employees), and only when the assembly is approved by several experts, buy it.
Also on the site:
Do-it-yourself construction set for adults: how to assemble a gaming computer without being a specialist updated: September 5, 2017 by: Johnny Mnemonic
The computer configurator with compatibility check allows you to quickly assemble a system unit with the user’s needs technical characteristics. Using our online designer, you can easily assemble a reliable office machine, a home multimedia system unit, or a powerful gaming configuration.
Computer assembly online
Nowadays, like many years before, assembling a computer from independently selected components is popular. This good opportunity choose what you want. Nothing limits you; there are hundreds of options available for assembly, among which there is sure to be one you like.
Our online store offers the opportunity to assemble a computer online through the configurator. In it, this process is presented in the form of categories of components, from the processor to the power supply. Each category contains an expanded range of models with descriptions of characteristics for ease of selection.
To simplify the selection of components, the configurator has a compatibility filter for the main components of the assembly. For example, by selecting a specific processor, the following components are automatically filtered by compatibility. Also, you will be presented with a choice to install operating system. After completing the assembly process, you receive the final result based on three parameters: price, technical data, rendered image. After placing an order and confirming it by phone, our specialists assemble this kit and check its functionality.
The advantage of this method of purchasing a system unit is that you not only choose the components you want, but also have the opportunity to choose the brand or manufacturer of the part.
Having assembled a certain configuration and completed by pressing the assemble/buy buttons, the assembly is assigned a specific serial number, by typing it in the product search bar, you can find this PC and send a link to it to friends or acquaintances for consultation or recommending them for purchase.
Important feature our configurator is the function “find out the opinion of an expert.” By sending your request through this form, you will receive a detailed response with a recommendation for email, specified by you.
Try it and see for yourself - assembling a computer online is easy and simple! In case of difficulties, you can always get advice from our specialists on all issues that interest you.